



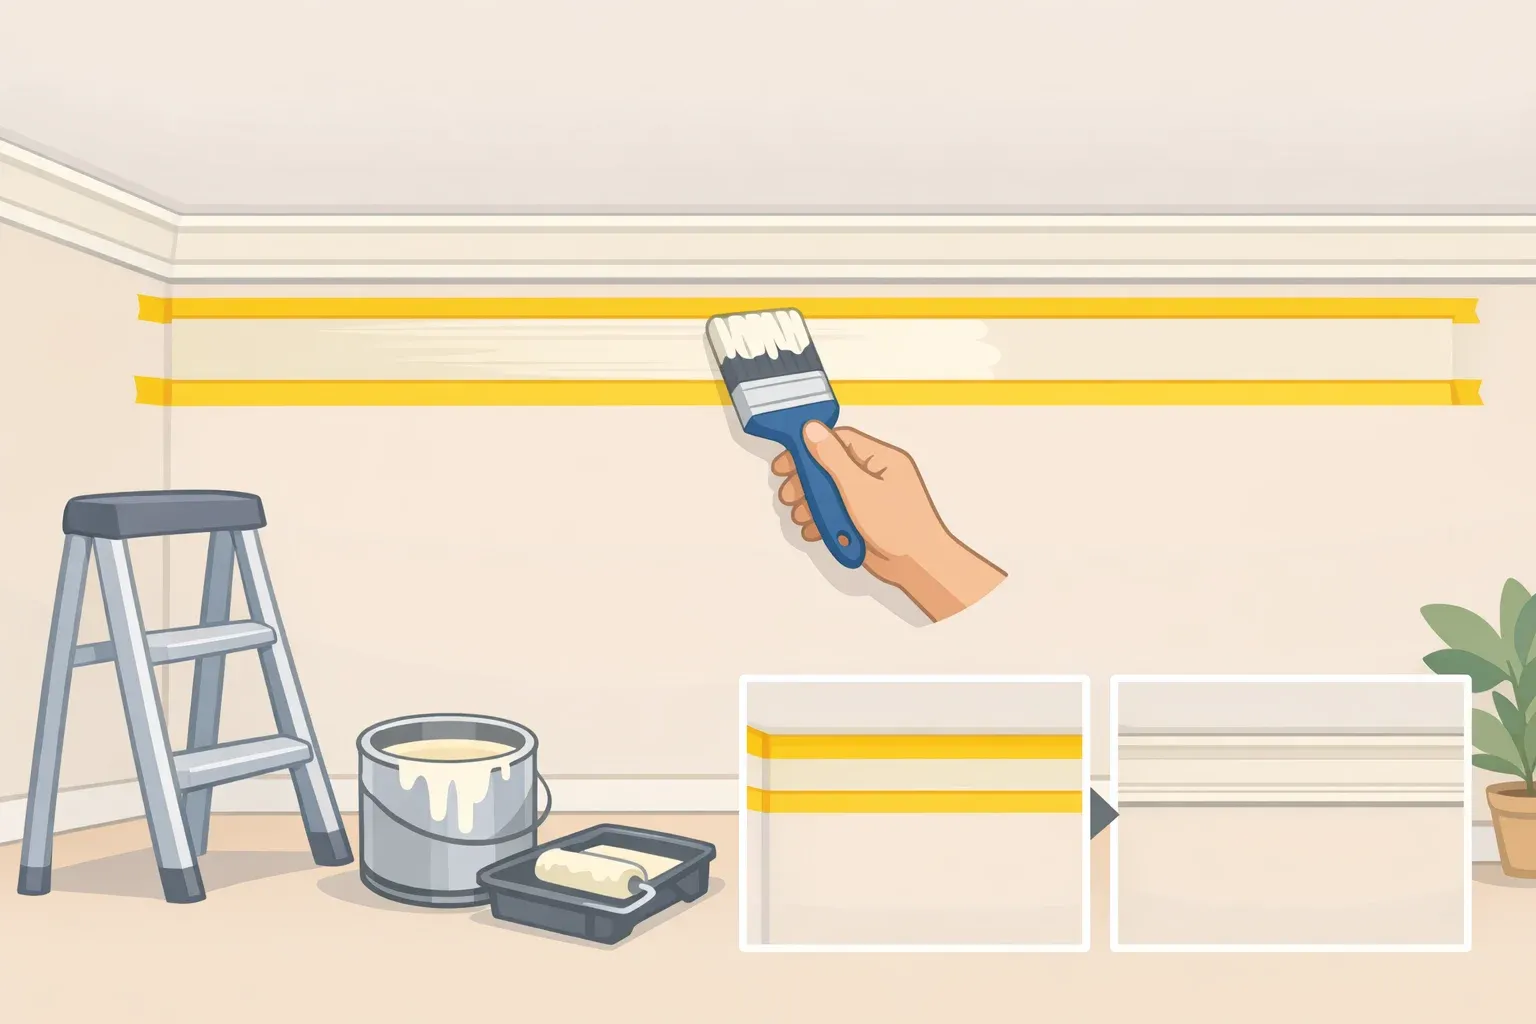
This guide walks through how to fake crown molding with paint using the colored-stripe method, with the precision notes that determine whether it reads as custom millwork or just a painted line. Plan on roughly $25 in materials and an afternoon of active work, with drying time pushing it to a same-day project at minimum. Two paint-only variations are covered at the end for readers who want a subtler or more dimensional result.
Honest expectation before starting: The concept is beginner-accessible. The execution is precision-dependent. What separates a convincing result from a visible stripe is a level line, the right width for your ceiling height, and controlled contrast. None of those requires skill; they require patience.
A cheap crown molding alternative: is your room a good candidate?
This trick is forgiving on smooth walls and merciless on bad surfaces. Check these before buying paint.
Works well when:
Walls are smooth or have a light orange-peel texture; tape seals flat, and lines stay crisp
Ceilings are standard height (8 feet) or taller
The goal is a paint trick to make ceilings look higher in a compact room
You're renting and need a reversible upgrade; the stripe paints over completely, WonderHowTo confirms
Skip it when:
Walls have heavy knockdown or popcorn texture; the tape won't seal, paint bleeds into the surface, and no amount of pressing fixes it. Skim-coating first is the only real workaround
Existing paint is peeling or patchy; tape will pull it further
Wallpaper is textured or lifting at edges (smooth, firmly adhered wallpaper is marginally workable; anything else will show through and break the line)
The room has severely uneven walls or a ceiling that dips noticeably; a stripe that sags with the ceiling will look crooked even if the ceiling itself is crooked
Width and proportion: decide this before measuring.
Most guidance puts the sweet spot at 2 to 4 inches for a standard 8-foot ceiling. Interior designer Orlando Soria's personal go-to is 5 inches, which suits taller ceilings but can feel heavy at standard height. Taller rooms can handle wider bands for a more dramatic effect; shorter rooms should stay at the lower end of that range. Decide the width now; it drives every measurement that follows.
One more variable worth settling before the first tape strip goes up: sheen. Real trim typically carries a higher gloss than surrounding walls. Using satin or semi-gloss for the accent band while keeping the wall in eggshell or flat creates a sheen contrast that reinforces the read of "separate architectural element." Flat accent paint on flat walls is harder to sell as trim.
How to create faux crown molding with paint: step-by-step
Materials:
1 quart accent paint, satin or semi-gloss finish, contrasting or complementary to wall color
1 quart base wall color, satin or eggshell, for touch-ups
High-quality painter's tape: FrogTape or 3M ScotchBlue, 1.5-inch width
2-foot or 4-foot level
Tape measure and pencil
2-inch angled brush for cutting in
Optional: 3/8-inch nap roller sleeve for filling wider bands faster
Step 1: Remove outlet covers and prepare the wall
Take off any switch plates or outlet covers in the work zone. Paint carefully around the outlet and switch boxes with a small brush, then replace the covers after the paint dries fully. Clean the wall surface of dust or grease in the work area; adhesion fails on dirty surfaces. If the existing paint is glossy, lightly scuff the band area with 220-grit sandpaper to help the accent paint grip.
After this step: Wall is clean, hardware removed, surface ready to mark.
Step 2: Measure down from the ceiling and mark a level guide line
Using a tape measure, mark the bottom edge of the stripe at consistent intervals, every 24 inches around the room, measuring down from the ceiling. Use the level to connect those marks into a continuous horizontal pencil line.
Follow the pencil line, not the ceiling edge. Ceilings are almost never perfectly level. Tracing the ceiling produces a wavy stripe; a measured, leveled line produces a straight one. If the ceiling dips significantly in one area, mark from the lowest visible point; otherwise, the stripe will appear to rise and fall as the eye tracks across the wall.
After this step: A faint pencil line runs the full perimeter at your chosen stripe width below the ceiling.
Step 3: Apply painter's tape along the pencil line
Run tape along the bottom edge of the guide line with the tape positioned below the line; the band being painted sits above it. Press the tape edge down firmly. On any slightly textured surface, press again with a credit card or putty knife edge to close gaps.
Any unsealed edge is a bleed path. A bleed is visible from across the room.
After this step: Tape runs the full perimeter with a crisp, sealed edge defining the stripe's lower boundary.
Step 4: Paint the accent band, two thin coats
Cut in along the tape edge with the angled brush first, then fill the band with a brush or roller. Two thin coats rather than one heavy one; thick applications take longer to reach the right window for tape removal and are more likely to peel. Allow 2 to 4 hours between coats, depending on humidity.
Keep a damp cloth within reach for immediate cleanup if paint strays below the tape.
After this step: Two coats cover the band evenly. The final coat has been applied and is beginning to dry.
Step 5: Remove the tape while the paint is still tacky
Pull the tape off within approximately 30 minutes of finishing the final coat, while the paint is slightly tacky but not fully dried. Angle the tape back at 45 degrees as you pull, working slowly and steadily, WonderHowTo recommends.
A note on conflicting guidance: one guide advises waiting until the paint is fully dry before peeling. The logic behind pulling while tacky: fully dried paint bonds more aggressively to the tape, increasing the chance of peeling the accent color, or the wall paint beneath it, and leaving a jagged edge. If uncertain, test a short corner section before committing to the full room.
Pull slowly. A rushed pull tears edges.
After this step: Tape is off, line is revealed. Touch up any minor bleeds immediately with the base wall color and a small brush before everything dries.
When things go sideways: common problems and fixes
The steps above are straightforward. These are the moments where projects stall.
Paint bled under the tape. Happens on slightly textured surfaces or when the tape edge isn't pressed down firmly. Fix it immediately, while the paint is still wet, using a small brush and the base wall color. Once it dries, the bleed is harder to address cleanly and may require repainting a larger section. Next time, press harder, or run a thin bead of the base wall color along the tape edge before applying the accent, sealing it from below.
The line looks wavy. Almost certainly a ceiling-trace error rather than a measuring error. If the stripe followed the ceiling contour instead of the leveled pencil line, there's no cosmetic patch; repaint the band in the wall color, let it dry fully, and re-tape from a fresh set of measured marks.
The stripe reads as paint, not trim. Usually, a sheen or contrast problem. Flat paint against flat walls gives the eye nothing to grip as a separate element. Repainting in satin or semi-gloss is the simplest fix, no re-taping required.
The width feels off once it's painted. Colors shift at ceiling height; a swatch on the wall at eye level doesn't predict how the band will read near the ceiling. Test swatches at the actual installation height before committing to the full room. If the band has already gone up and looks too heavy, a slightly narrower re-tape and second application will tighten it.
The ceiling is noticeably uneven. A stripe that closely follows an undulating ceiling will look intentional if the deviation is subtle and consistent; it will look like a mistake if the ceiling dips sharply in one corner. In badly out-of-square rooms, the ceiling-extension method, painting the gap white rather than a contrasting color, is more forgiving because small deviations disappear into the white junction.
Two variations worth knowing
The basic stripe does most of the work. These two variations change the mood.
The ceiling extension
Instead of adding a contrasting color stripe, stop the wall paint a few inches below the ceiling and paint that narrow band the same shade as the ceiling, usually white. The color-block boundary at the wall paint's edge reads as a molding line.
Best for neutral or traditional rooms where a bold new color would feel out of place. It's also the better choice when the ceiling is slightly uneven, since white on white reads as a ceiling condition rather than a stripe error.
The shadow line (for more dimension)
After the primary stripe dries, tape off a narrow band, roughly half an inch, directly below the main band, and paint it one to two shades darker than the wall color. This mimics the shadow a real trim profile casts against the wall. Pairing a lighter inner shade with a darker outer line pushes the three-dimensional read further. Worth the extra taping effort in rooms where the painted molding is a genuine design focal point; skip it in hallways and secondary spaces where the base stripe is sufficient.
A note for readers who want something more permanent: A hybrid approach using two strips of inexpensive flat trim with a painted gap between them, all unified in semi-gloss, creates the impression of thicker, more expensive crown molding. It works particularly well on ceilings above 8 feet. That's a different project with different tools, and it isn't reversible the way paint is. The same visual logic applies: the gap and the unified paint color create the illusion, not the trim thickness.
What to check before calling it done
Four things separate a convincing result from a visible stripe. Run through them before packing up.
The line is level. Any dip or rise across the wall is immediately visible. If it's off, repaint and re-tape. No workaround.
The width suits the room. A band that can feel heavy on an 8-foot ceiling may disappear on a 10-foot one. Scale the proportion to the ceiling height.
The edge is sharp and clean. A blurry or ragged lower edge reads as paint, not trim. Quality tape, firm pressing, and tacky window removal are what get you there.
The contrast serves the room. Mustard stripe works because the bold color against pale walls pulls the eye upward, making 320 square feet feel less compressed. A more neutral contrast, ceiling white extending a few inches down the wall, reads as architectural structure without announcing itself. Neither approach is wrong; they serve different rooms and different temperaments. Test paint swatches at ceiling height before committing, because colors behave differently up there than they do at eye level.
What comes next
The materials cost runs roughly $25, and the result is fully reversible; paint over it if the look stops working or a lease requires it, WonderHowTo confirms. That's the practical case.
The more interesting thing is where the skillset goes. The same level-and-tape fundamentals that produce a convincing faux crown molding transfer directly to paint-based wainscoting, chair rails, and wall panel illusions. The stripe is the simplest version of a much broader technique: using measured lines and controlled contrast to make flat walls read as finished architecture. Master the stripe and the rest follows.



















Comments
Be the first, drop a comment!