


Two bathrooms. One cost $150. The other cost under $50. Neither involved a contractor, a permit, or any tile removal. Both went from dated and characterless to rooms that look like someone made deliberate choices.
These are real budget bathroom accent wall ideas, not theoretical transformations. Both are documented weekend projects using paint, paintable beadboard wallpaper, and careful prep. The formula behind both is the same: use one consistent color, choose a finish that can handle bathroom humidity, and add a textured accent treatment that gives the room visible structure. This guide walks through all three steps, plus the conditions where this approach makes sense and where it doesn't.
What this covers: The core makeover — paint, sheen selection, and a beadboard wallpaper accent wall — runs roughly $50 to $150, depending on bathroom size and what materials are already on hand. These are planning estimates drawn from two documented projects, not guarantees. Optional finishing details, such as peel-and-stick floor tile, stenciled cabinets, or a new shower curtain, can add more and are addressed separately.
Before you start: Check for active mold, water damage, or badly peeling surfaces. Paint and wallpaper are cosmetic fixes; they won't repair a compromised substrate, and in a wet environment they'll fail faster on a damaged wall. Address structural problems first. If your home was built before 1978, test painted surfaces for lead before sanding, scraping, or disturbing old paint. Follow EPA lead-safe guidance, or hire a lead-safe certified contractor if lead paint may be present.
Plan before you buy
The most common way a budget bathroom project goes sideways is buying paint before measuring the room or deciding which surfaces to treat. A few minutes of planning prevents a second hardware store trip.
Work through this checklist before you order anything:
Measure each wall (height × width, minus door and window area). Calculating square footage before buying helps prevent both overbuying and running short mid-project.
Decide the scope upfront: walls only, or walls plus cabinets, radiator, and trim? Committing to full scope before purchasing means buying enough paint in a single batch and avoiding mismatched sheen levels from different store runs.
Check the fan. If the bathroom has no exhaust ventilation, wallpaper adhesion is a real concern in sustained humidity. Paint is still viable with the right formulation; wallpaper is riskier.
Identify the dry wall for the accent treatment. The beadboard wallpaper goes on walls that don't receive direct water spray; more on this in Step 3.
If adding beadboard wallpaper, measure the accent wall area separately before ordering.
Rough budget framework, based on the two documented projects:
Core makeover (paint + beadboard wallpaper): $50–$150
Optional extras (floor tile, stencils, soft goods): additional cost varies
Total with optional extras: about $80–$210, depending on bathroom size and materials on hand
When this formula is the wrong choice
This approach has real limits. Know them before you buy anything.
Skip paint and wallpaper if:
There's an active leak or visible water damage behind the walls. Paint won't seal a moisture problem; it masks it until the wall fails.
The plaster is crumbling or the drywall is delaminating. Wallpaper needs a sound, flat substrate. Paint is more forgiving on minor imperfections, but not on structural failure.
The wall you want to treat receives direct water spray. Paintable wallpaper is for dry zones only; keep it well clear of shower and tub enclosures.
A lease or HOA prohibits wallpaper installation or cabinet painting. Renters should get written approval before applying standard prepasted wallpaper or painting built-ins; removable peel-and-stick products are not automatically damage-free on every painted wall.
The bathroom has zero ventilation. Bathroom-specific paints with mold-inhibiting additives help in poorly ventilated rooms, but wallpaper in a chronically humid space with no airflow is likely to fail at the seams over time.
Step 1: Use one color throughout
The most impactful decision in a cheap bathroom wall makeover isn't which color you choose; it's how consistently you commit to it.
The $150 weekend refresh documented by Apartment Therapy used a single periwinkle-blue across walls, cabinet fronts, and even the radiator to unify a 1970s bathroom that had "completely lacked any interest or color." When every surface reads the same hue, the eye stops cataloging what's outdated and starts reading the space as a whole. Consistency is the mechanism. Not a specific color, not an expensive one.
Apply the color to walls first, then cabinet fronts, then architectural features such as a radiator, exposed pipes, or interior window trim. Paint the surfaces people see at eye level; leave the ceiling and wet-zone tile alone.
Color choice matters less than it might seem, but a few practical rules help:
Low-light bathrooms benefit from light blues, greens, or warm whites, which read truer under artificial light.
Mid-tone colors are more forgiving of patchy or aged surfaces than very light or very dark ones.
Deep, saturated colors can work but need decent ambient light to avoid reading as oppressive in a small room.
Before opening the can: Fill cracks with spackling compound, sand rough patches smooth, wipe down all surfaces with a damp cloth, and let everything dry completely. Paint doesn't hide an uneven wall; it finds every flaw.
Step 2: Pick the right paint finish
Color is what people notice. Finish is what determines whether the result holds up and whether it reads as deliberate or just slapped on.
Bathroom walls face more humidity than most painted surfaces, so finish selection affects both durability and appearance. Sherwin-Williams recommends satin or semi-gloss for bathroom areas because those finishes are better suited to moisture than flatter paints. Satin is the safer baseline for full bathrooms; eggshell can work in a lightly used powder room or a well-ventilated bath where walls stay dry. For trim, cabinet fronts, and areas that need more wipeability, semi-gloss is usually the safer call. If the bathroom has poor ventilation, choose a bathroom-formula paint with mold-inhibiting additives rather than standard interior latex.
You can also create contrast without adding another color. Use the same color in satin on the walls and semi-gloss on trim or cabinet fronts so the edges catch more light while the walls stay softer.
Practical rule: Use satin for most bathroom walls, semi-gloss for trim and cabinet fronts, and eggshell only in drier, well-ventilated spaces.
One more thing worth testing before buying: lighting direction and paint finish both affect how a color reads on a wall. Semi-gloss reflects more light than satin or eggshell, which means the same color will look slightly brighter on trim than on walls. Brush a test patch in the actual bathroom light before committing to a full gallon.
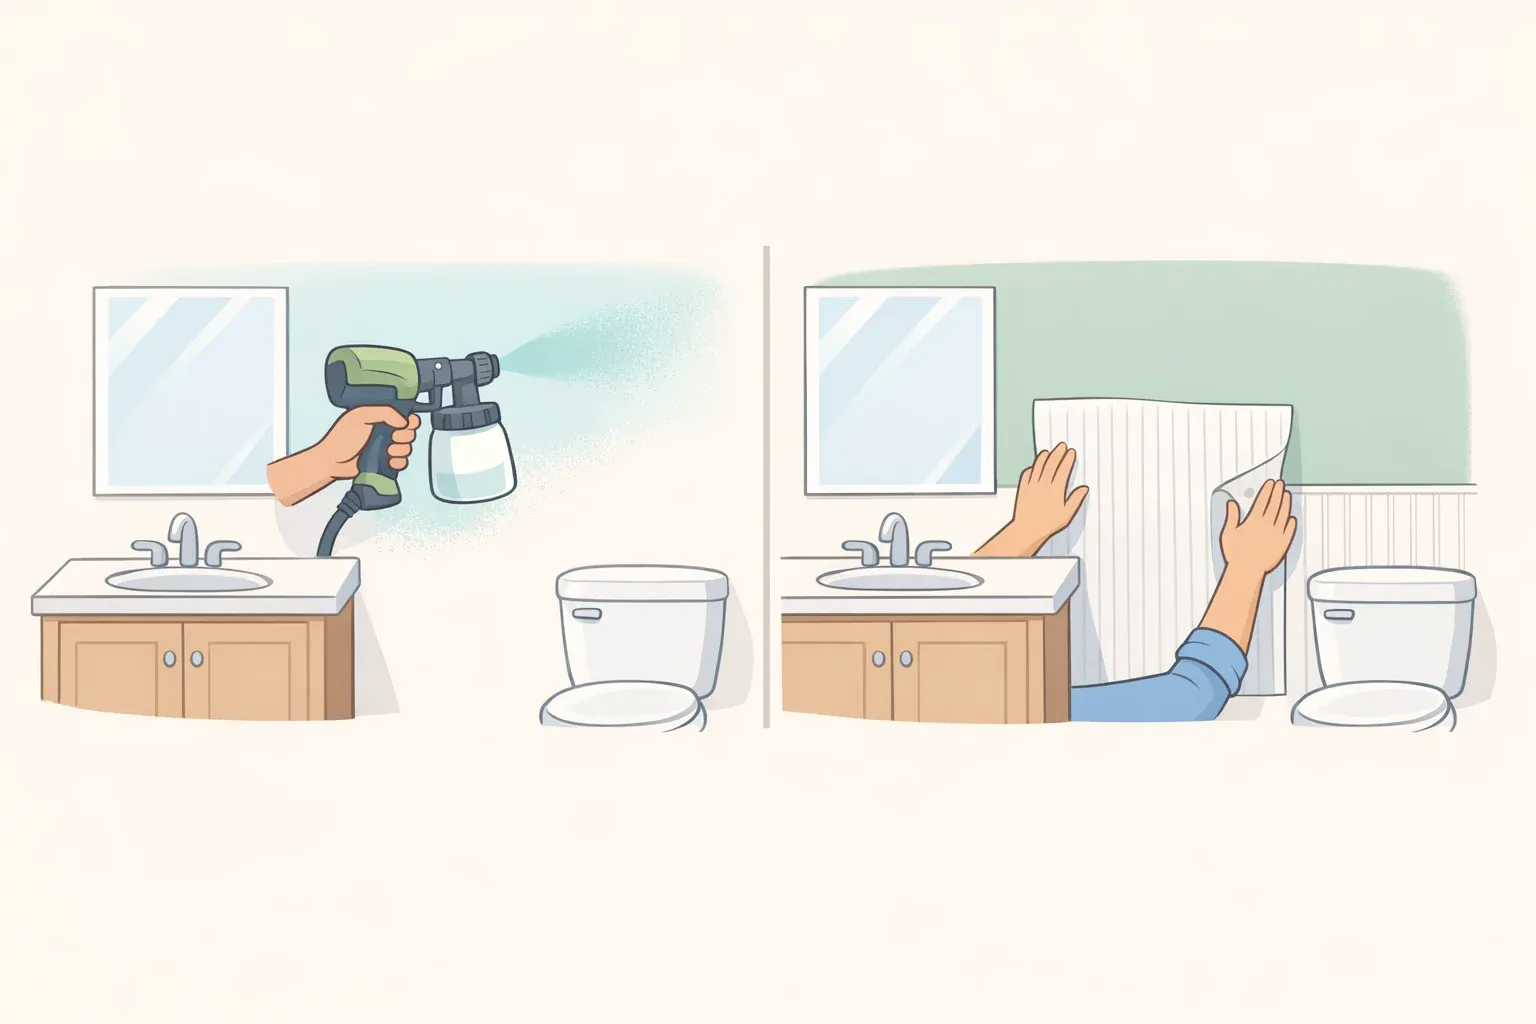
Step 3: Add beadboard wallpaper
Better Homes & Gardens documented a similar under-$50 project using two rolls of prepasted paintable beadboard wallpaper from Walmart, then painting it Benjamin Moore's Savannah Shade. The result mimicked beadboard without the cost or cutting required for wood panels.
Where to install it: The lower two-thirds of the wall, as in the BHG project. If you do not have enough wallpaper for the upper third, paint that section in the same color or a lighter tint of the same hue. The horizontal break gives the small room a more finished look.
Where not to install it: Inside the shower or tub enclosure, or on any wall that receives direct splash. This is a dry-zone treatment only.
These steps apply to prepasted paintable beadboard wallpaper. If you buy peel-and-stick, paste-the-wall, or another wallcovering type, follow that product's bathroom-use and installation instructions instead.
Installation steps:
Measure the accent wall from floor to your two-thirds mark. Calculate the number of strips based on roll width.
Clean the wall thoroughly and let it dry completely. Soap residue or grease will prevent proper adhesion.
Mark a level horizontal line at your two-thirds height using a pencil and a long level. Get this right; it's the line everything else is measured against.
Soak each prepasted strip in water per manufacturer instructions, then apply from the bottom of the wall up to the marked line.
Smooth out air bubbles with a wallpaper brush or damp sponge, working from the center outward.
At vertical seams, butt edges cleanly rather than overlapping. Overlapped seams create a ridge that shows through paint.
Trim excess at the top edge with a straightedge and utility knife.
Let the wallpaper dry overnight before applying any paint. The BHG author followed this sequence and painted the wallpaper the following day.
Apply your chosen color in eggshell or satin finish. Two coats is standard; let the first coat dry fully before the second.
Optional: Add one finishing detail
Paint and the accent wall treatment are the core of this formula. One optional finishing detail can make the project feel more complete.
In the $150 Apartment Therapy makeover, the stenciled cabinet fronts became the project's main finishing detail. Kate used thrift-store stencils alongside two accent colors, Behr's Nutmeg Frost and Behr's Rumors, applied over the main blue. It added a focal point that a flat coat of paint alone would not have delivered.
Other options from the same project, in order of cost:
Peel-and-stick floor tile: The checkerboard tiles were installed directly over existing tile for $60, adding a high-contrast update without tile removal.
A repurposed shower curtain: Made from leftover fabric using iron-on hem tape, at essentially no cost.
Do not layer in every upgrade at once. Choose one finishing detail beyond the wall color, then stop.
How to start this weekend
The value of this approach is specific: a bathroom that feels more intentional, accomplished in a weekend with paint, careful prep, and one dry-zone accent treatment. It will not replace a full renovation, but it can buy time before a larger remodel.
If you're ready to start, work in this order:
Identify the driest wall in the bathroom that's the accent wall candidate.
Pick one color and decide whether you're painting walls only or walls plus cabinets and trim.
Buy wall paint in eggshell or satin; buy trim and cabinet paint in semi-gloss of the same color. If the bathroom has poor ventilation, choose a bathroom-formula paint with mold-inhibiting additives over standard interior latex.
If the accent wall stays dry and the substrate is sound, add two rolls of prepasted beadboard wallpaper to the order.
Skip the wallpaper entirely if the wall gets any direct spray; paint alone will still do most of the work.
Expect the prep to take longer than the painting; that is what helps the finish last.


Comments
Be the first, drop a comment!