


Most kitchen lighting plans start with the wrong question. Recessed lighting and kitchen fixtures are not competing choices; they do different jobs. Recessed lights provide broad room coverage, decorative fixtures define zones, and under-cabinet lights brighten the counters where most kitchen work happens.
No single fixture can light under cabinets, brighten an island, and fill the whole room evenly. The common mistake is relying on one overhead source for everything, which leaves counters shadowed, corners dim, and the room with little flexibility.
The fix is to plan kitchen lighting in layers: ambient light for overall visibility, task light for prep and cooking, and decorative light for warmth and definition. If the ceiling is already open, plan those layers before drywall closes. If the kitchen is finished but feels dim or flat, use the same framework to find the missing layer.
What each kitchen light should do
Recessed lights, pendants, flush mounts, sconces, and under-cabinet strips each solve a different problem. Knowing those jobs first helps you avoid buying fixtures that look good but do not light the right surfaces.
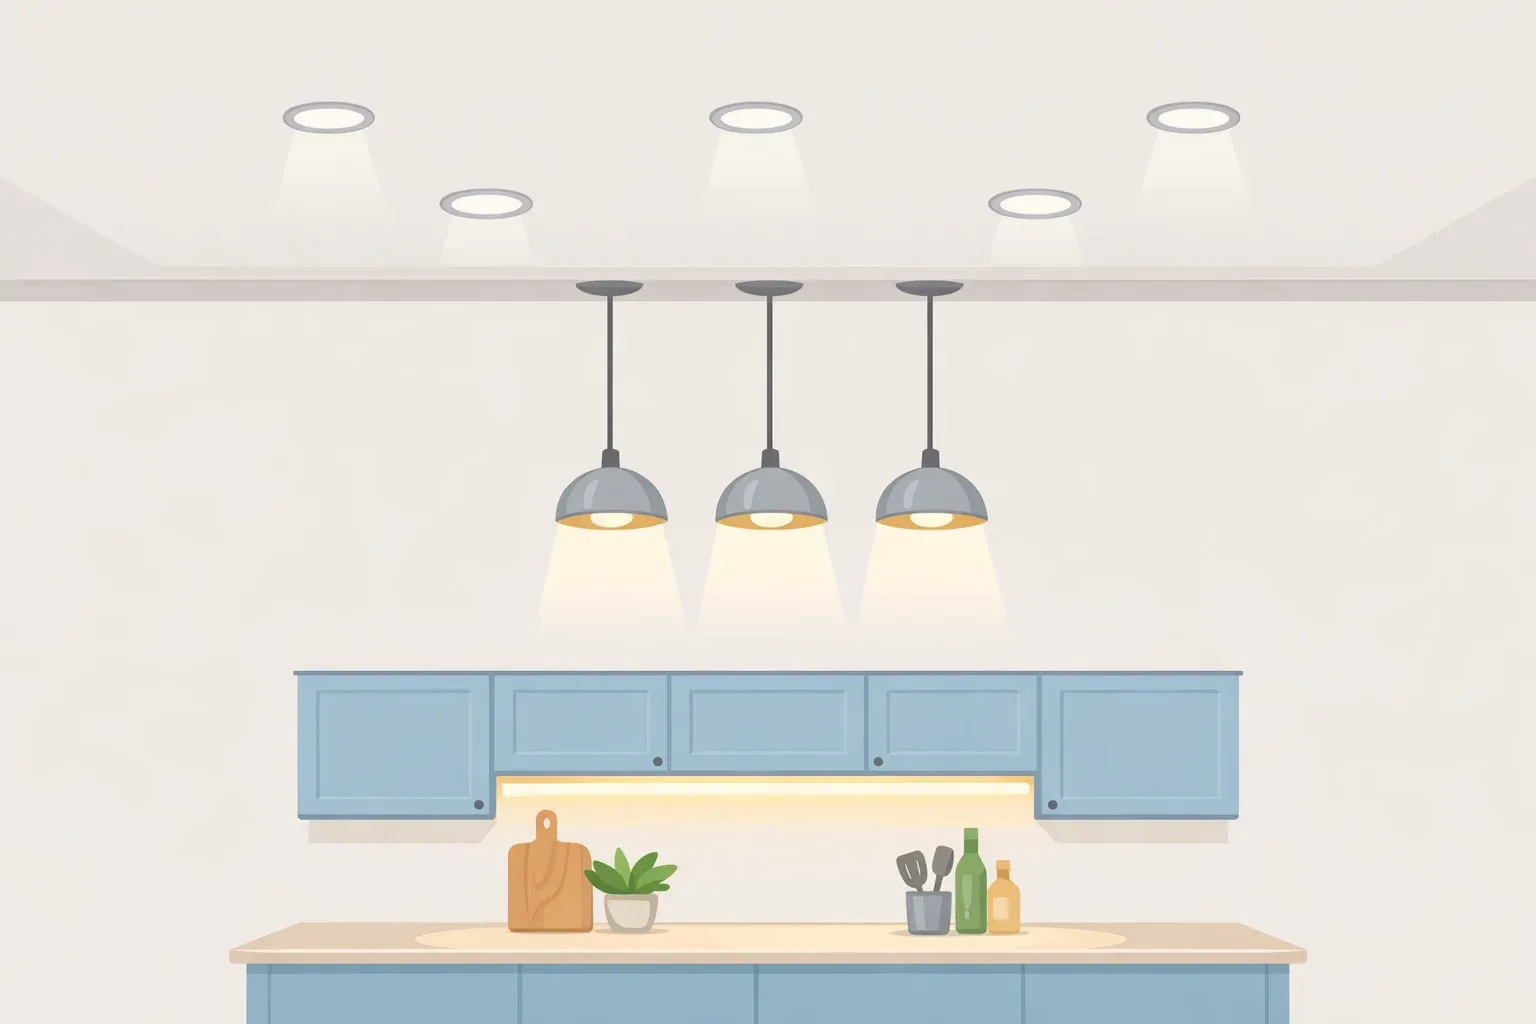
Where recessed lights work best
Recessed lights, also called can lights or downlights, sit flush inside the ceiling and add little visual weight. They create a clean, simplified look that can make a kitchen feel larger and more open.
That low-profile design is the main advantage. Recessed lights can spread ambient light across the room without competing with cabinets, pendants, or other visible fixtures. Think of them as the base layer: useful, low-profile, and not enough on their own.
More cans do not automatically mean better light. A poorly lit kitchen usually does not need more ceiling cans; it needs better placement, dimming, and task lighting at the work surfaces. Too many recessed lights can make a kitchen feel sterile instead of warm, and they still may not fix shadows on the counters.
Where pendants and surface fixtures work better
Flush mounts, semi-flush fixtures, pendants, and sconces are meant to be seen. They define zones, create focal points, and add warmth that a grid of ceiling cans cannot.
A pendant over an island does two jobs at once: it sends light toward a work surface and gives the room a visual center. In many kitchens, one statement fixture is enough. Choose the island or the table as the focal point; lighting both with competing fixtures can make the room feel busy.
Surface fixtures also help when recessed lights are not practical. Low ceilings, older wiring, beams, or finished drywall can make a flush mount or pendant a simpler upgrade than adding new cans.
Why under-cabinet lighting matters most
If the budget allows only one lighting upgrade, start with under-cabinet lighting. It fixes the shadow problem that overhead-only kitchens create, and many options do not require ceiling work.
Better Homes & Gardens identifies a lack of under-cabinet lighting as a common kitchen-lighting mistake because wall cabinets block overhead light and cast shadows onto the counter. That makes under-cabinet lighting one of the most practical fixes in a working kitchen.
Brightness depends on the size of the kitchen, the countertop finish, and how much ambient light the room already has. Placement matters as much as output: mount strips near the front edge of the cabinet so the beam reaches the cutting board instead of washing only the backsplash.
Plug-in LED strips can solve many dark-counter problems without opening a wall. Hardwired under-cabinet lights look cleaner, but new wiring, recessed fixtures, dimmer swaps, and ceiling cutouts should follow local code and may require a licensed electrician.
How to light each kitchen layout
Start with the work zones, not the fixtures. Map the countertops, sink, range, island, and eating area first. Then decide which layer lights each zone.
Standard kitchen with no island
Use recessed lights for general room coverage, then add under-cabinet strips for counter-level task lighting. If the sink feels dim, use a small recessed fixture, flush mount, or adjustable light over that zone.
No island means no pendant decision; keep it simple. A clean ceiling layer and strong under-cabinet lighting will usually do more than adding decorative fixtures that have nowhere useful to land.
Kitchen with a 6- to 8-foot island
Keep recessed lights from competing directly with island pendants. The recessed lights should cover the room, while the pendants define the island and add focused light where people prep, eat, or gather.
A 6-foot island often works with two pendants. A 7- to 8-foot island may take two larger pendants or three smaller ones, depending on scale. Match the pendants to how the island is used. A prep-heavy island needs brighter, more directional light; a seating-focused island can go softer.
Open-concept kitchen
Use fewer recessed lights, not more. A dense grid of recessed lights in an open-concept kitchen can spill too much light into the living area and make both zones feel flat.
Pendants, under-cabinet strips, and accent lights let the kitchen feel active without blasting the adjoining room. The goal is contrast: enough light to cook, enough softness to keep the open space comfortable.
Accent lighting — toe-kick strips, in-cabinet lights, or backsplash washers — is an optional fourth layer that can make a kitchen feel finished rather than merely functional. Plan ambient, task, and decorative light first. Treat accent lighting as the polish, not the foundation.
House Beautiful's four-layer kitchen lighting formula follows the same idea: ambient, task, accent, and decorative lighting each have a separate job.
Placement and color temperature mistakes to avoid
Good kitchen lighting usually fails in two places: fixture placement and bulb choice. A beautiful pendant or expensive recessed fixture can still disappoint if it lands in the wrong spot or uses the wrong color temperature.
How to place recessed lights without shadows
The most common recessed-light placement mistake is putting cans directly above where someone stands at the counter. Since a person at the counter can block the downlight, place recessed lights about 18 to 24 inches out from the upper cabinet faces so the beam lands closer to the work surface.
Spacing is a starting point, not a universal formula. Many 4-inch fixtures land about 4 to 6 feet apart, while many 6-inch fixtures land about 5 to 7 feet apart. Avoid running cans in one straight line down the center of the room; that can create an "airport runway" effect instead of even, useful light. Vaulted, very low, or open-beam ceilings need a separate plan.
Use gimbal or adjustable recessed fixtures near sinks, cooktops, or angled ceilings when a straight-down beam will not hit the work surface cleanly.
Match color temperature and CRI
Most residential kitchens look best with bulbs in the 2700K to 3000K range: warm enough to feel comfortable, but clean enough for cooking and prep. Cooler bulbs can work in some task-heavy spaces, but they often feel harsh in a home kitchen.
The bigger mistake is mixing color temperatures in the same room. If recessed lights are cool white and pendants are warm white, the kitchen can feel mismatched even when every fixture works on its own.
CRI, or color rendering index, is the other spec worth checking. For task lighting, look for 90 CRI or higher so food, countertops, and cabinet finishes look more accurate under the light.
Put each layer on its own control: recessed ambient lights, under-cabinet task lights, pendants, and accent strips. Use dimmable LED fixtures and compatible dimmers so the lights do not flicker, buzz, or stop dimming smoothly.
ENERGY STAR says certified downlight fixtures use up to 90% less energy than traditional incandescent models, so ENERGY STAR-certified downlights are worth checking when replacing older recessed fixtures.
What to upgrade first
The best upgrade depends on how much access you have. A finished kitchen calls for different choices than a full remodel with walls and ceilings open.
Finished kitchen
Start with under-cabinet lighting. It fixes dark counters without moving ceiling fixtures. Choose plug-in strips for a simple DIY fix, or use hardwired lights if you are already bringing in an electrician.
Next, replace old recessed trims or bulbs with dimmable LED inserts in the same color temperature. Add compatible dimmers where the wiring allows. This can make existing fixture locations more useful without moving the cans.
The Spruce estimates recessed-light installation at about $180 to $480 per fixture, depending on fixture type, wiring needs, location, and smart-lighting features. Treat that as a rough U.S. estimate, not a universal price.
Full remodel
If the ceiling is open, solve the hard-to-change parts first. Position recessed lights before drywall closes, hardwire under-cabinet lighting, and choose one main statement zone: the island or the table.
Recessed fixtures that may touch insulation should be IC-rated and labeled for that use. Non-IC fixtures need insulation kept at least 3 inches from the enclosure, wiring compartment, driver, or power supply. Do not assume an LED fixture is safe for insulation contact just because it runs cooler than an older bulb. Check the product label before buying, and use a licensed electrician for new wiring or ceiling cutouts.
Modern thin-profile and wafer-style LED fixtures can make some retrofits easier because some are designed for existing ceiling openings or electrical box cutouts. They still need to match the installation conditions, wiring, dimmer, and insulation requirements.
Kitchen lighting checklist
Before the drywall closes, or before you buy fixtures, run through this checklist:
Map the work zones: countertops, sink, range, island, and eating area.
Use recessed lights for ambient coverage, not as the only light source.
Place recessed lights about 18 to 24 inches from upper cabinet faces when lighting counters.
Add under-cabinet task lighting near the front edge of the cabinets.
Choose whether the island or the kitchen table gets the statement fixture — not both.
Keep bulbs in the same color temperature, usually 2700K to 3000K for residential kitchens.
Look for 90 CRI or higher for task lighting.
Put each layer on its own compatible dimmer or switch.
Confirm recessed fixtures are IC-rated where insulation contact is possible.
Call a licensed electrician for new wiring, hardwired fixtures, ceiling cutouts, or any setup that may involve insulation, junction boxes, or circuit changes.
Recessed lights, kitchen fixtures, and under-cabinet lighting all belong in the same plan. The trick is giving each one the right job. Use recessed lights for broad coverage, pendants or surface fixtures for zones and warmth, and under-cabinet lighting for the counters. When those layers work separately and dim independently, the same kitchen can handle bright prep work, quiet dinners, and everything in between.


Comments
Be the first, drop a comment!