




DIY Plywood Window Trim: How to Make It Look Custom
This guide walks you through how to install plywood window trim that reads as intentional finish carpentry selection, fabrication, installation, and finishing, in that order. Follow the same process on every window in the house, and the cumulative effect is the actual upgrade: rooms stop looking assembled piecemeal and start reading as a considered interior.
A window casing does two things simultaneously. It covers the structural gap between the window frame and the finished wall, and it defines the visual edge of the opening giving each window a crisp boundary that belongs to the room's design rather than marking where the framing crew stopped, per JASpector. A well-executed casing converts a rough opening into a finished architectural feature, according to Build-Construct. That's the destination. Plywood gets you there reliably in the right circumstances.
When plywood makes sense over MDF
MDF is the easier material for painted trim. It takes paint smoothly, costs less per linear foot ($0.80–$1.20 versus $1.50–$2.50 for ¾-inch plywood), and requires less prep, per ToolsRadar. So why choose plywood?
Three reasons. It holds fasteners significantly better 250 lbs per inch of screw-hold versus 150 for MDF. It expands roughly half as much in humid conditions: 1.5–2.5% versus 3–4% at high humidity, according to ToolsRadar. And its visible grain can be deliberately exploited for a warmer, more architectural result when stained.
For kitchens, mudrooms, older homes with humidity swings, or any project where the trim will be stained rather than painted, plywood is the smarter long-term choice. For a dry interior room with painted trim, MDF is perfectly reasonable and cheaper.
Before you start: three quick checks
- Is the window unit secure, reasonably plumb, and sitting flush with the wall plane? Plywood trim will not fix a loose or twisted jamb. Fix the window first, per JASpector
- Are you painting or staining? This determines edge treatment strategy and primer choice both covered in Step 3
- Budget enough time for prep and finishing. That's where most of the work actually lives, not in the nailing
Tools and materials: Miter saw or circular saw, fine-finish blade (high tooth count essential for plywood), 18-gauge brad nailer, wood glue, painter's tape, sandpaper (120-, 220-, 320-grit), wood filler, shellac-based primer or sanding sealer, interior latex enamel. Optional but recommended: compact router with ⅛-inch roundover bit.
Step 1: Plan the layout reveal, profile, and cut list
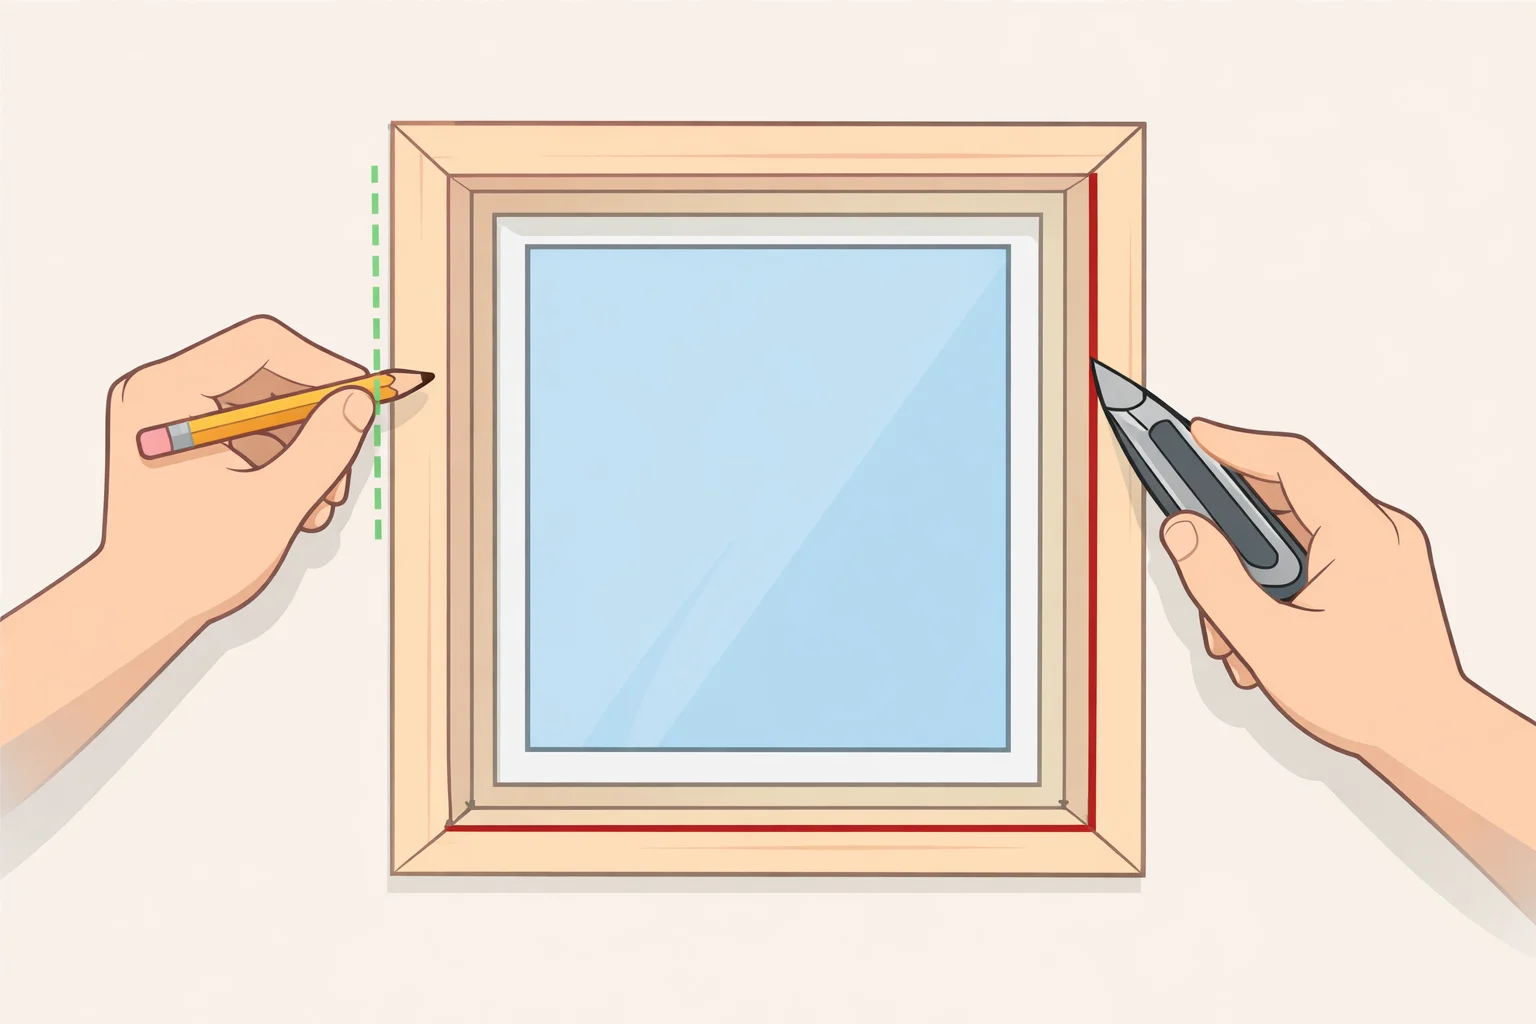
Establish the reveal dimension and casing width before measuring for cut lengths. These decisions govern every cut in the project. Making them after the fact creates problems that can't be cleanly fixed.
- The reveal is the narrow strip of jamb left visible between the jamb edge and the inside face of the casing. Standard residential practice is ¼ to ⅜ inch, but the specific number matters far less than applying it identically to every piece on every window, as Build-Construct recommends. Set a combination square to your chosen measurement and mark lightly in pencil around the full jamb perimeter before cutting any stock to length. Align casing to this line, not to the jamb edge itself
- Choose casing width before ripping. Wider trim reads more traditional; narrower reads more contemporary. For a butt-joint-with-overhanging-head look that suits modern plywood window trim, narrower profiles tend to suit that detail better. Pick one width and apply it to every window in the house that consistency is what creates the whole-home effect
- Decide on corner treatment. Mitered top corners are the residential standard and suit most profiles. Square-cut butt joints with a head piece that overhangs the side legs are more forgiving to cut. Most traditional casings use miters, per JASpector
- Measure each window: height of both side legs (from sill or apron to top jamb, plus reveal), plus the full head length including any overhang. Write a cut list for every window before touching the saw, and plan extra material for miter waste. One 4x8 sheet of ¾-inch plywood yields approximately 80 linear feet of ripped casing, per ToolsRadar
Cut a one-foot test strip before committing to the full cut list. Edge-treat it, prime it, paint or stain it. This single step confirms whether your blade is leaving clean cuts, whether your edge treatment bonds properly to that specific plywood grade, and whether the finished result reads the way you intended before you've ripped 80 feet of strips.
Step 2: Select and prep the right plywood
- For painted trim, use cabinet-grade birch or maple plywood. Hardwood veneers are uniform enough to paint without blotching and hold miter detail cleanly. Sanded pine plywood works on a budget but dents more easily and requires more prep, per Woodshop Diaries. For stained trim, birch is the reliable choice. It takes stain richly, though priming first helps control blotching, as ToolsRadar confirms
- Buy A or B face grade on the show face, and stay with ¾-inch thickness. The price difference between ½-inch and ¾-inch is modest roughly $10–$15 per sheet, per Woodshop Diaries and not worth the loss in fastener holding strength. The rigidity matters on longer runs and at miter corners
- At the store: inspect both faces and all four edges before loading a sheet. Reject anything with bow, corner delamination, or veneer voids. Problems visible at the rack compound at miter cuts, per Woodshop Diaries
- Acclimate the sheet in the installation room for 48–72 hours before cutting. The target interior moisture content for trim is 6–9%, per ToolsRadar. Material that hasn't equilibrated can move after installation
Step 3: Rip the strips and treat the edges

The exposed edge of a ripped plywood strip is the main fabrication challenge of this entire project. Get it wrong and no amount of good installation work saves the result.
- Use a fine-finish blade for all ripping and miter cuts. Plywood tears out along veneer layers with coarse-tooth blades, and the damage doesn't sand out cleanly, per Woodshop Diaries. Run painter's tape along the cut line before sawing. The tape holds surface fibers down and meaningfully reduces splintering
- Two edge treatments, matched to finish type. For painted trim, run a compact router with a ⅛-inch roundover bit along the inside edge. It softens the corner, eliminates the raw-ply look, and creates a more durable profile, as Build-Construct describes. For stained trim, or where you want the edge to read as solid wood, apply iron-on pre-glued edge banding. It comes in rolls of pre-glued wood veneer that iron directly onto the plywood edge and trim flush with a utility knife, per Woodshop Diaries
- Sand faces lightly with 220-grit only. The outer veneer is thin aggressive sanding cuts through it and creates a problem that can't be spot-fixed, per Woodshop Diaries
Plywood with an unrouted, unsealed exposed edge announces its material and undercuts the whole point of the installation. This is where the custom look is either earned or forfeited. Spend the extra time here.
Step 4: Install the interior plywood window casing
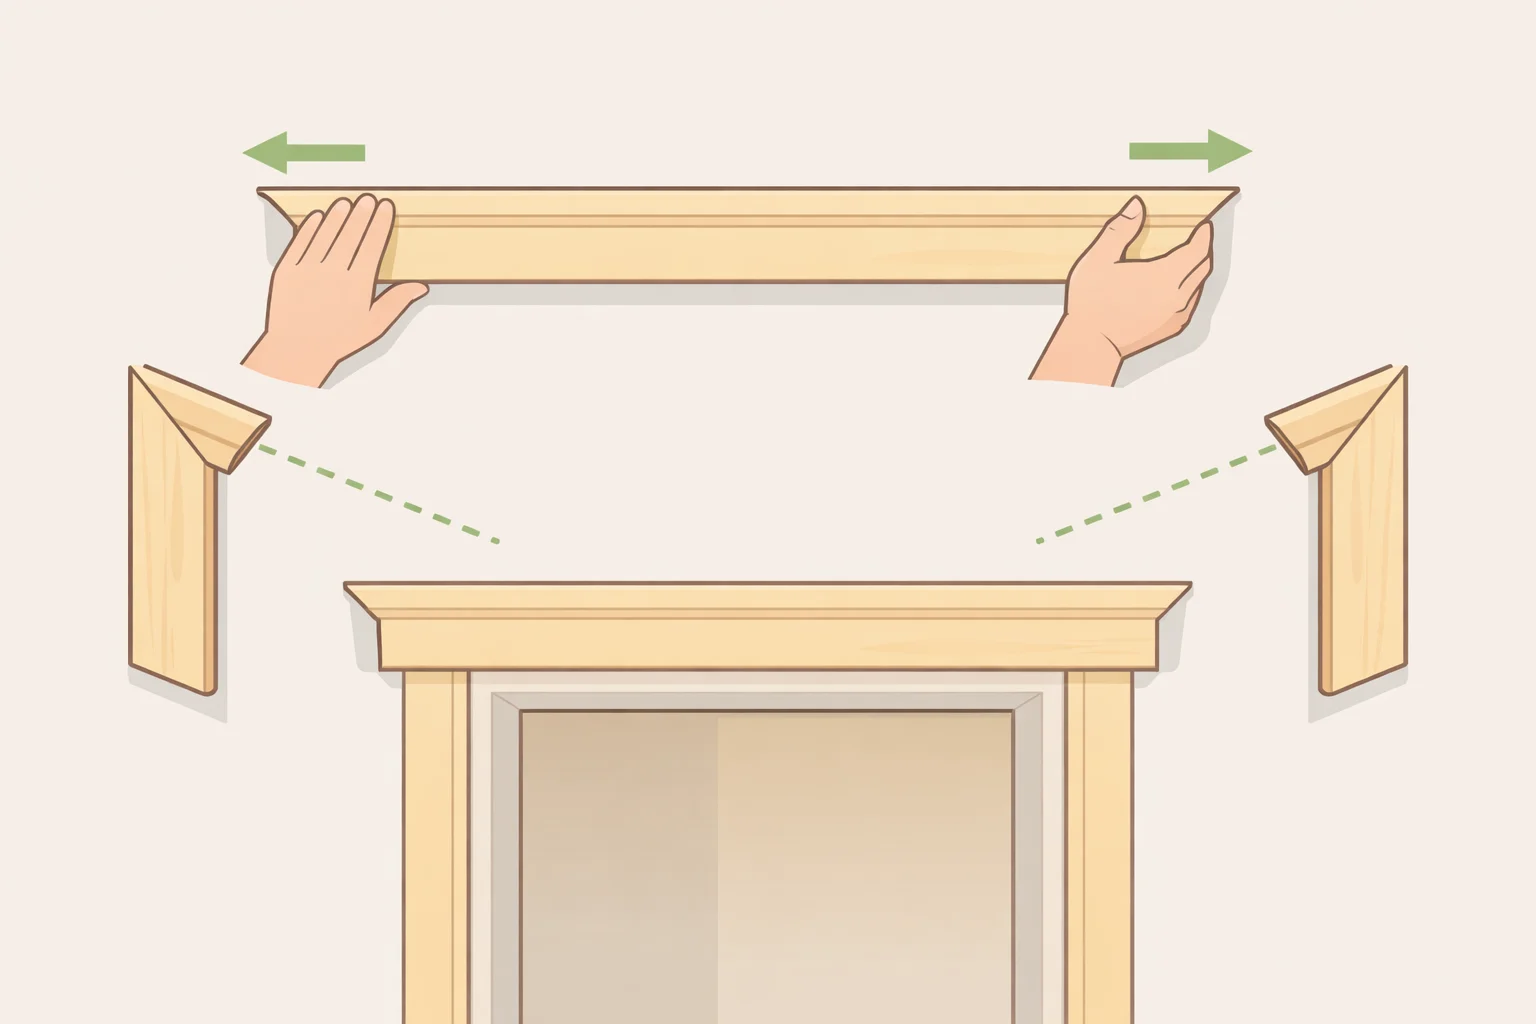
Casing most often looks bad at four specific places: top corner miters that don't close tight, the outer wall edge where casing meets uneven drywall, the transition into sill or apron at the bottom, and anywhere an old jamb doesn't sit flush with the current wall finish, according to JASpector. Identify all four before installation begins.
- Verify the jamb is secure and reasonably flush with the wall plane. Finish work sharpens good carpentry; it doesn't conceal bad carpentry, per JASpector. Shim or refasten the jamb if needed before any trim goes on
- A practical install sequence: head piece first, then side legs. The head gives a fixed reference for marking leg length and confirms the reveal line is consistent across the top. Dry-fit every piece before applying glue. If a miter doesn't close cleanly, adjust the cut don't force the joint
- Before gluing miters, apply a thin coat of shellac or sanding sealer to the end-grain face of each cut. End grain absorbs glue unevenly, which weakens the bond. Sealing first controls absorption and creates a stronger connection, per Build-Construct
- For this DIY interior window casing, 18-gauge brad nails are the standard fastener, per Build-Construct. Drive nails every 16 inches along each casing piece, with one nail within 2 inches of each miter joint. Once the glue has set typically 30 to 45 minutes reinforce each miter with a brad nail driven from the back side. Set all nail heads just below the surface immediately after driving
Out-of-square openings: Most residential windows are not perfectly square, per JASpector. If the jamb is out of square, 45-degree miters won't close. Cut a test miter on scrap, hold it in place, and assess the gap. Then adjust both mating pieces by equal amounts so neither carries an obviously non-standard angle. A sharp block plane can clean up a miter that's close but not quite right without requiring a full recut.
Wall gaps at the outer edge: Textured or uneven drywall creates a gap behind the outer edge of the casing. A hairline bead of paintable caulk is the correct fix. A visible, thick bead signals poor substrate prep professionals treat thick caulk as evidence of a fit issue, not a solution, per JASpector.
Step 5: Fill, prime, and paint to a finished surface

This is where plywood trim either reads as custom millwork or gives itself away as sheet goods. None of these steps are interchangeable, and none can be skipped.
- Fill nail holes with wood filler, not spackle or joint compound. Wood filler shrinks less when dry and sands to a harder surface that takes topcoat without soft spots forming underneath, per This Old House. Once dry, sand with 220-grit until no fastener location is visible or tactile
- Prime before topcoat. This is not optional for plywood. Priming heavily is essential for painted applications, per ToolsRadar without it, grain telegraphs through paint and edges absorb finish unevenly. Pay particular attention to edges and end grain, which need more primer than face surfaces. The difference between plywood trim that reads like mill-grade casing and plywood trim that reads like painted sheet goods lives almost entirely in this step
- Apply two coats of high-quality interior latex enamel, sanding lightly with 320-grit between coats, per Build-Construct. Latex dries faster, produces fewer VOCs, and adheres over oil-based surfaces making it the safer choice when painting over existing trim of unknown type, as This Old House explains
- On sheen: satin hides imperfections well filled nail holes, edge transitions, and minor veneer undulations stay invisible under most lighting, per This Old House. Gloss and semi-gloss are more durable and easier to clean, but both amplify surface flaws. If the prep work is solid, any of the three sheens will hold up; if there's any doubt, satin gives more margin
- Final check: hold a work light at a low raking angle across the finished surface. Raking light reveals irregularities that standard overhead lighting hides entirely, per Build-Construct. Spot-fill, sand, and touch up before calling it done
What done looks like: consistent reveal on all four jamb faces, tight miter corners with no visible gaps, caulk that's a hairline rather than a fill, and a surface that reads as trim. Run this check on every window before moving to the next room.
From one window to a whole-home finish
One trimmed window looks like a fix. Every window trimmed with the same profile, the same reveal, and the same finish looks like a decision design intent rather than incremental repair, as JASpector frames it. That repetition is the actual upgrade, and it's what this process is built for.
The material math works in favor of the approach. One 4x8 sheet of ¾-inch cabinet-grade birch yields approximately 80 linear feet of ripped casing, per ToolsRadar, with the added advantage of custom width control that stock profiles don't offer.
The same reveal logic and fastening basics carry over directly to door casings once the window trim is established. Completing both throughout the house is what moves the result from "some trim work done" to a home that reads as fully finished.




















Comments
Be the first, drop a comment!