



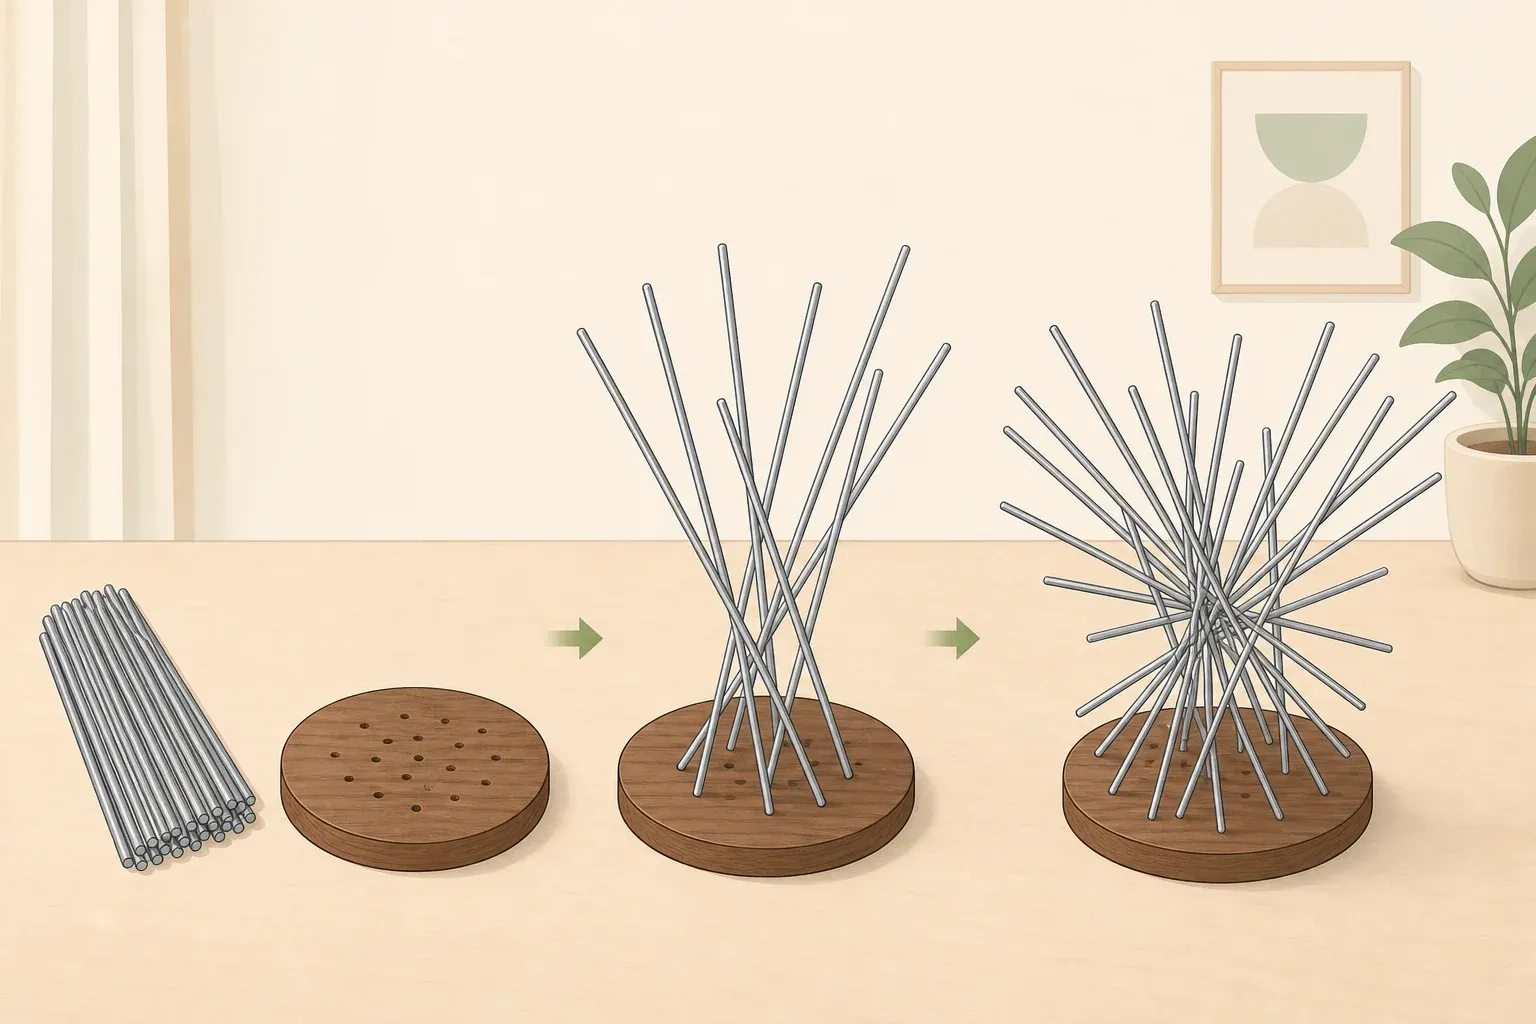
This guide walks through building a DIY Harry Bertoia Sonambient sculpture dupe: a tabletop cluster of 15 slender steel rods, cut into three length groups and set into a hardwood base, styled after the look of Bertoia's sculptural bush forms.
Treat these measurements as a starting plan, not a fixed formula. Rod diameter, base weight, drill-bit sizing, adhesive requirements, and final cost will vary depending on the materials available locally.
The grouped heights and open spaces between rods are what create the clustered outline. That's why hardware-store steel rod and a drilled wood block can reproduce a similar silhouette without a studio or welding torch.
This build copies the visual idea of clustered, uneven stems. It doesn't reproduce Bertoia's acoustic engineering or constitute an authentic work or authorized reproduction. Describe the result as Bertoia-inspired décor.
Why the original commands six figures
Phillips New York sold Bertoia's Untitled (Sonambient) for $251,550 in June 2026, according to HENI.
The 1975 piece had unusually strong provenance: Benjamin and Deborah Mangel acquired it directly from Bertoia shortly after it was made, and it remained in their collection until the Phillips sale.
Results vary even among authenticated Bertoia works. At the same Phillips sale, a 1975 Untitled (Bush) sold for $67,100, while a 1965 Untitled (Bush) offered at Christie's that week went unsold.
Those prices reflect authenticated works, provenance, materials, artistic importance, and the collector market. They don't establish a dollar value for the visual silhouette reproduced in this DIY project.
Bertoia's sound sculptures also involved experimentation with metals, dimensions, movement, and acoustics. The rod layout below is simply a styling plan for a decorative object, not a reconstruction of Bertoia's fabrication method.
Materials and setup for your DIY Harry Bertoia Sonambient sculpture dupe
Rods: 15 lengths of slender steel rod. Around 1/16 to 3/32 inch in diameter is a practical starting range for this small decorative build, but choose a diameter stiff enough to remain substantially upright at the proposed height. Avoid substituting very thin craft wire if you want the straight-stem appearance shown here.
Cutting plan: 5 short rods at 4 to 5 inches, 5 medium rods at 6 to 7 inches, and 5 tall rods at 8 to 10 inches. Grouping cuts into three bands rather than choosing completely random lengths produces the clustered outline used in this project.
Base: One solid hardwood block around 4 inches across and approximately 2 inches thick. The exact size isn't critical, but the base needs enough weight and footprint to remain stable with all 15 rods installed.
Ballast, optional: A steel fender washer or small steel plate can be attached underneath if a dry-fit stability test shows the finished proportions are prone to tipping.
Drill and bits: Bits matched to the measured diameter of the rods. Test the fit in scrap wood before drilling the actual base.
Adhesive: A two-part epoxy whose manufacturer lists metal-to-wood bonding as an appropriate use. Check its label for working, handling, and full-cure times.
Vertical guide: A piece of stiff cardboard, thin plywood, or other scrap material drilled with a pattern matching the base. This can help hold rods approximately vertical while the adhesive sets.
Tools: A cutting tool specifically rated for the diameter and type of steel rod you're using, a metal file or abrasive paper suitable for metal, safety glasses, a drill, and a clamp or vise.
Finish: Matte black spray paint is one straightforward option. Use a product suitable for metal and follow its preparation, ventilation, application, and curing instructions.
Skill level and scope: Beginner to intermediate, depending on the rod stock and cutting tools chosen. No soldering or welding is required.
Because rod stock, epoxy, wood, and finish prices vary substantially, price the materials available locally rather than treating a fixed $15 estimate as guaranteed.
Before you start
Wear safety glasses when cutting, filing, or drilling. Use only a cutter or saw rated for the steel rod you've selected rather than forcing a tool intended for softer or thinner wire.
Clamp the wood securely before drilling and keep your hands away from the drill bit's path.
Deburr every cut rod end before assembly. Steel rod can leave sharp edges after cutting, so file each end until it no longer catches or feels sharp.
Test your drill-bit size before drilling the actual base. Make a hole in scrap wood using a bit close to the rod's measured diameter and test the fit.
You want enough clearance to insert the rod and adhesive without leaving so much movement that the rod can't be held in position during curing.
Dry-fit the layout and test stability before gluing anything. Arrange the rods in their planned positions and check whether the base remains stable when the tallest stems are gently disturbed.
If the base readily tips, use a wider or heavier base, shorten the tallest rods, or add suitable ballast before final assembly.
This project is decorative. It isn't engineered, tuned, or tested as a sound sculpture. Don't strike, pluck, or deliberately flex the rods in an attempt to reproduce the acoustic behavior of a genuine Bertoia Sonambient work.
Step-by-step method
Mark the base layout. Sketch two loose rings of positions across the top of the base, with nine positions toward the outside and six staggered inside them. Leave enough wood around every hole to prevent neighboring holes from merging or weakening the base. The arrangement should look organic rather than mathematically perfect.
Test the rod fit. Before drilling all 15 holes, drill one test hole in scrap wood using the bit selected for your rod diameter. Insert a short offcut and adjust the bit size if necessary.
Clamp and drill the base. Secure the hardwood block to a stable work surface. Drill each marked position approximately ½ inch deep, or deeper if the proportions of your rod and base require additional support. Keep the drill as close to vertical as practical.
Cut rods to the planned lengths. Cut five short rods at 4 to 5 inches, five medium rods at 6 to 7 inches, and five tall rods at 8 to 10 inches. Deburr every cut end before continuing.
Dry-fit before gluing. Insert the rods without adhesive and step back. Rearrange the heights until the cluster looks irregular and open rather than forming a uniform dome. Check stability again.
Prepare the alignment guide. Transfer the base's hole pattern to the guide material and drill or punch openings large enough for the rods to pass through without binding. Test the guide before applying adhesive.
Mix and apply epoxy according to its instructions. Work in batches small enough to stay within the epoxy's stated working time. Apply only the amount needed for the joint, insert each rod, and clean up excess adhesive according to the manufacturer's directions.
Use the guide to maintain alignment. Position the guide over the rods without forcing them sideways. Its job is to limit movement while the epoxy sets, not to bend misaligned rods into place. Adjust individual rods before the adhesive begins to harden.
Allow the epoxy to cure fully. Don't load, flex, paint, or repeatedly handle the rods until the adhesive has reached the manufacturer's stated full-cure time.
Check every joint. After curing, gently check that each rod is securely bonded. A rod that moves at its joint needs to be repaired before finishing.
Finish the piece. If you're painting the rods, protect the wood base or finish it separately. Apply the metal-compatible coating in a well-ventilated area according to its label, including preparation, coat thickness, drying time, and recoat instructions.
Adjustments, variations, and troubleshooting
Rods pull loose from their holes: Don't assume the adhesive itself is the problem. Check hole diameter, depth, surface preparation, and whether the epoxy is rated for both materials. Remove failed adhesive as appropriate for the product and remake the joint rather than wedging tape or loose filler around it.
Rods lean excessively: The stock may be too thin for its length, the holes may be oversized, or the rods may have shifted while curing. Shorten the tallest rods or switch to slightly thicker stock rather than relying on adhesive to make flexible wire rigid.
Cluster looks sparse or brush-like: Reposition rods to break up obvious rows and fill large visual gaps. The goal is irregular density with visible open space, not a symmetrical brush.
Base tips too easily: Use a wider or heavier base, shorten the tallest stems, or add securely attached steel ballast underneath.
Want brass instead of steel: Brass rod can produce a different finish and may require different cutting tools, adhesives, surface preparation, and finishing products. Check compatibility before substituting materials.
Household with kids or pets: Keep the finished sculpture out of easy reach. Even carefully deburred metal rods can create a poking or eye-injury hazard if someone falls against the piece or bends a stem.
Finishing up and keeping it stable
A finished piece should have 15 securely attached stems with varied heights and visible space between them. The base should remain stable during ordinary handling, and none of the joints should move when checked gently.
If those conditions aren't met, correct the structure before displaying the sculpture rather than relying on paint or filler to conceal the problem.
Dust the finished piece with a soft, dry cloth. If the steel remains exposed rather than painted or otherwise protected, keep it dry to reduce the chance of surface corrosion.
If a rod works loose later, remove the piece from display until the joint can be repaired properly. Don't leave a sculpture with a loose, bent, broken, or sharp rod where someone could brush against it.
Most importantly, describe the finished piece accurately. It's Bertoia-inspired décor, not a Harry Bertoia sculpture, an authentic Sonambient work, or an authorized reproduction. The six-figure originals derive their significance from Bertoia's authorship, fabrication, provenance, and place in his body of work, not simply from having metal rods arranged on a base.







Comments
Be the first, drop a comment!