




Budget builder-grade bathroom makeover: what to keep, paint, cover
Melissa and Wyatt Shipman had already DIYed most of their house over nine years of living there, but the basement half bath was the room they kept avoiding, according to Apartment Therapy. It was a holdover from the early 1990s: dingy tan vinyl, an oak vanity, dim lighting, and a dusty blue toilet and sink. The couple set a $200 budget for the room and landed close, finishing at $203.76 without replacing the toilet, sink, or vanity, per the same source.
Their project is a workable blueprint for a budget builder-grade bathroom makeover: keep whatever still functions, resurface what looks dated, and spend money only where it actually changes how the room feels. The Shipmans combined five moves to get there: scrape the ceiling, repaint everything, sand and repaint the vanity, cover the floor with peel-and-stick tile, and swap in a new light fixture.
That $203.76 total depended on reusing a toilet, sink, and vanity the couple chose to keep, plus paint they already had sitting in the garage. Treat it as a case study in what's possible, not a shopping list to copy line for line. A comparable half-bath remodel that bought new fixtures, a countertop, and flooring landed at $986, and a small-bathroom remodel done by a professional averages $2,500 to $5,000, according to Dori Turner Interiors, citing HomeGuide. Where your own project lands between those numbers depends almost entirely on what you can honestly keep.
This approach only works when the room is dry, the existing fixtures function properly, the vanity is structurally sound, and the current floor can take an overlay instead of needing a full tear-out. If any of that isn't true, you're looking at a repair or a partial remodel, not a cosmetic refresh. The checks below sort out which situation you're actually in before you spend a dollar.
What you'll need
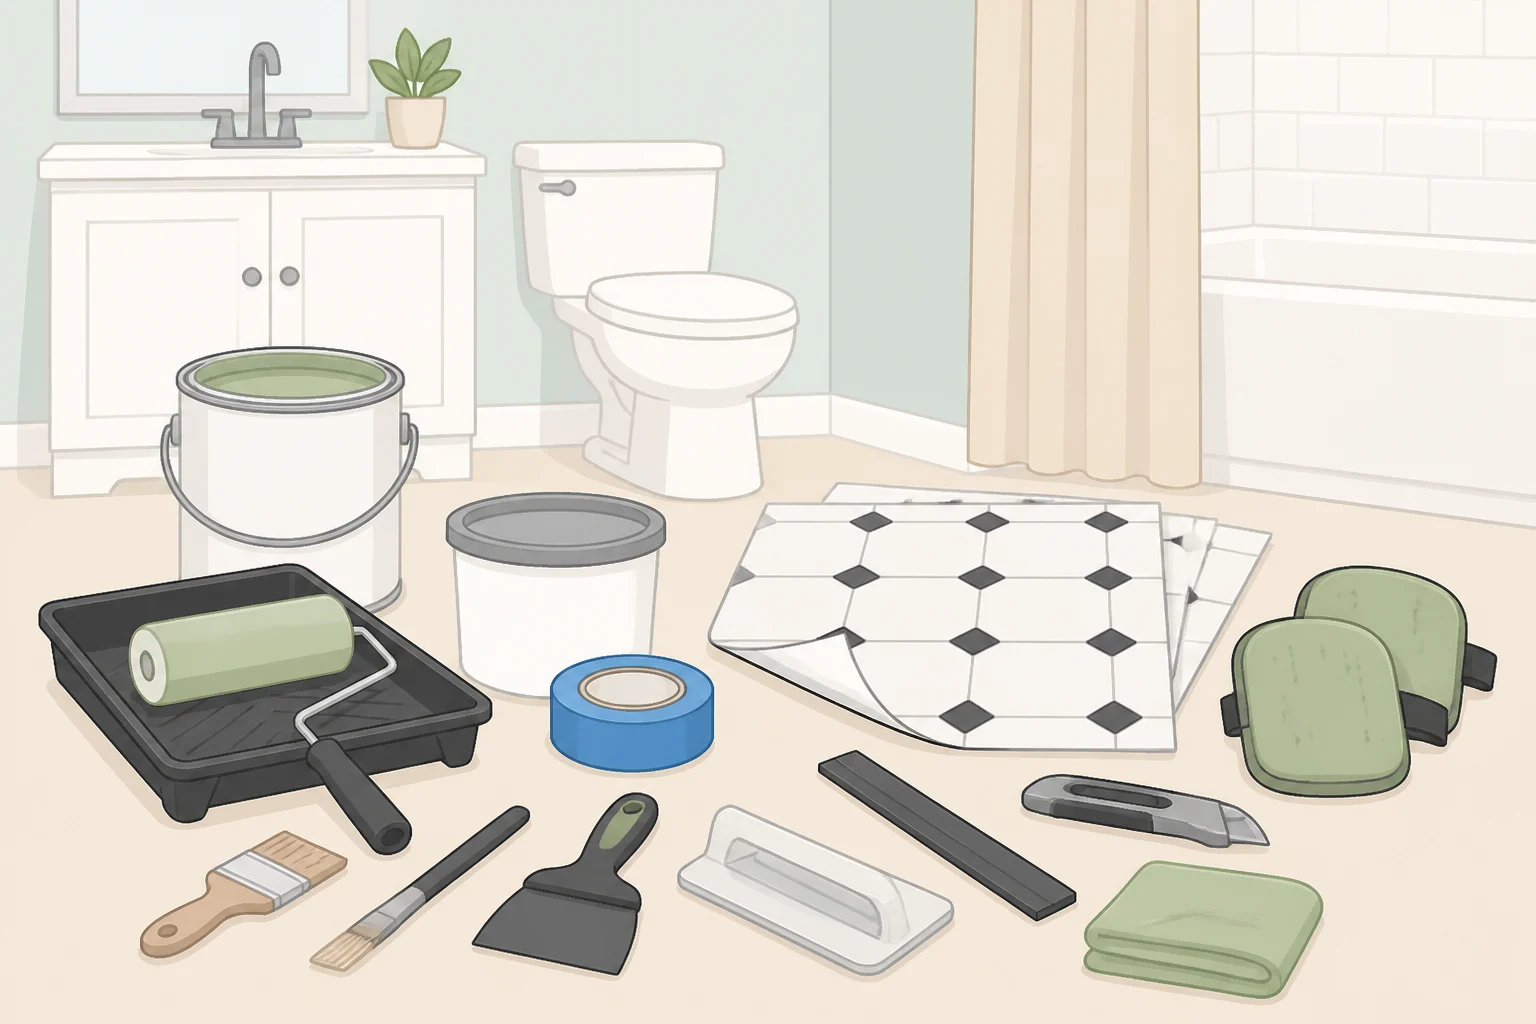
Cleaning, painting, and a basic vanity repaint are beginner-friendly. Reshaping the vanity door edges is more of an intermediate add-on. Unknown ceiling texture, an active leak, a soft subfloor, or electrical work beyond a straightforward fixture swap all call for professional help before you touch anything.
- A household cleaner rated for mildew, or bleach and water
- Damp rags, a drop cloth, and plastic sheeting
- Bathroom-rated paint, a 2½-inch angled brush, a roller with cover, and a paint tray
- Painter's tape
- Sandpaper and a tack cloth for the vanity
- Peel-and-stick vinyl floor tile, measured to your room plus extra for cuts
- A new light fixture, if you're doing that step
Benjamin Moore lists painting a bathroom as a beginner-level project most people can finish in a weekend, which gives a rough sense of how to pace just that one step.
Before you start: decide what to keep
Walk the room before you plan a budget. Check the toilet and sink for cracks, loose bases, or slow drips; the vanity for soft or swollen wood near the floor; the existing flooring for soft spots, lifting seams, or standing moisture; and the light fixture and switch for a working circuit.
The Shipmans' decision to keep their toilet, sink, and vanity instead of replacing them is what made their low total possible, according to Apartment Therapy. If your fixtures and vanity pass these checks, you're in a similar position: a cosmetic job rather than a repair.
Hold off on painting or flooring work if you find active leaking at a toilet or sink base, a spongy subfloor, mold that keeps coming back after cleaning, or a toilet or vanity that wobbles. Paint and new flooring will cover these problems for a while, not fix them, and the eventual repair only gets more involved once something's been tiled or painted over.
Leave unknown ceiling texture alone. If your bathroom has a textured popcorn ceiling and you don't know what it's made of, have it tested by a qualified professional before sanding, scraping, or otherwise disturbing it, regardless of the home's age.
Once you know what you're keeping, sort the project into three buckets before you shop:
| Category | Typical items | Notes |
|---|---|---|
| Reuse (no cost) | Toilet, sink, vanity box, subfloor, existing wiring | Only if the checks above pass |
| Buy | Peel-and-stick tile, paint, painter's tape, sandpaper, drop cloth | Plan to spend more than $200 if you're buying paint and tools new instead of pulling from leftovers |
| Optional | New light fixture, cabinet hardware, toilet or sink replacement | Add these only if a reuse item fails inspection, or you want a bigger upgrade |
Step 1: scrape the ceiling
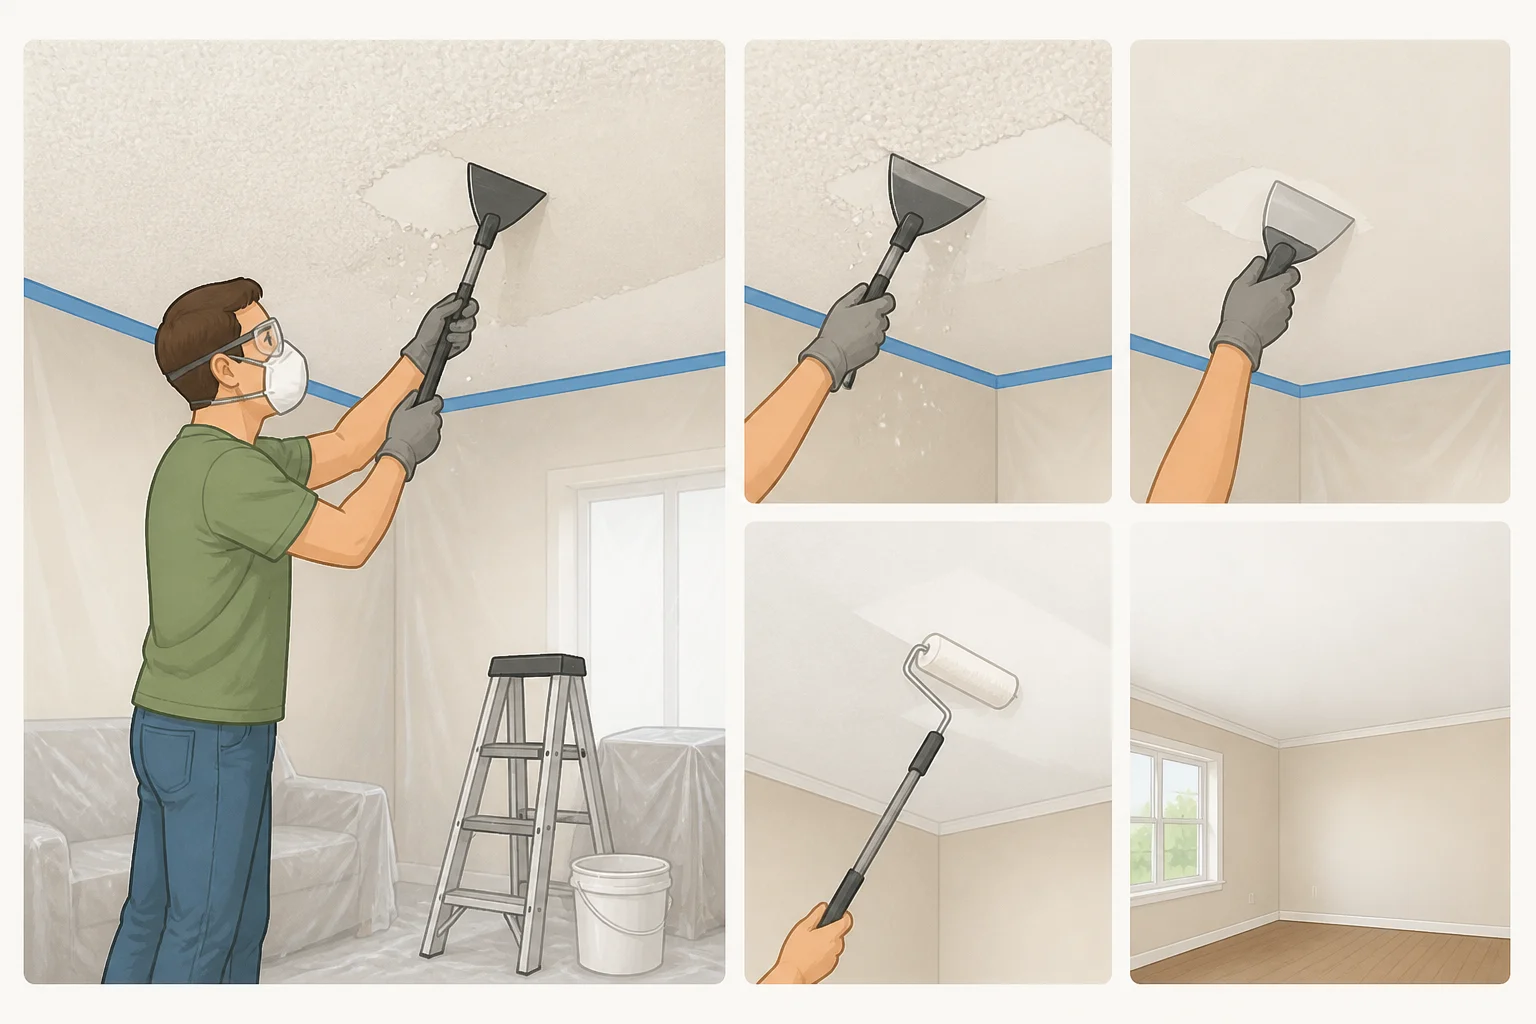
Once a textured ceiling has been cleared by a professional, scraping it off can make an outdated bathroom look dramatically newer. The Shipmans say removing their popcorn ceiling instantly made the room look "30 years younger," according to Apartment Therapy.
Do this before you paint. Scraping kicks up dust and debris that settle on every other surface in the room, so clearing it out first saves you from repainting over grit later.
When you're done, the ceiling should be smooth and flat with no texture remnants, and fully dry before paint goes on. If you're not confident identifying or removing the texture yourself, this is a reasonable step to hand off to a professional while you DIY the rest.
Step 2: repaint the walls and ceiling
The Shipmans covered yellow-toned walls with crisp white paint they already had on hand, which brightened the room without adding to the budget, per Apartment Therapy. Before you paint, wash the walls with a mixture of three parts water to one part bleach to remove mildew, then let the surface dry completely, Benjamin Moore recommends.
Use a paint formulated for bathroom humidity, tape off the vanity, ceiling, and door, and cover the toilet with plastic sheeting before you start rolling, according to the same source. Let the final coat dry fully, and plan to wait around 24 hours before putting the bathroom back into everyday use, per the manufacturer's guidance.
Step 3: refresh the vanity
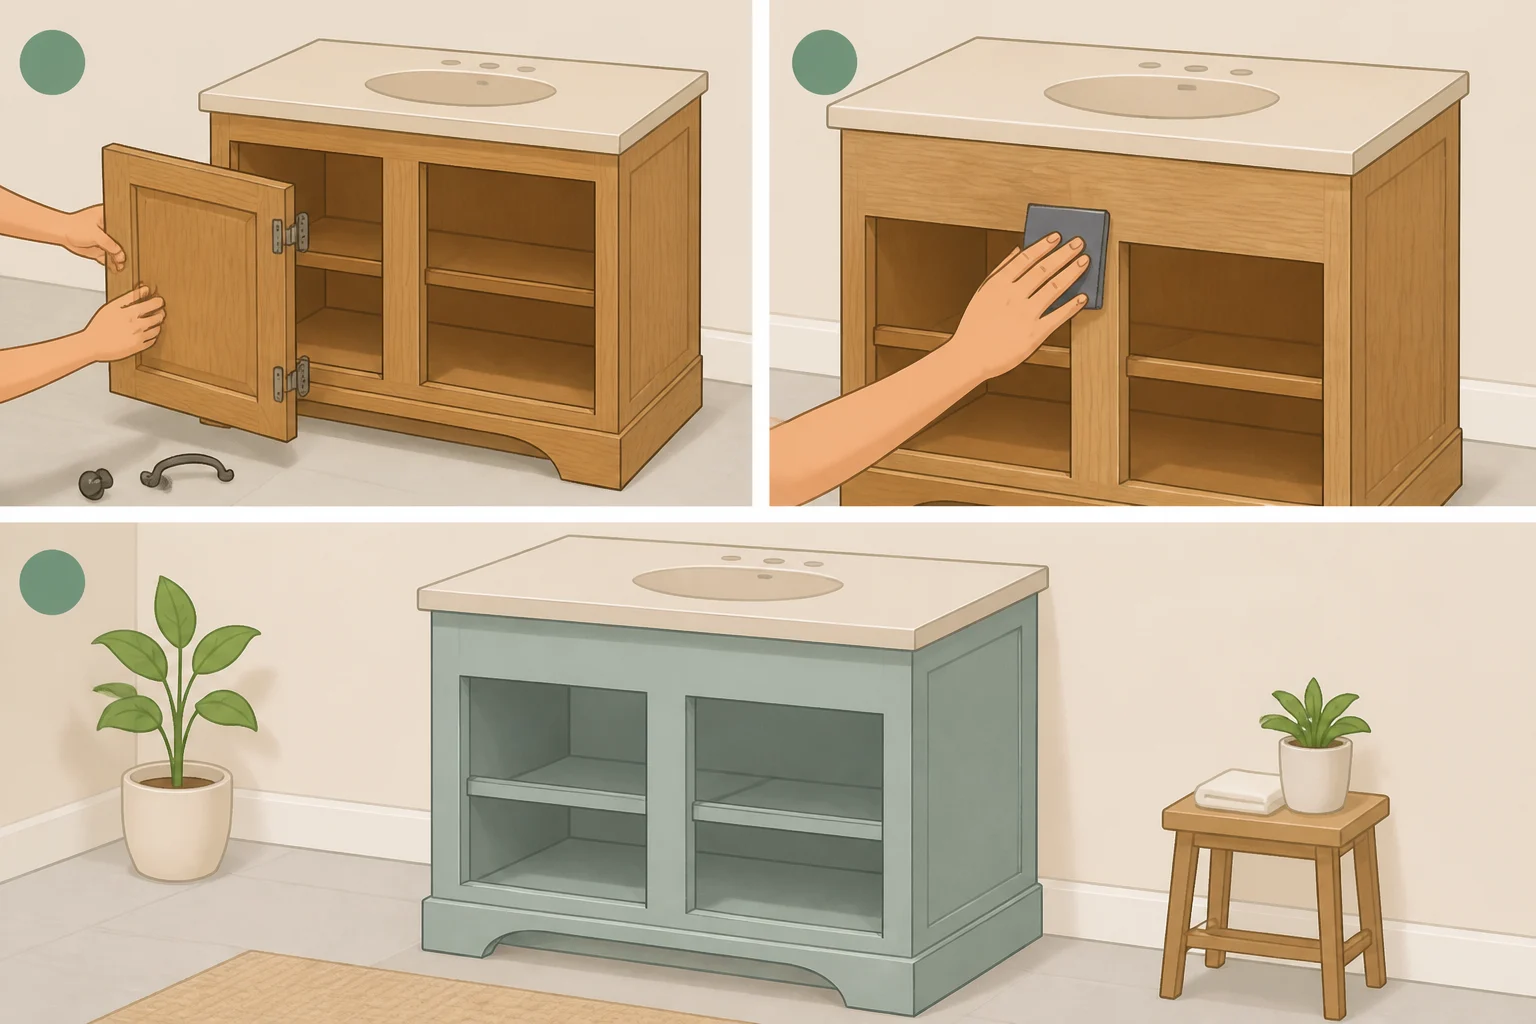
The basic version of this step is beginner-friendly. Remove the vanity doors and drawer fronts, take off the hardware, and set it aside somewhere you'll remember where each piece goes. Painting doors flat on a drop cloth gives more even coverage than painting them in place.
Clean the cabinet surface, then sand it enough to knock down the shine, until it looks dull and feels slightly rough rather than slick. Wipe away the dust with a tack cloth or damp rag before paint goes on; leftover dust will show up as grit in the finish. That alone makes a dated oak vanity look current without touching the structure.
The Shipmans went further and sanded down the decorative edge detailing on their vanity doors before painting it black. Melissa says that move, more than anything else, made "a huge difference" in how the piece looked, per Apartment Therapy. She says many people who repaint cabinets already own the tools to reshape the edge profile on solid oak doors, even if they haven't thought to try it.
Reshaping an edge profile takes more time and a steadier hand than a basic repaint, and it's easy to end up with an uneven section if you rush. Treat it as an optional upgrade rather than a required one, especially if your vanity isn't solid oak. Let the paint cure fully before reinstalling hardware and rehanging the doors.
Step 4: a peel-and-stick tile bathroom makeover that keeps costs down
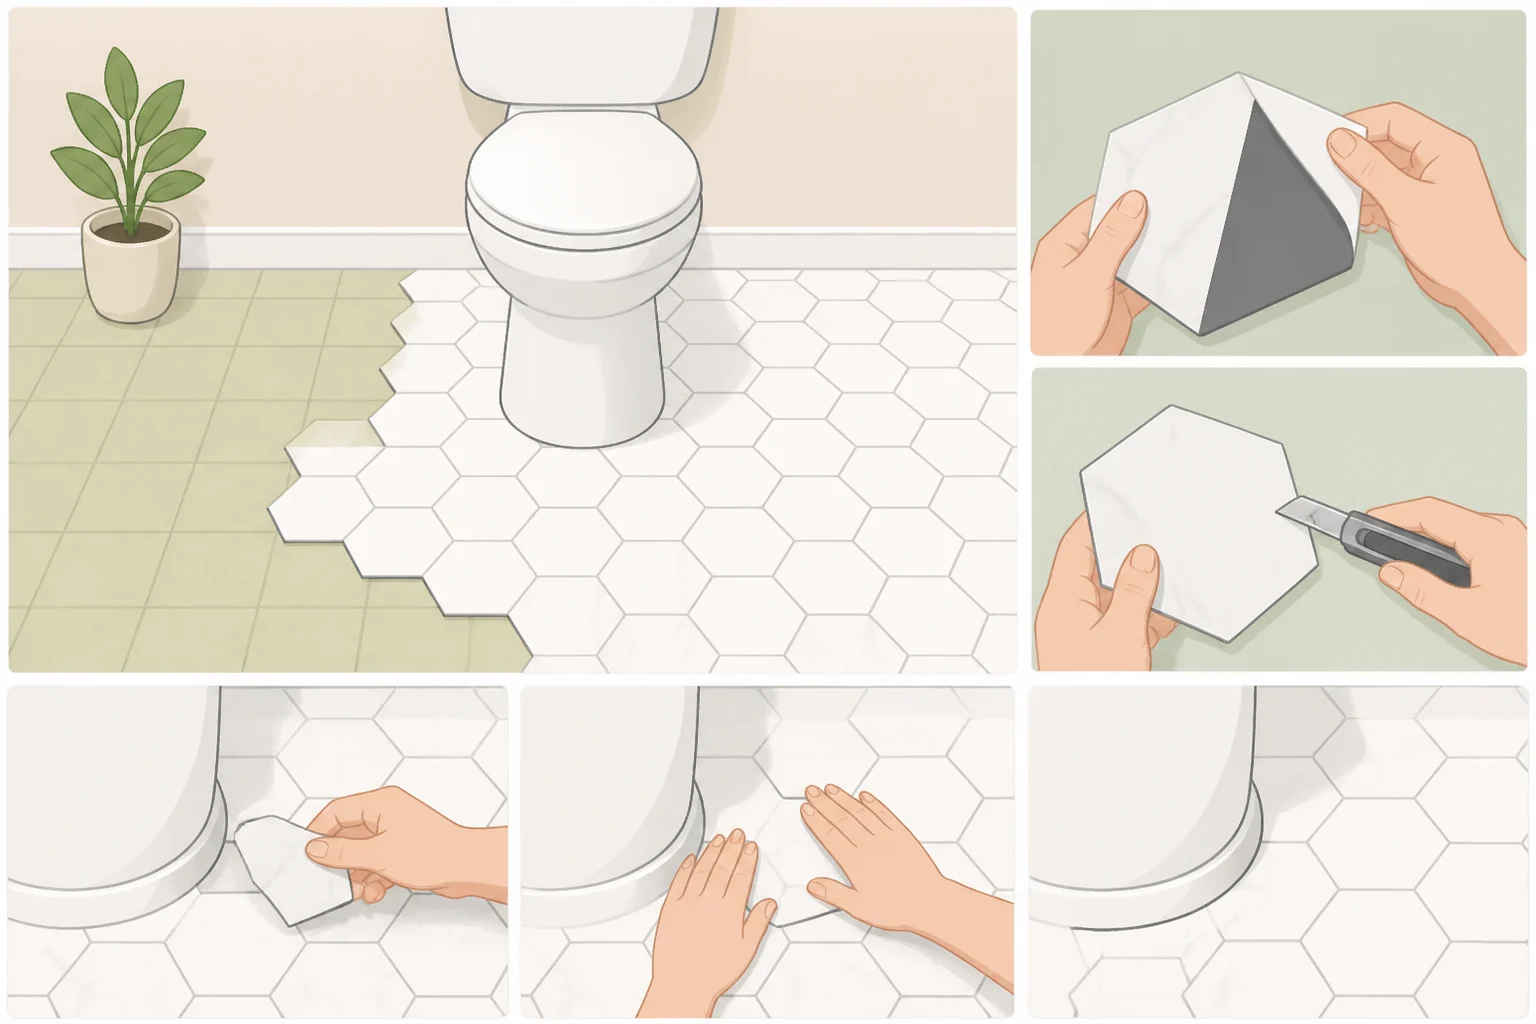
With a full floor replacement out of reach, the Shipmans covered their existing vinyl with stick-on tile instead, choosing a graphic hex pattern in gray, white, and black, according to Apartment Therapy. Melissa says the low cost of peel-and-stick made a bold pattern feel like a safer bet than committing to permanent tile. Installation was "a bit of a challenge," but took only a few hours in their small half bath.
Peel-and-stick tile is meant to go over a sound existing floor, not fix a damaged one. If your earlier walk-through turned up soft spots, lifting seams, or standing moisture, that's a repair job first, not a surface this kind of tile belongs on.
Measure the length and width of the room to get total square footage, then check the tile packaging for how much area each box covers to figure out how many you need. Beyond that, lean on the manufacturer's own instructions rather than general advice. Tile makers specify their own subfloor prep, how much extra material to buy for waste and cuts, whether the toilet needs to come out or can stay put while you tile around its base, and how long the adhesive needs to cure before the floor can handle regular foot traffic. Those details vary by product, so the box and instruction sheet are the real source of truth here.
In one separate small-bathroom project, flooring cost less than $250 start to finish, another data point on how affordable this step can stay even outside a strict $200 total, per Dori Turner Interiors. When you're done, the tiles should lie flat with no lifted corners and fit cleanly against the toilet base.
Step 5 (optional): upgrade the light fixture
The Shipmans credit their new light fixture, alongside the white walls and scraped ceiling, with making the finished room feel noticeably brighter, according to Apartment Therapy.
Turn off the power to that circuit before touching anything. Follow the new fixture's installation instructions exactly, and check your local electrical code requirements for the work involved. If anything about the existing box or wiring doesn't match what the fixture instructions describe, stop and consult a qualified electrician rather than guessing your way through it.
If you'd rather skip the electrical work entirely, this is the easiest step to defer while still finishing the rest of the refresh yourself.
Adjustments and budget variations
If your pre-project checks turn up a failing sink, faucet, or toilet, the job is no longer a cosmetic refresh, and the budget shifts accordingly. In one homeowner's project, a sink and faucet together cost $125 and a replacement toilet cost $100; those numbers come from a single project, not a price guide for your own fixtures, per Dori Turner Interiors. A small-bathroom remodel done by a professional averages $2,500 to $5,000, according to the same source citing HomeGuide. Labor alone makes up 40 to 60 percent of that total, which is part of why keeping sound fixtures in place matters so much to the bottom line.
A bold floor pattern reads differently once the rest of the room is simplified. Painting the walls and ceiling one flat white, the way the Shipmans did, gives a busy hex tile somewhere to stand out without competing with other colors or finishes in a small room. If you want a similar effect with a different tile pattern or colorway, keep the walls, ceiling, and vanity in a single neutral tone and let the floor carry the contrast.
There's no long-term data here on how peel-and-stick tile holds up after years of bathroom moisture and foot traffic. Treat it as a budget-friendly overlay rather than a permanent floor, and follow the product's own care and cleaning instructions rather than guessing at how to maintain it.
Finish-line guidance
Before calling the room done, check it against this short list:
- No active leaks at the toilet or sink base
- Tile lying flat, with no lifted corners or gaps at the toilet base
- Paint and tile adhesive cured according to the product label, not just dry to the touch
- Any new light fixture wired, grounded, and tested with the breaker back on
- No soft or spongy spots anywhere underfoot
Only put the bathroom back into regular use once the paint and tile instructions say the surfaces have cured, not just dried. Clean the tile with a damp cloth rather than soaking it, and re-press any corner that starts to lift as soon as you notice it.
If a soft subfloor, a leak, or wiring that doesn't match the fixture instructions turns up at any point, stop the cosmetic work and deal with that first. No amount of paint or tile fixes a structural or electrical problem underneath it; it just buys time before the problem resurfaces.



















Comments
Be the first, drop a comment!