



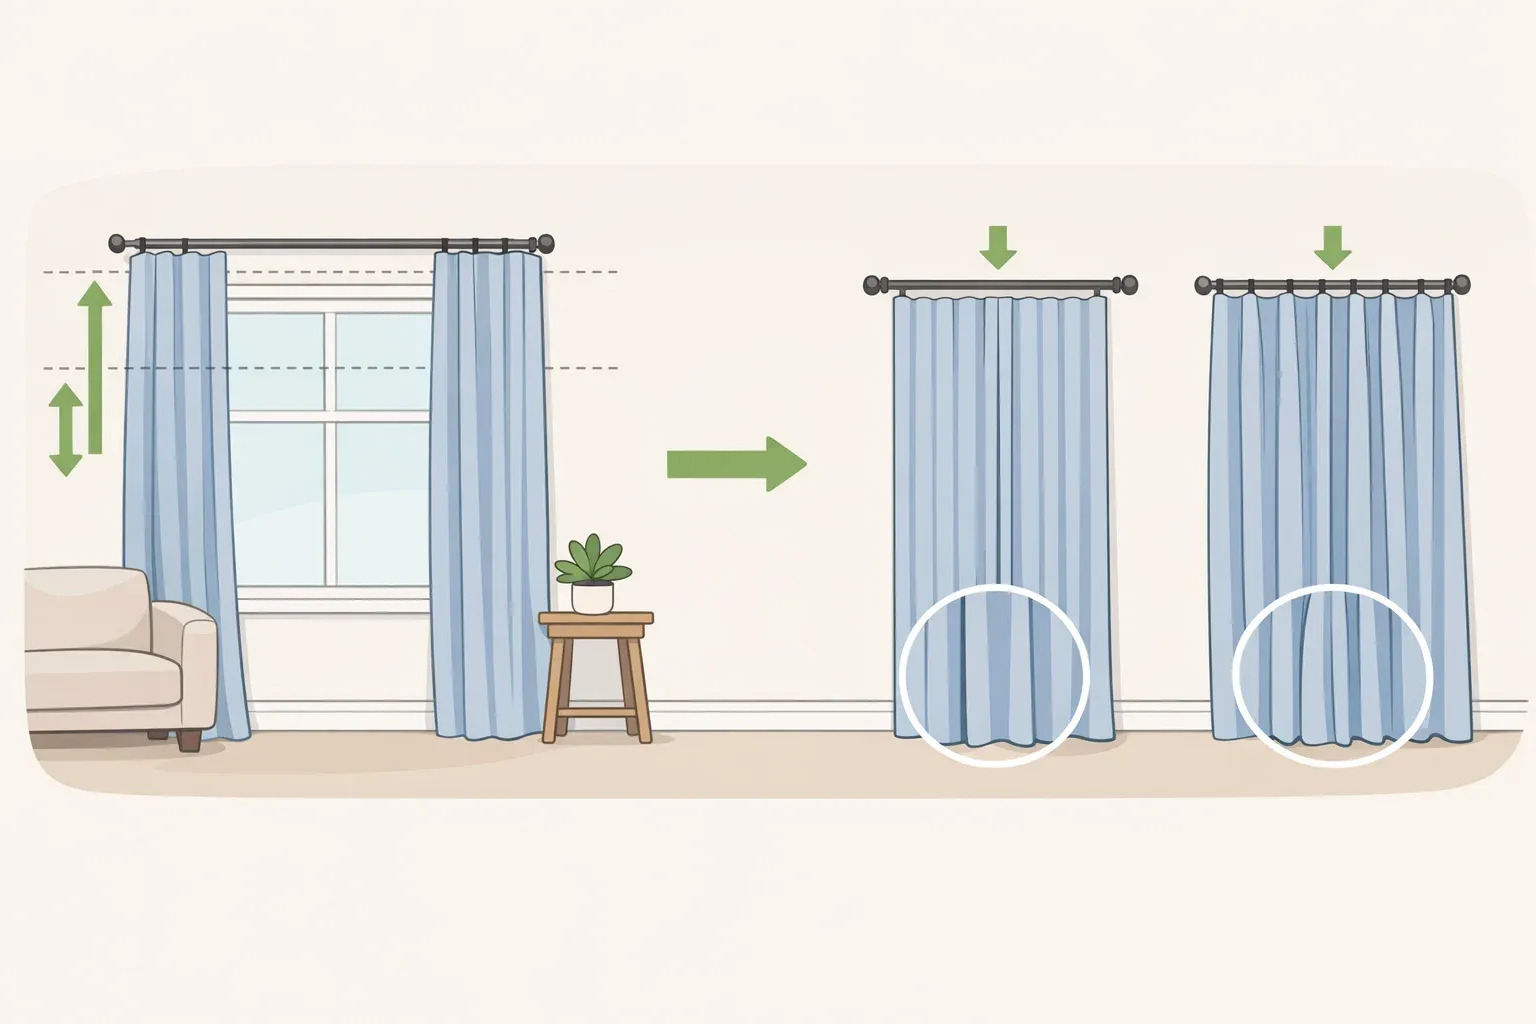
How to make curtains look expensive: 4-step designer formula
Budget curtains read as cheap for specific, fixable reasons. By the end of this guide, you'll know how to make curtains look expensive using the same structural logic designers apply to every install: hang height, rod width, fabric fullness, and hem weight. Four decisions. Miss any one and even quality fabric can look like an afterthought.
Two tracks run through this guide. Some readers are rehanging what they already own. Others will find their panels are too short or too narrow to work with regardless of where the rod moves. A quick self-assessment before Step 1 tells you which situation you're in.
Designer Victoria Holly is direct about the underlying problem: "Cheap curtains often feel and look lackluster because they don't have enough fabric or structure. Your panels might be too narrow, hung too low, or feel flat when closed." Even beautiful fabric reads flat and unfinished without the right drape and a crisp pleat, she adds, per The Spruce.
The first three steps address proportion. The fourth is the step most people skip entirely, and it's the one that makes the previous three cohere.
Prerequisites: A tape measure, a pencil, and a level for rod placement. For drapery weights: a needle and thread, or iron-on hem tape for a no-sew option. A handheld steamer is useful but not required.
Know before you drill: assess your current panels first
A two-minute check that tells you whether this is a rehanging project or a partial repurchase
Measure your current panels before touching the wall. Two numbers matter: length and width. Panel length should reach from the ceiling (or just below crown molding) to the floor. Shorter than that and the proportions won't work regardless of where the rod moves. For width, folds should remain visible even when panels are fully closed, which means total fabric measuring close to double the window's opening width, per The Spruce.
The quick diagnostic:
- Rod height target: ceiling line or just below crown molding
- Rod width target: window opening width + at least 32 inches (16 inches per side beyond the frame)
- Total panel fabric width target: close to double the window opening width
If your panels clear both checks, this is a rehanging project. Work through all four steps. If they fall short on length or width, Step 3 covers the purchase math. Either way, Steps 1, 2, and 4 apply to both tracks.
Step 1: Mount the rod at ceiling height, not window height
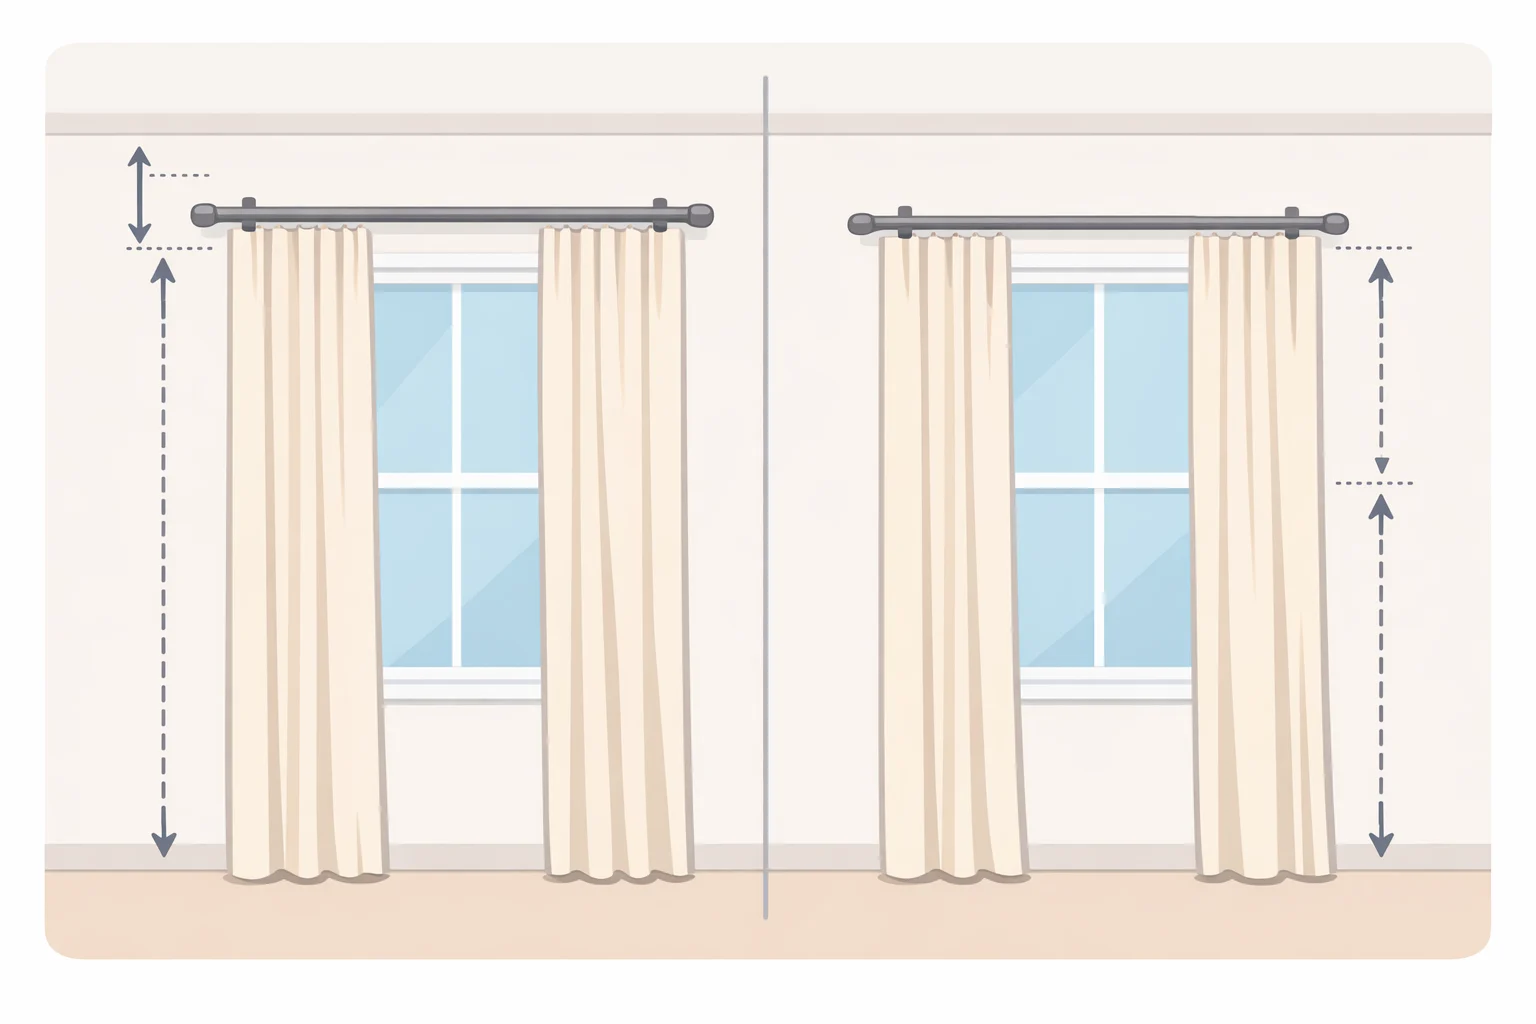
The single placement decision that changes how tall a room feels
Mount the rod at the ceiling line or just below the crown molding. Not a few inches above the window frame. That gap between rod and window top is dead wall space; it signals the installer stopped thinking at the window. Holly recommends ceiling placement specifically because fabric running from near the ceiling to the floor tricks the eye into reading the full wall height as intentional, per The Spruce. The ceiling feels taller. The window feels larger.
Repositioning the brackets costs nothing. Worth sitting with before buying anything new.
If keeping current panels: Measure your panel drop from ring or grommet to hem. If they fall short of the floor at ceiling height, you have two options: let the fabric rest slightly on the floor, which reads as deliberate in most rooms, or add length via hem tape before Step 4.
If buying new: Measure ceiling to floor and order panels at that length or slightly longer. Panel lengths vary by retailer, so measure before ordering rather than assuming standard sizes will work.
Common mistake: Installing brackets first, then measuring. Measure floor-to-ceiling first. Mark rod placement. Install brackets. Then confirm panel length before any drilling is permanent.
Step 2: Extend the rod well past the window frame on both sides
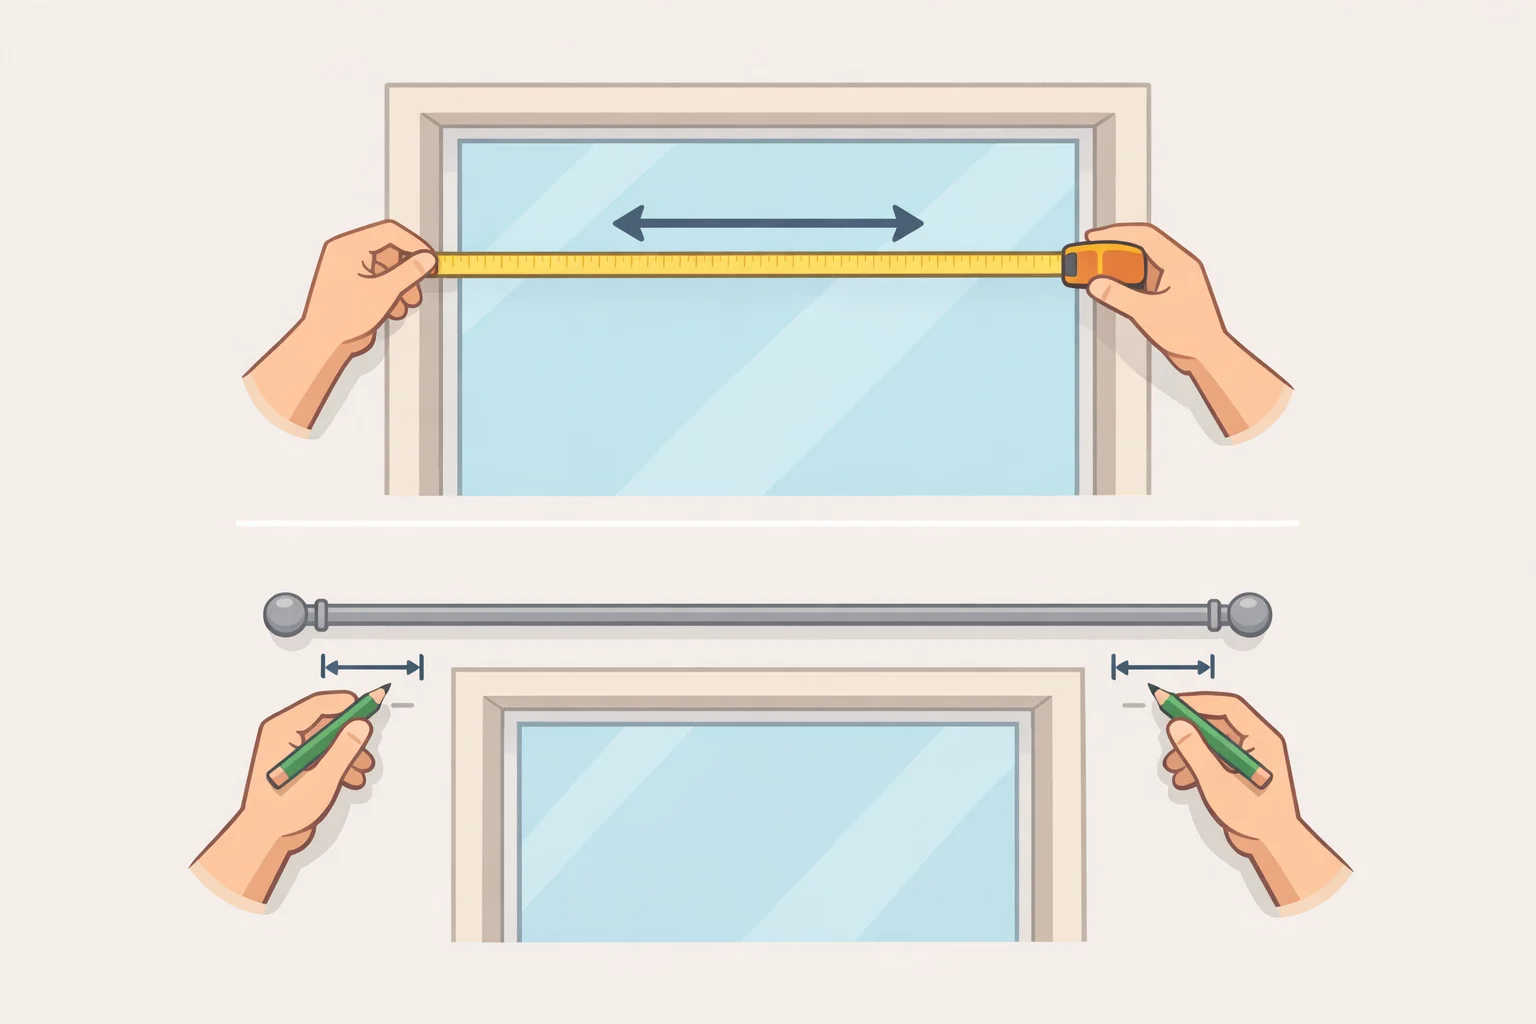
How extra rod width makes a small window look like a considered design choice
The rod should extend at least 16 inches beyond each side of the window opening, a minimum of 32 additional inches of rod width beyond the glass, per The Spruce. Most installations stop well short of that.
When panels stack entirely off the glass when open, the window appears wider than it is and more natural light enters the room. Both read as intentional. Neither requires new curtains, just wider bracket placement.
The math: Window opening width + 32 inches = minimum rod span. A 36-inch window needs at least a 68-inch rod. A 48-inch window needs at least an 80-inch rod.
Gotcha: Some adjustable rods won't reach the spans this method requires. For wider windows, look for two-piece telescoping rods rated for the full length, or have a hardware store cut a wooden dowel to size and finish it to match. Check the rod's weight capacity before hanging heavier panels.
If keeping current panels: Panels that previously covered the window will now stack to the sides. That's what you're after. The curtains haven't changed; only where they live when open has.
Step 3: Curtains that look custom start with the right fabric width
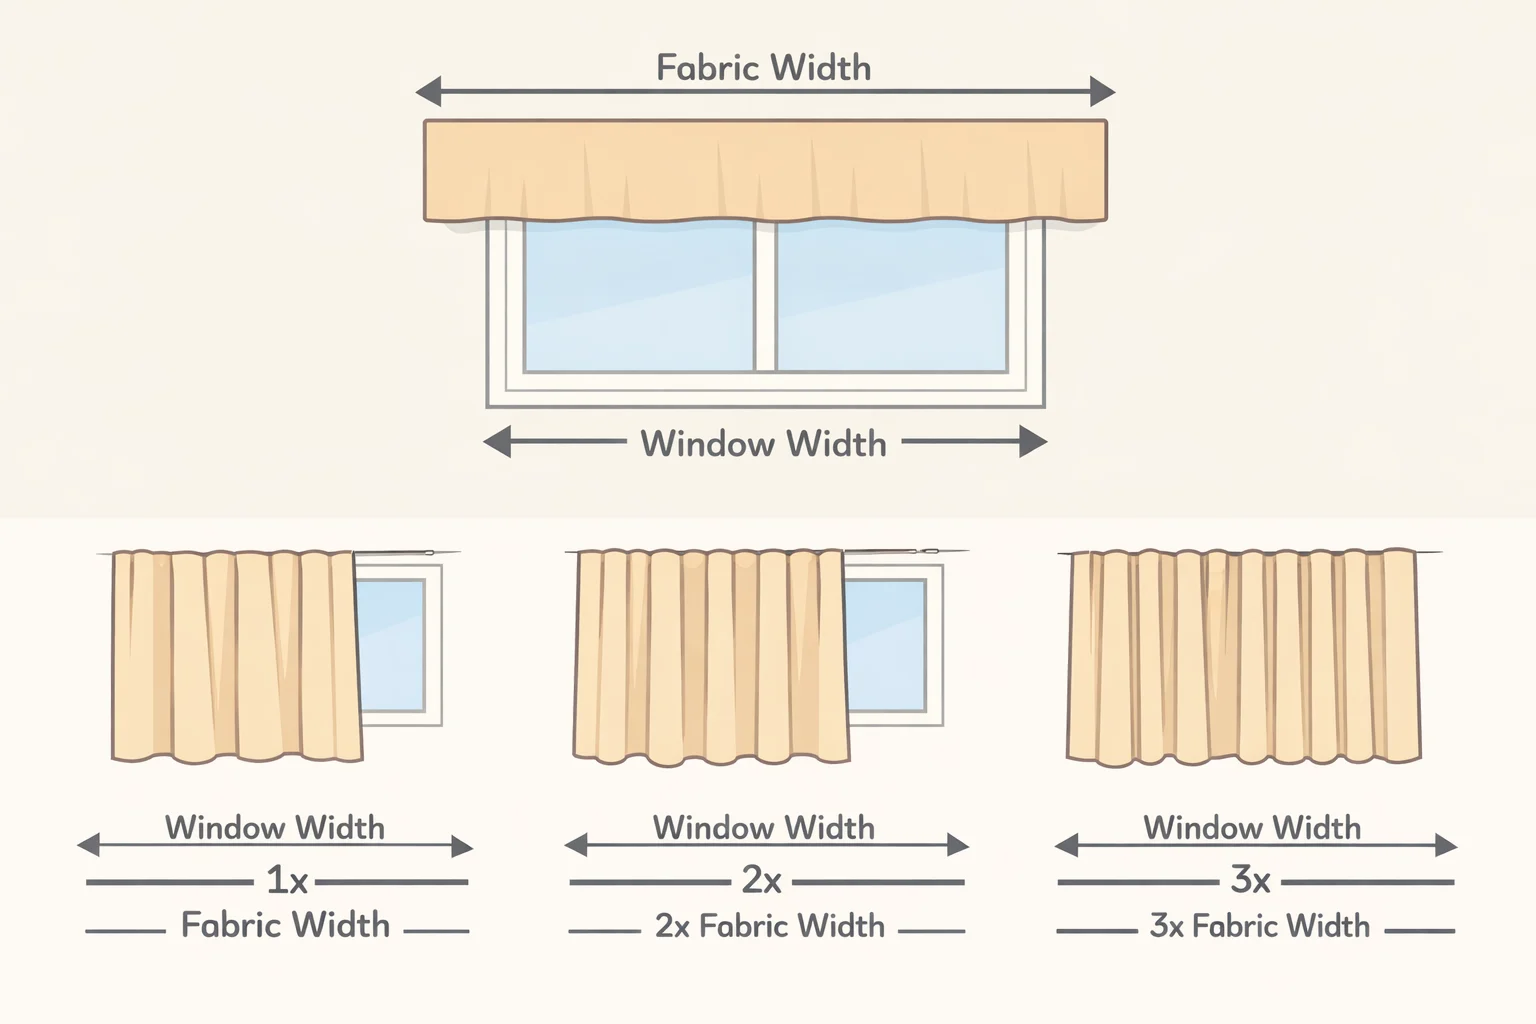
The fullness ratio that separates flat-looking panels from ones with real presence
Total panel fabric width should be close to double the window opening width. That way, folds stay visible even when the panels are fully closed, rather than lying stretched and flat across the rod, per The Spruce. Flat fabric reads as cheap regardless of the material.
A single 54-inch panel over a 50-inch window has almost no fullness. It covers the opening but doesn't drape. That distinction is visible from the doorway.
The math: Window opening width × approximately 2 = total fabric width needed. For a 40-inch window, aim for roughly 80 inches of fabric across however many panels you hang.
If keeping current panels: Check your total fabric width against the formula. If you're close, drapery weights in Step 4 will help pull folds into shape. If you're well short, hanging an additional panel alongside what you already own is a practical fix; fullness improves without discarding anything.
If buying new: Off-the-shelf panels typically run 42 to 54 inches wide. Buy based on fabric width, not rod pocket size. If two panels don't get you to the right total width, buy a third.
Step 4: Add drapery weights, the finishing move most people skip
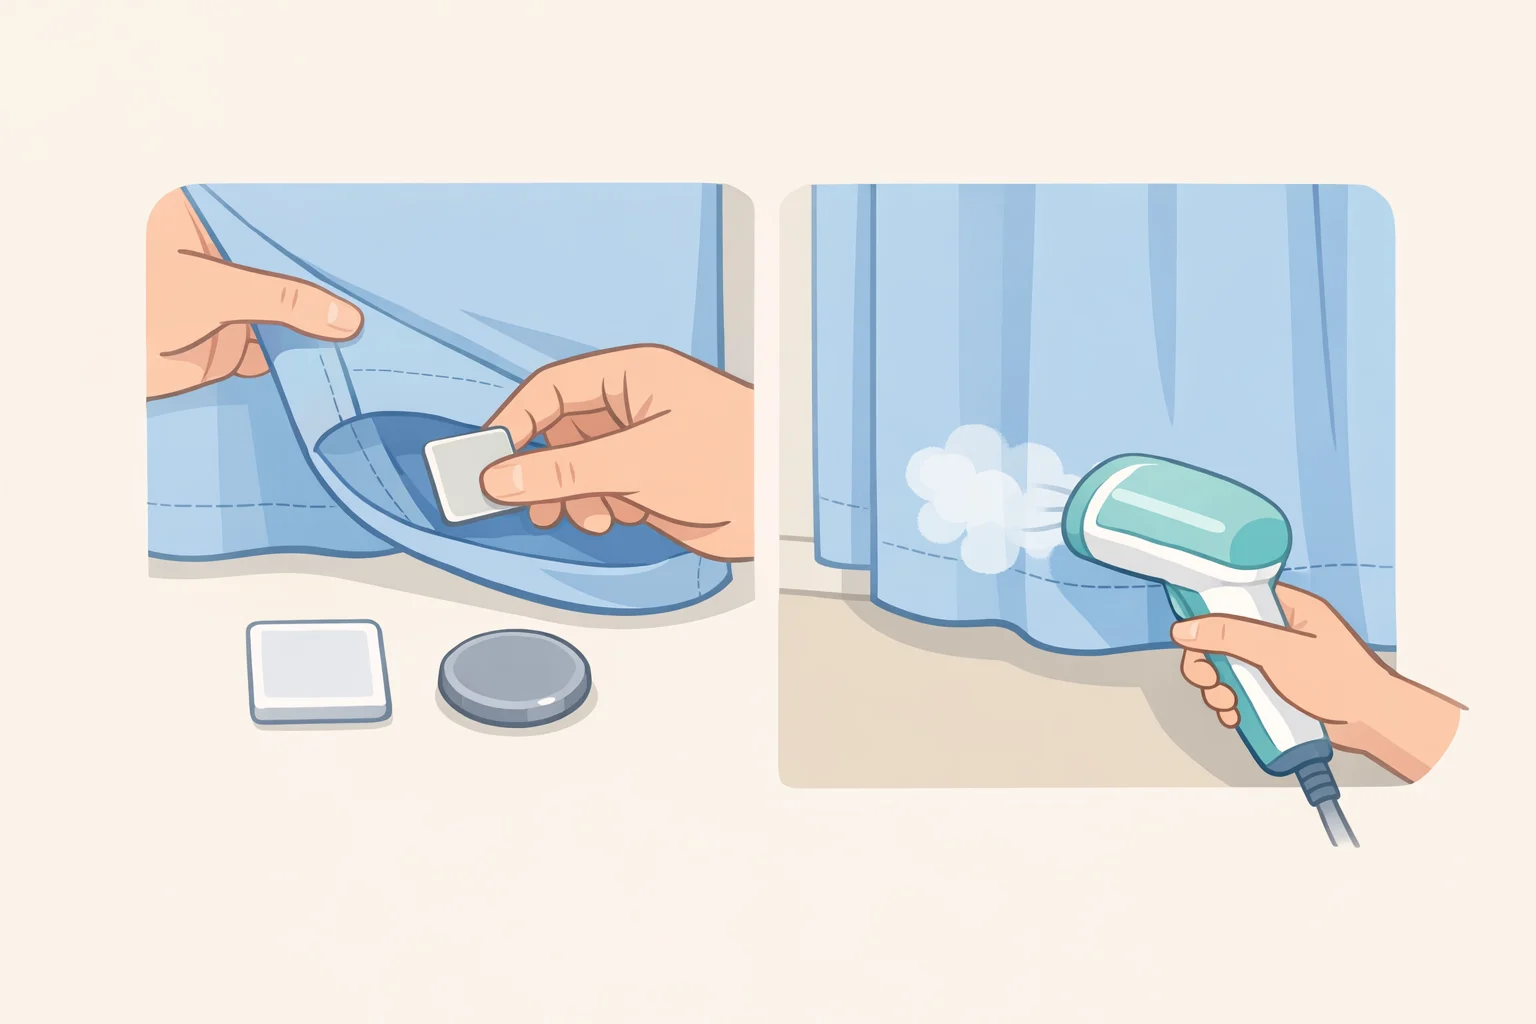
What they are, which type to choose, and how to put them in
Drapery weights are small metal pieces sewn into the hem of a curtain panel to help the fabric hang properly, working on the same principle as the magnets at the bottom of a shower curtain. They're hidden in the hem, inexpensive, and easy to add, per The Spruce.
Without consistent downward tension at the hem, lightweight panels drift, corners curl, and everything built through Steps 1 through 3 goes soft. Designer Nadia Watts puts it plainly: weights let curtains sit exactly where you want them and instantly feel more polished and elevated. Holly adds that the visible result is clean, tailored folds rather than fabric that looks flimsy, per The Spruce.
Who benefits most: Lightweight and sheer panels gain the most obvious improvement. Curtains near HVAC vents, exterior doors, or high-traffic areas, where fabric tends to blow around, also benefit, Watts notes, per The Spruce. Heavier panels gain structure too, but the change is most visible on thin fabrics that currently billow or go shapeless.
Two types, one rule:
- Individual metal weights sewn into corners and at intervals along the hem. Best for heavier or medium-weight fabrics. Some panels already have small pouches along the hem built for this purpose; insert the weight and stitch or press the pocket closed.
- Chain or rope-style weights that run the full bottom hem. Better for lightweight or sheer fabrics, where consistent tension across the entire width prevents bunching between anchor points.
Holly's guidance: rope-style on lighter fabrics, individual pieces on heavier ones, per The Spruce.
Sew-in method: Fold back the hem lining at one bottom corner. Slip an individual weight into the corner pocket and stitch closed with overhand stitches using matching thread. For a chain weight, tack it at both ends and the center.
No-sew method: Use iron-on hem tape to create a small pocket at each corner, insert the weight, and press closed. Less durable through repeated washing, but functional with no sewing required.
Final step: Run a handheld steamer down each panel after weighting. It removes factory creases and helps the newly weighted hem settle into clean vertical folds. Designer and Sorry Girls co-founder Kelsey Marillis documented this exact sequence on a budget bedroom curtain wall using spool-style weights on panels that, in her words, "looked cheap because they are cheap." Her summary: "All I needed was a little steam, hem, and drapery weights," per The Spruce. The curtains didn't change. What changed was everything about how they hung.
When to replace versus when to rehang
The decision isn't complicated. If your panels reach ceiling to floor and total fabric width lands close to double the window opening, this is a rehanging project. Move the rod, widen the brackets, add weights, steam. Done.
If the panels are too short to survive ceiling-height mounting, or too narrow to hold a fold, no amount of hardware adjustment fixes that. Replace them, or add panels until the width math works. That's the whole decision tree.
Custom drapery costing thousands per room isn't necessary to get results that read that way, per The Spruce. The structural failures are specific and the fixes are direct. Panels that hang from near the ceiling, stack off the glass when open, carry enough fabric to fold, and hold a clean vertical line at the hem: that's what the eye reads as expensive. The weights are the last piece, and they're the one most people never try.




















Comments
Be the first, drop a comment!