


A true shadow line is built in, not added later. If your walls are already finished, you're working with approximations and there's a clear order to which ones are worth your time. This guide walks through how to create a shadow line in a room at every renovation stage: from full structural implementation when walls are open, to the best retrofit options when they're not.
A shadow gap is a deliberate, engineered recess left where two surfaces meet, often around 10 to 30mm wide in residential interiors, producing a continuous shadow line in place of visible molding. Smaller reveals can also be intentional, depending on the system: ClarkDietrich lists shadow reveal profiles that create reveals smaller than 10mm. Rather than concealing the junction between wall and floor with a baseboard, the technique turns that transition into an architectural feature, using negative space to create depth without adding physical mass.
This guide focuses on reveal details at room edges floor-to-wall and wall-to-ceiling transitions. Door and window trimless systems belong to the same design family but require different hardware and tolerances; they're mentioned for context, not as DIY targets.
For most DIYers, the realistic options are grooved skirting, slimmer flat baseboards, or a sharper painted ceiling line. A true recessed shadow gap is usually contractor-level work because it depends on framing, drywall or plasterboard placement, profile installation, and precise finishing.
Why shadow lines can make a room feel more open
Shadow gaps change how a room is perceived. They don't change its dimensions, and they won't rescue a poorly proportioned space.
When a wall terminates at the floor through a recessed gap rather than a chunky baseboard, the wall plane feels lighter and less visually interrupted. Large-profile moldings can have the opposite effect in tight rooms or rooms with low ceilings because they add visual weight at the edges.
Uninterrupted wall planes also reduce visual clutter, allowing lighting, cabinetry, and finishes to register more clearly. At floor level, a properly detailed gap can also help account for normal flooring movement, but it should be planned around the finished floor material and installation method.
The accurate description of the effect is more open and refined, not dramatically bigger. Shadow gaps won't hide crooked walls; the absence of trim makes uneven surfaces immediately obvious. In rooms defined by ornate decorative molding, a shadow gap will read as out of place rather than complementary. And a genuinely dark, cramped room still needs light, proportion, and finish doing their jobs. The edge detail alone won't carry it.
Is a shadow gap right for your room?
The single most important variable is renovation stage. Everything else — style match, wall condition, and household traffic — follows from that. Work through these in order.
What stage is your renovation? True architectural shadow gaps can't be added cleanly at the last minute. The channel, bead, or shadowline profile usually needs to be planned before drywall or plasterboard finishing. Intrim Mouldings' shadowline installation guidance also shows why finished floor height matters: some systems are installed before flooring and plasterboard. Retrofitting into finished walls requires cutting away finished surfaces, installing a new profile, and refinishing the area. It is invasive and costly, and usually worth doing only if walls are already open for another reason.
Are your walls straight enough? Unlike decorative molding, which can mask imperfections, reveal details demand precise installation; any irregularity in framing or plaster telegraphs directly to the finished surface. Existing walls and floors are rarely perfectly straight, and creating clean, consistent gaps in period properties with uneven floors or bowed walls may require additional prep or re-framing before work can begin. Run a long level along your base walls before committing. Any meaningful deviation at multiple points means remedial work comes first.
What's the household's traffic and damage tolerance? Traditional baseboards absorb daily impact from furniture, pets, vacuum cleaners, and foot traffic. True recessed shadow gaps can also collect dust and grime, so avoid them in splash-prone bathrooms, laundry rooms, mudrooms, or areas that are frequently mopped unless the profile and wall finish are specified for that use. Shadow gaps leave wall edges exposed, so chipped plaster or dented profiles can require patching, re-plastering, and repainting rather than a quick touch-up. For households with children or pets, traditional trim usually performs better. There's also cracking risk: buildings shift with settling and thermal expansion, and without rigid integrated framing and quality profiles, hairline cracks can appear along the plaster edge at the gap.
Does your room's style support it? The effect is strongest in contemporary and minimalist interiors — rooms with smooth walls, flush cabinetry, and minimal hardware where shadow gaps read as intentional precision rather than missing trim.
One code note worth flagging: trim style itself usually is not the issue, but the wall assembly can be. The International Code Council's fire-code provisions on interior finishes are a reminder that trim, finish materials, and wall assemblies still have to meet applicable safety requirements. Do not cut into or interrupt garage-separation walls, apartment party walls, demising walls, or other fire-rated assemblies without a licensed contractor or local code official confirming the detail.
What you may need
For a true built-in shadow gap, Trim-Tex's architectural reveal products are one example of the purpose-made profiles used to create clean drywall reveal details. You may also need a laser level, drywall or plasterboard, joint compound or plaster, primer, paint, and an experienced drywall/plaster finisher. For finished-room alternatives, you may need grooved skirting, slim flat baseboards, a pry bar, saw, adhesive or fasteners, filler or caulk, painter's tape, primer, and paint.
How to create a shadow line: built-in vs. retrofit options
True shadow-gap construction and retrofit approximations are different scopes, not just different difficulty levels. Choose your path based on the questions above.
Path A: walls are open (new build or gut renovation)
Step 1: Add shadow-gap detailing to the framing scope.
Decide at the framing stage, not the finishing stage; this is the only point where the detail can be done cleanly and cost-effectively without demolition later. Start with floor-to-wall and wall-to-ceiling transitions; these are structurally more manageable than door or window systems and produce the most visible spatial benefit.
Step 2: Source and fix the profile.
Confirm the finished floor height before setting the gap. Underlayment, tile, timber, carpet, or polished concrete can all change where the shadow line lands. If the floor build-up changes after the profile is installed, the reveal can end up too narrow, too wide, or uneven. Shadow gaps require a purpose-built metal or PVC bead or channel fixed to the framing before plasterboard installation. Without a proper profile, achieving a consistent, durable edge is not reliably possible. At floor level, extruded aluminum profiles can offer better impact resistance than softer trim materials and can help stabilize the plaster edge. For sizing, 10–15mm produces a subtle, crisp shadow line suited to most minimalist interiors, while 20–30mm creates a more pronounced effect in larger rooms.
Step 3: Mark level lines and install with precision.
Use a laser level to mark the gap location continuously around the room. Any deviation becomes permanently visible; there's no trim to mask errors. The framing itself is where many projects run into trouble. Standard lumber tolerances are often not tight enough for this work, so ask your framer explicitly to hold tighter tolerances at these edges.
Step 4: Finish with the same precision the structure requires.
Drywall must meet the metal channel exactly; corners need reinforcement and must be perfectly square; skim plaster must be smooth with no waves. Any surface imperfection shows immediately when there's nothing decorative to hide behind. Paint lines must be crisp, the sheen must be even, and caulk should be invisible. Use a sharp brush, painter's tape rated for clean removal, and two thin coats rather than one heavy one. This is not basic finish work. It requires an experienced plasterer and painter who has worked with reveal details before.
Path B: walls are finished (existing room, no demolition planned)
These options approximate the modern shadow gap trim effect without structural work. Each moves the room in the right direction, with different tradeoffs.
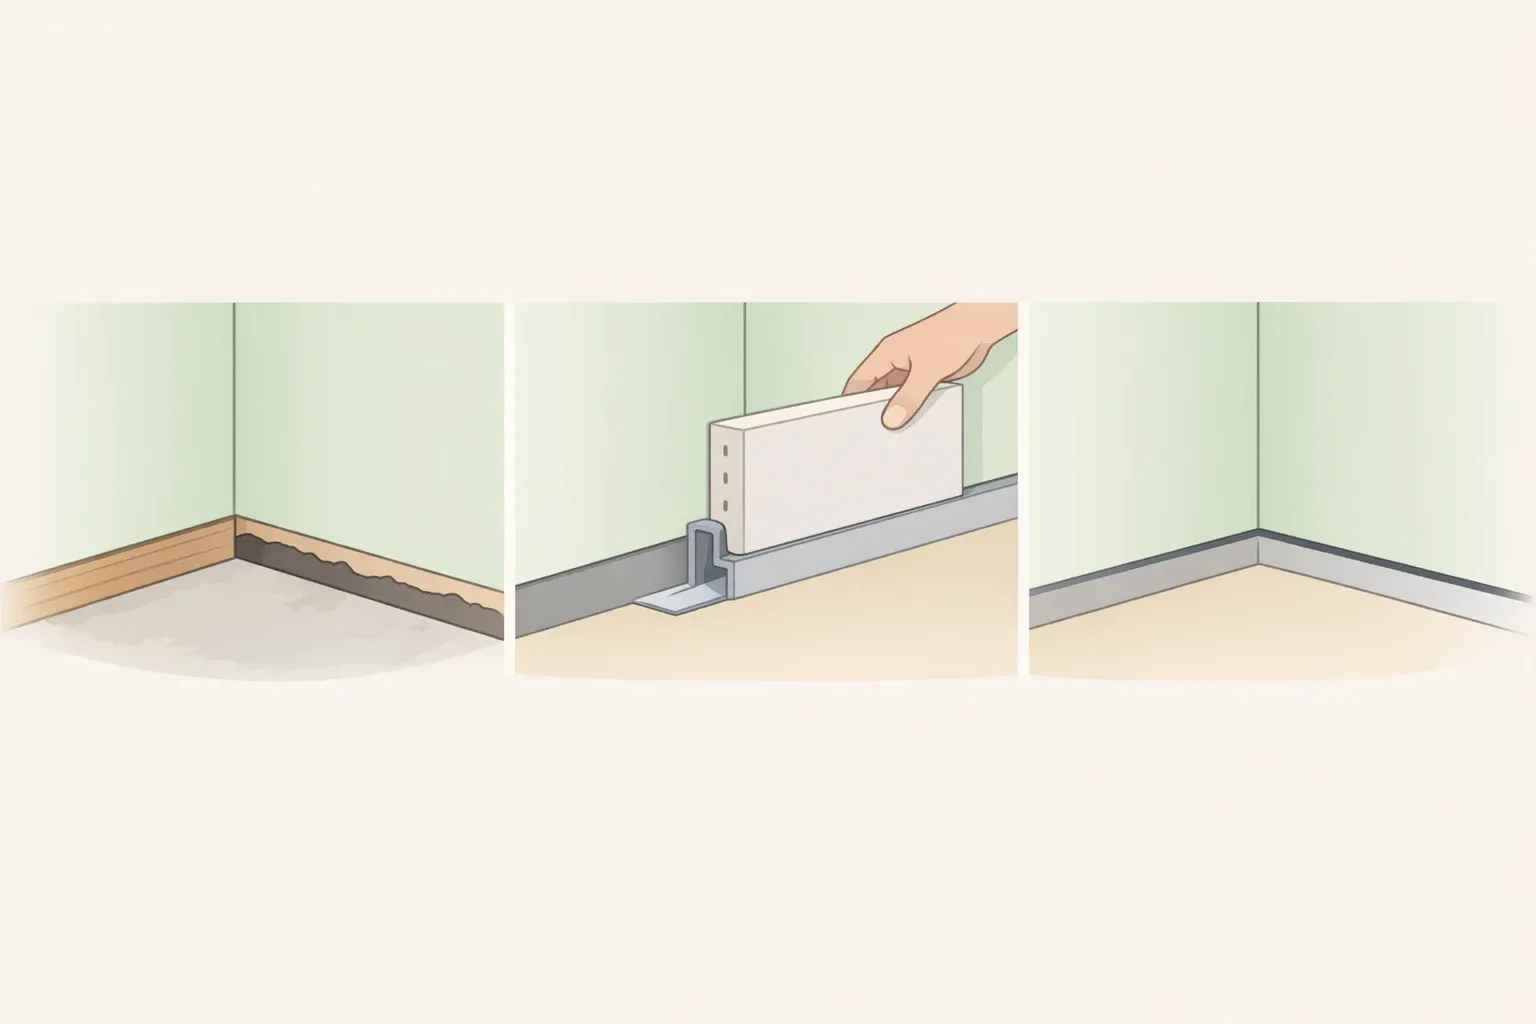
Option 1: Hybrid grooved skirting profile.
The most accessible version of the DIY shadow gap wall detail is a skirting board with an integrated groove that creates a subtle shadow line while retaining the practical protection of a conventional baseboard: no specialty framing, no demolition, and standard installation. The result is a continuous shadow line at the base of the wall that reads as intentional at normal viewing distance. Choose this when you want the visual effect without exposing wall edges to impact damage; it's reversible and works across most interior styles.
One thing to check before ordering: if the existing floor is noticeably uneven, the groove line will follow it. A quick level check will save you from that problem. The downside is that it's still a visible baseboard; anyone looking closely will see it's not a true recessed gap. For most finished rooms, that's a reasonable tradeoff.
Option 2: Minimal flat baseboard replacement.
Remove existing ornate or chunky baseboards and replace with slim, flat MDF or timber boards painted to match the wall. This eliminates the visual weight that makes rooms feel tighter without creating a true recessed gap; the wall plane reads as more continuous, the trim recedes, and the room opens up perceptually. Traditional trim conceals uneven floors and movement at joints, making it forgiving in renovation contexts, which means this option also preserves that practical benefit.
Choose this as a lower-cost alternative when grooved skirting isn't available or budget is tight. The limitation is real: it approximates the effect through visual lightness rather than actual shadow, so the result is subtler than a true reveal detail. It's still a meaningful upgrade over a heavy-profile baseboard in a contemporary room.
Option 3: Ceiling-to-wall paint line sharpening.
At the ceiling transition, omitting crown molding during a repaint and getting the ceiling-to-wall line razor sharp does not create a true recessed shadow gap, but it can borrow the same minimalist effect without structural work. Without crown molding interrupting the joint, the wall plane can read as taller and cleaner, with the ceiling appearing to float slightly above it.
The tradeoff: every imprecision in that joint becomes immediately obvious without trim there to absorb it. Don't attempt this on textured or genuinely uneven ceilings; the line will wander, and there's nothing left to blame it on. Done well, it's the cheapest option on this list and has a disproportionate effect on how a room reads.
What to do next
The decision rule is simple. If a renovation is coming and walls will be open, build the shadow gap in at the framing stage. That's the only cost-effective window for the real thing; improvised versions without proper profiles rarely look as crisp or hold up as well.
For finished rooms: start with the hybrid grooved skirting profile, move to minimal flat baseboards if that's not available, and sharpen the ceiling-to-wall line on the next repaint. Each step in that sequence moves toward the effect without requiring demolition or specialist trades.
The principle transfers even when the construction doesn't. Reduce trim mass at the room's edges, keep lines sharp, let the wall plane do the work. The gap itself is almost incidental. What it's really replacing is visual noise.


Comments
Be the first, drop a comment!