




IKEA dresser bathroom storage hack: turn dead wall space into storage
Philadelphia renter Madeline Warshaw inherited a bathroom with a pedestal sink, a sealed "mystery door" leading nowhere, and storage that amounted to one medicine cabinet mirror. Her fix was an eight-drawer IKEA HAUGA dresser placed directly over that dead door, an IKEA dresser bathroom storage hack she calls the biggest change in the room. She says it gave her more bathroom counter space and storage than she'd ever had in that spot, according to Apartment Therapy.
This guide walks through adapting that idea in your own bathroom: repurposing unused wall space with a freestanding dresser, then dressing up a plain pedestal sink with a fabric skirt. Keep one thing in mind going in. The dresser is bedroom furniture pressed into bathroom service, not a built-in vanity, so it needs a dry spot away from spray and splash, and it needs to go up following its own anti-tip restraint instructions before you load a single drawer.
Warshaw built her pleated skirt from water-resistant outdoor fabric with her grandmother, turning what she describes as a basic Home Depot pedestal sink into "a charming focal piece that really set the tone for the space," per Apartment Therapy. The skirt conceals open space under the sink rather than sealing it into a cabinet, and since the original project doesn't spell out exactly how she hung it, this guide offers one practical, removable option along with a few fallbacks.
Plan your IKEA dresser bathroom storage hack
Gather these before you start:
- The dresser itself (Warshaw used the eight-drawer IKEA HAUGA, Apartment Therapy reports)
- The anti-tip wall restraint hardware made for that dresser
- A stud finder
- A drill with bits suited to your wall type
- A level and tape measure
- Fabric, thread, and a sewing machine or hand-sewing supplies for the skirt
- Curtain wire or tension wire, plus cup hooks, or a thin mounting board for an alternate hanging method
- Bins or organizers sized to the drawers
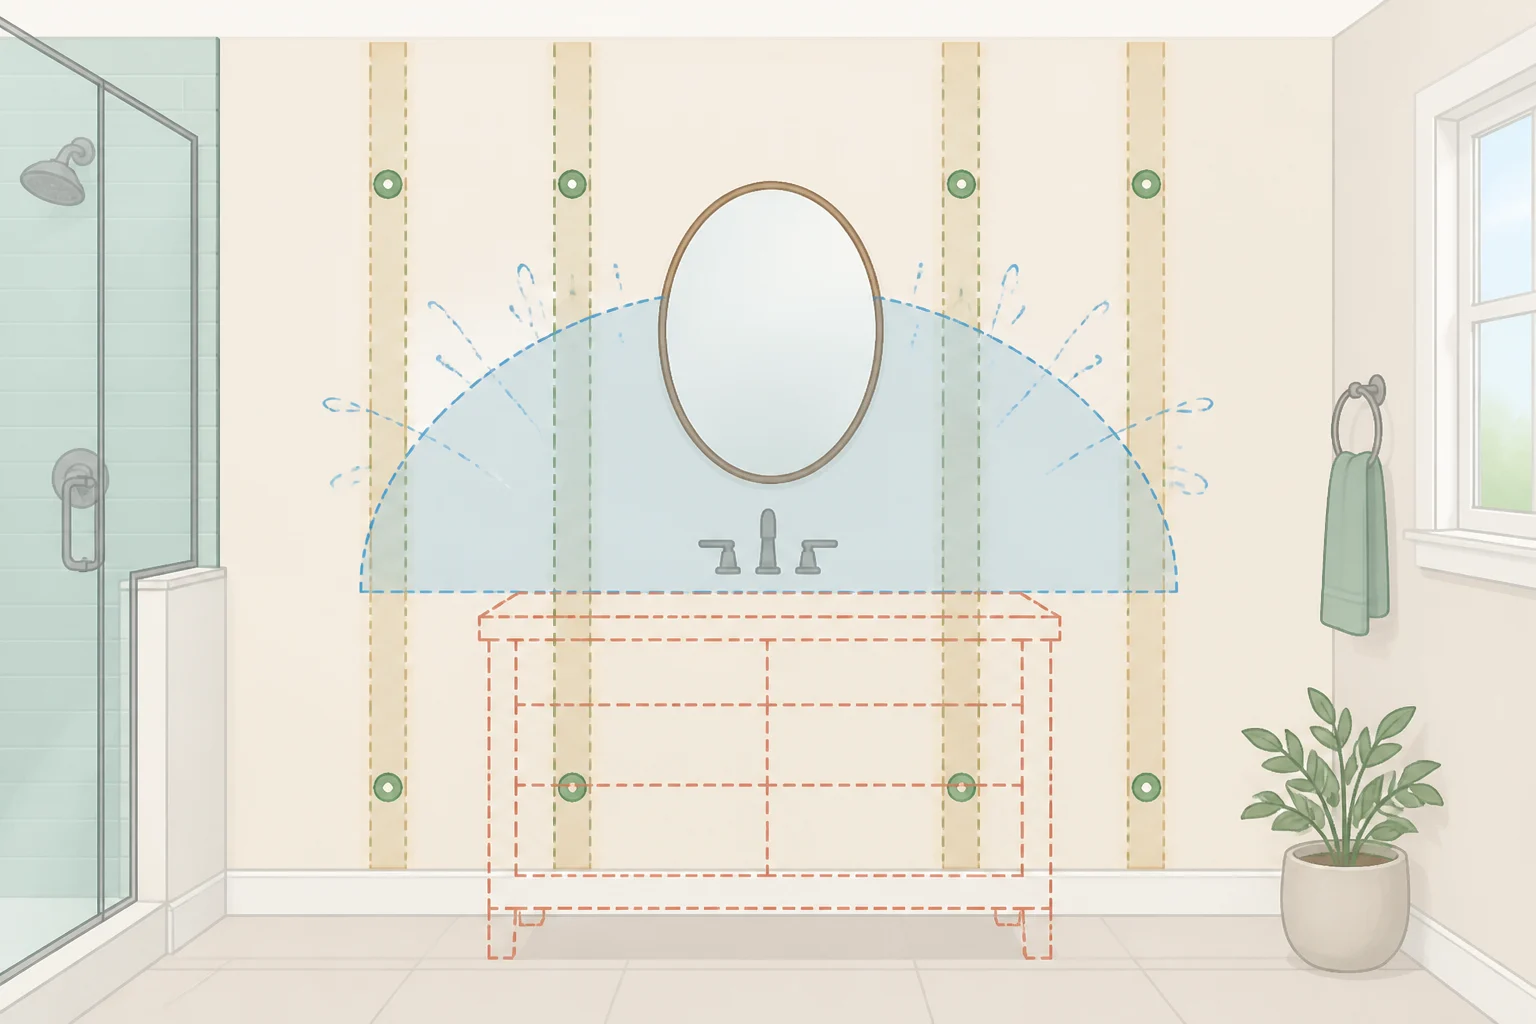
Before you pick up the drill, know where you can and can't put a hole. Avoid drilling near outlets, light switches, or anywhere you suspect a supply line or drain pipe runs behind the wall. A stud finder helps locate framing, but it won't reliably tell you what's buried behind drywall, so if you're not confident about what's back there, stop and have an electrician or plumber check before you commit.
Measure your clear wall space using the dresser's full assembled dimensions, not the shipping box. Check the current listing on IKEA's site for the exact HAUGA configuration you're buying, since dimensions vary by piece and can shift between model years. Don't trust a figure pulled from an old blog post or a different retailer's page.
Identify your splash zone next. The dresser needs to sit outside the direct spray path of a shower or tub, and anything you set on top should stay dry, since a dresser top isn't sealed like a vanity counter.
Check whether your wall can take a real anchor before you commit to a layout. A stud or solid blocking is the most reliable backing, but requirements vary by restraint hardware, so follow the installation instructions packaged with your specific anti-tip kit rather than treating one anchoring method as universal. Confirm the dresser's footprint won't block access to an electrical panel, plumbing cleanout, vent, or shutoff valve, even one you rarely use. If you rent, get your landlord's sign-off before covering any sealed door, vent, or access panel. In an older building, a sealed door can still serve plumbing or ventilation on the other side even if it looks purely decorative.
Assembling and anchoring the dresser is beginner DIY, but only once you've confirmed a solid anchor point. If you can't identify one, don't install this dresser there; see the alternatives further down. The pleated skirt is a step up, intermediate sewing, so practice on scrap fabric first if you've never worked with pleats.
Warshaw's project doesn't list a total cost. Two other IKEA bathroom furniture projects offer rough reference points, though neither matches this dresser-and-skirt setup. One installed IKEA HEMNES vanity ran $388 as a single line item inside an $892 full bathroom renovation (Eliza Morrill Home). A separate customized IKEA vanity project, which involved cutting drawer fronts and a paint kit, totaled $454 (At Home With Ashley). Build your own number instead of borrowing theirs: price the dresser, anti-tip hardware, fabric, thread, hanging hardware, and bins as separate line items, since neither cited project covers all of those pieces.
Install the dresser as drawer storage
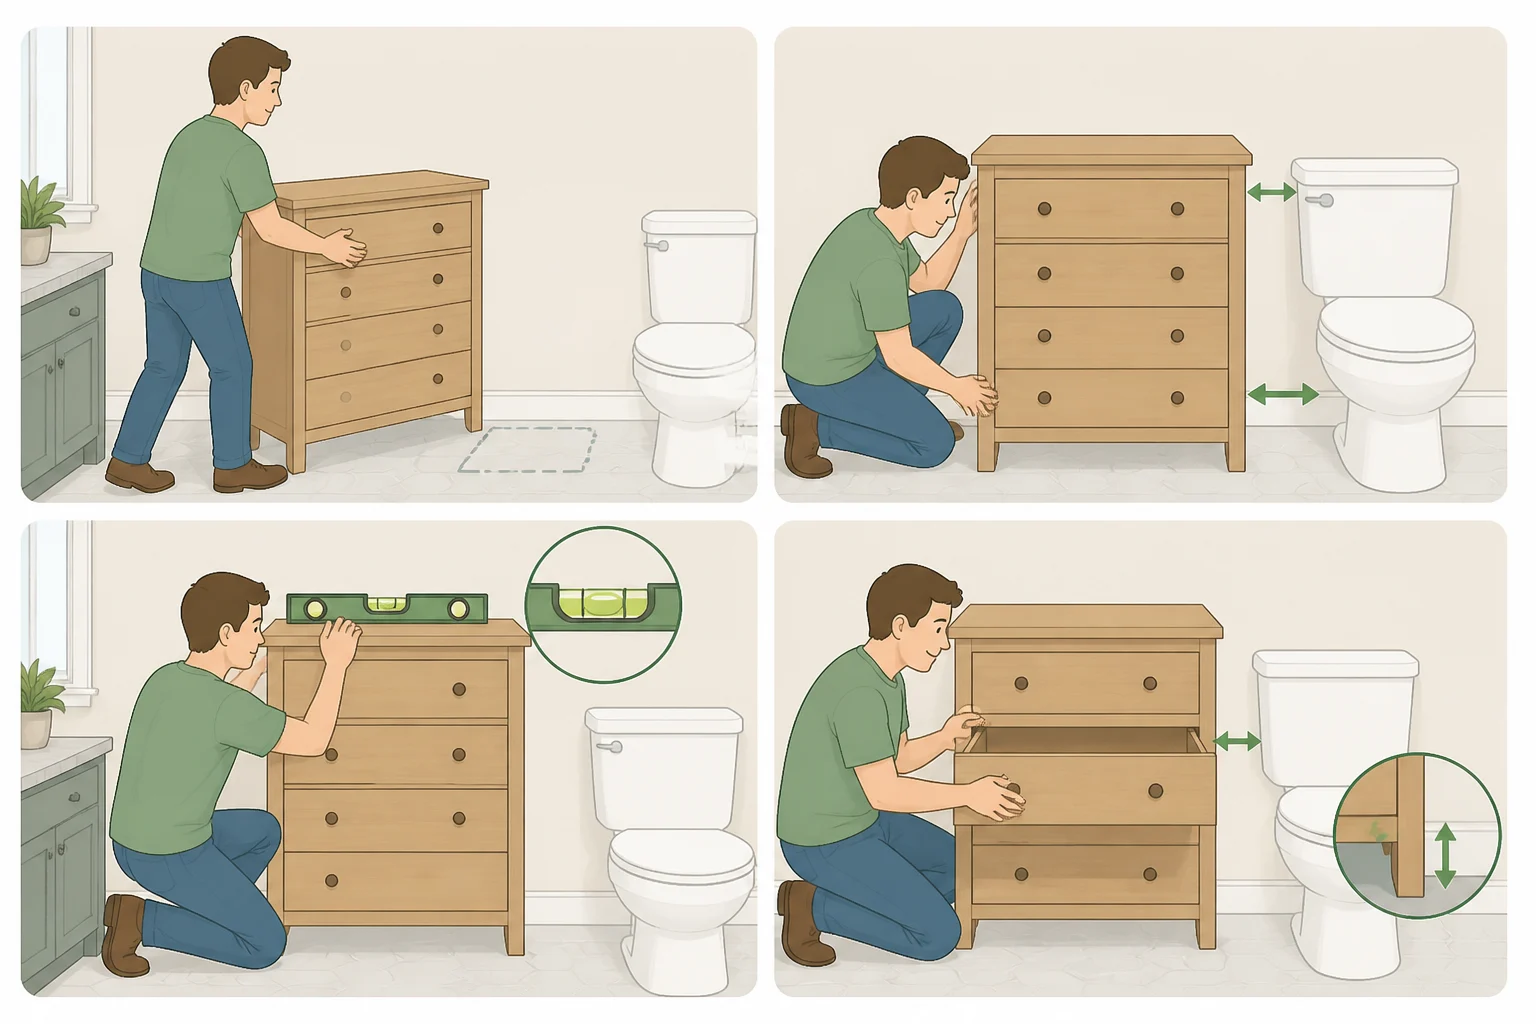
- Assemble the dresser outside the bathroom first if your doorway or hallway is narrow, then carry it in fully built. Trying to build it in a cramped bathroom usually means banging drawer fronts into the toilet or tub.
- Dry-fit it against the wall and open every drawer at once to check clearance against the toilet tank, baseboard trim, or a swinging door. These clash points rarely show up when you've only measured a flat section of wall.
- Using the anchor point you confirmed during planning, install the anti-tip hardware exactly as its instructions describe before you put anything in the drawers. That hardware exists to keep a tall dresser from tipping once it's loaded, so don't skip it to save time.
- Push the dresser flush to the wall, keeping its full footprint outside the sink and tub splash radius you identified earlier.
- Treat the top as a dry landing spot only. Check the specific model's product and care information to see whether the surface and edges are sealed for moisture, and don't assume it behaves like a bathroom vanity top just because it's sitting in a bathroom now.
- Confirm success: every drawer opens and closes freely, the dresser doesn't rock when a drawer is fully extended, and the top and base stay dry during normal bathroom use.
- If the wall won't support a secure anchor, stop here. Don't install an unsecured dresser in the room. See "When this IKEA bathroom storage hack won't work" below.
- If you're renting, remember that anchor hardware leaves screw holes. Get permission before drilling, and plan to patch and touch up paint when the dresser eventually comes out. This is a minimally invasive project, not a hole-free one.
Add a sink skirt for color and concealment
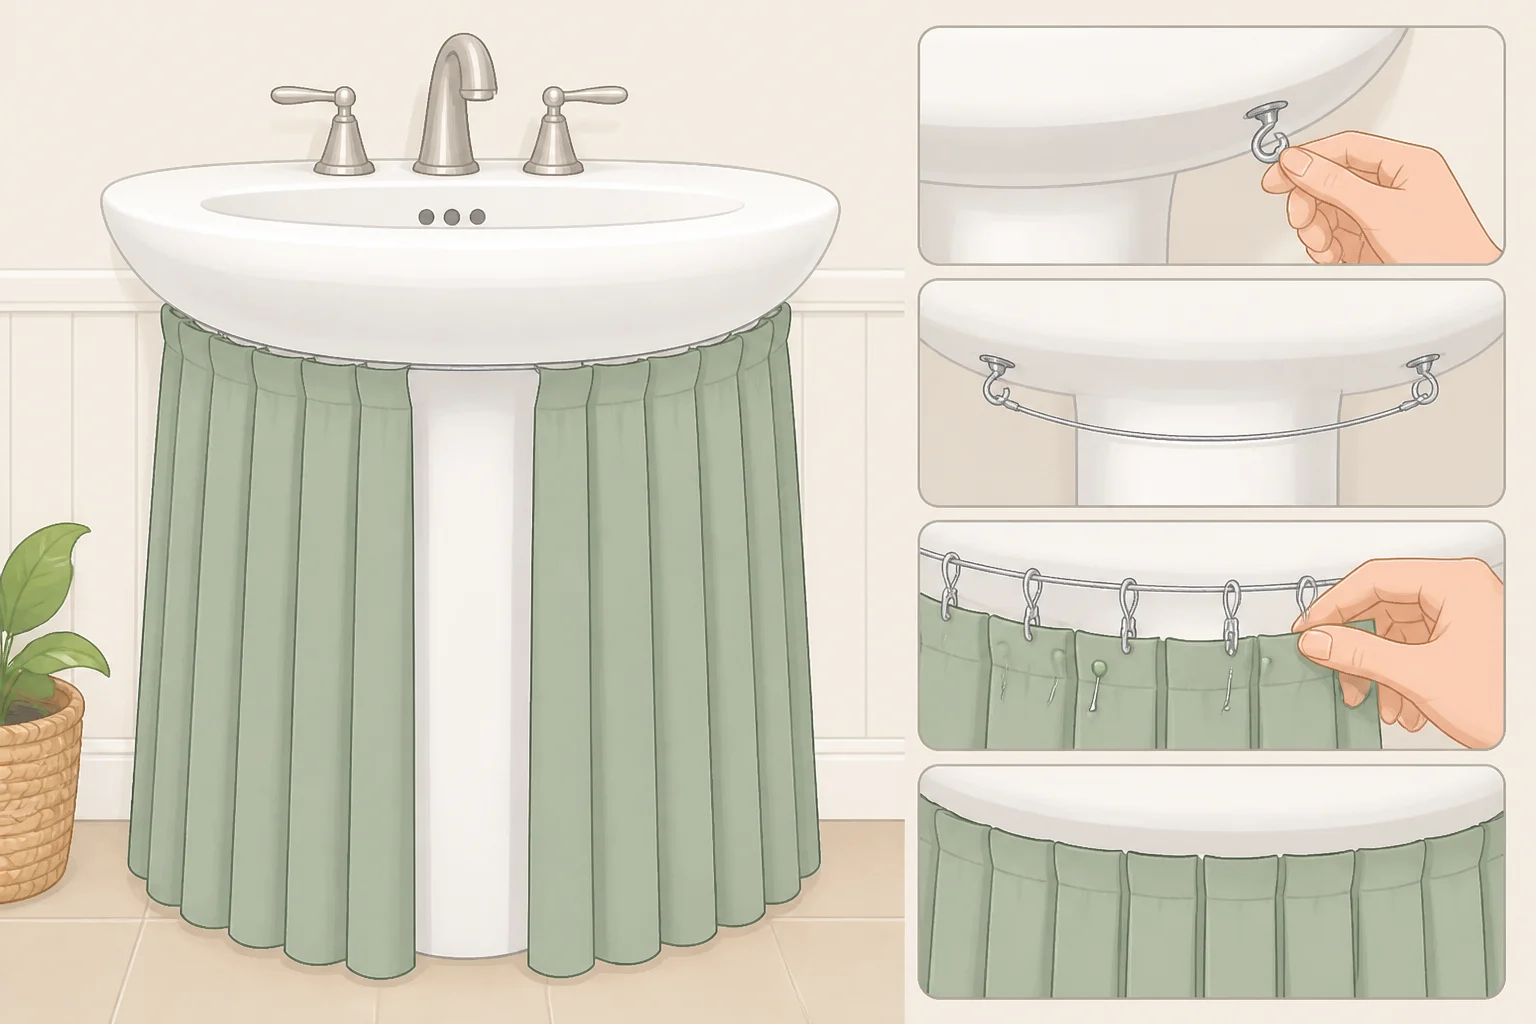
Treat this as a decorative, moderately advanced sewing project inspired by Warshaw's skirt. The source material confirms she used pleated, water-resistant outdoor fabric, but it doesn't document her exact measurements or mounting method, so what follows is one practical starting point, with room to adjust as you go.
- Measure your pedestal's circumference at the basin edge and its height to the floor. Cut an oversized test panel from scrap fabric, pin box or knife pleats along the top edge, and wrap it around the pedestal to check fullness before you touch your good fabric. Pleat fullness is easiest to judge on your own pedestal, not from a fixed formula borrowed off a blog.
- Once you're happy with the test panel, sew the real pleats along the top edge so the fabric hangs with visible fullness instead of lying flat against the pedestal.
- Hem the bottom edge just above your floor's highest point, so it won't drag or stay damp after mopping.
- For a removable mount, one decorative option is running a tension wire or curtain wire through the top hem and hooking it to small cup hooks screwed into the wall behind the pedestal, not into the sink itself. This is a craft solution rather than a tested installation standard, so confirm hook weight ratings against your fabric and check that no supply line or drain pipe sits behind your planned hook placement before drilling.
- Test the mounting before you trust it. Once hung, gently tug the fabric at several points. It should hold its position without the hooks pulling loose or the wire sagging. If it slips, add more hooks spaced closer together, matched to the weight rating printed on the hardware packaging, rather than leaning on fewer, more heavily loaded points.
- Before storing anything underneath, lift the skirt and confirm you can still reach the water shutoff valves without unpinning or cutting fabric.
- Choose fabric with your bathroom's humidity in mind. Warshaw used water-resistant outdoor fabric for her skirt, Apartment Therapy notes. Check the care label before you buy, and follow whatever cleaning method it specifies rather than guessing.
When this IKEA bathroom storage hack won't work
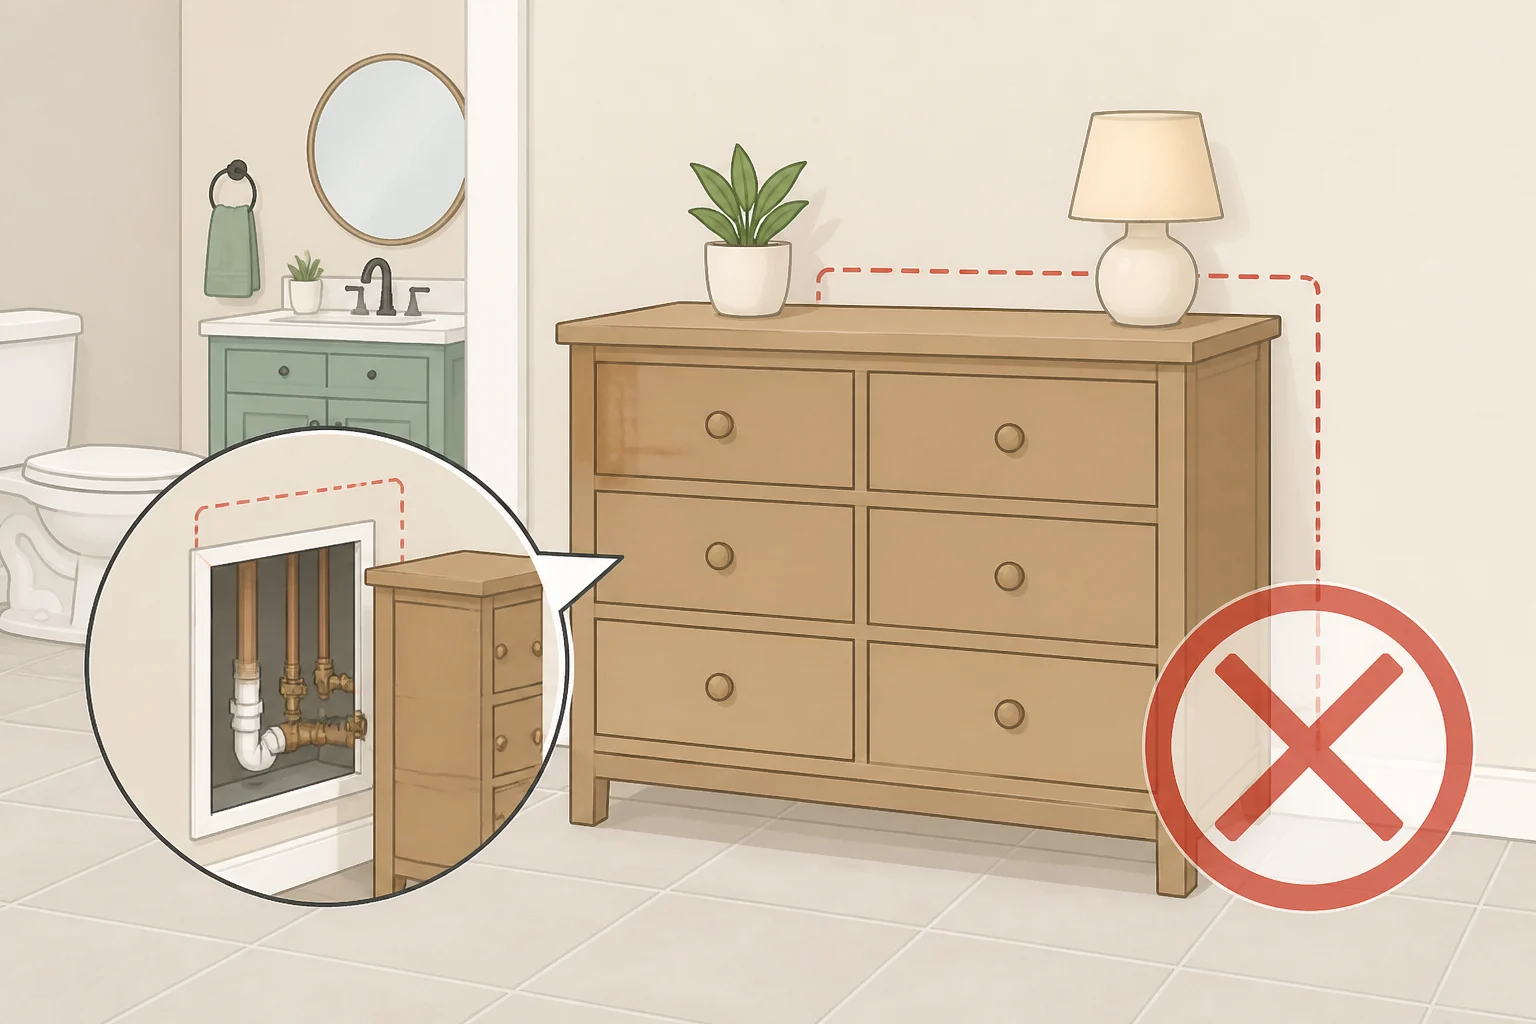
Skip this setup if you can't secure the dresser, can't preserve access to panels and shutoffs, or can't keep the room reasonably dry.
No secure anchor point: if the wall is hollow, tiled over, or you can't confirm solid backing, don't improvise with adhesive strips alone to hold up a tall, loaded dresser. Switch to a narrower wall-mounted bathroom cabinet designed for lighter anchoring, or a slim open shelving unit secured according to its own manufacturer instructions.
The dresser blocks something you need: if sliding it into place covers an electrical panel, plumbing cleanout, vent, or a shutoff valve, shift the layout or downsize to a shallower piece rather than cover access points for a few extra inches of storage.
The room stays consistently damp: the HAUGA is standing in for a vanity here, not built as one. If your bathroom stays damp even with the fan running and the door left open after showers, treat that as a sign to pick furniture built for wet-area use instead of pushing a standard dresser into the room.
Drawers hit the baseboard, toilet tank, or door swing: shift the dresser a few inches, or choose a shallower model before anchoring. Don't force a drawer that catches; stop and adjust the dresser's position instead.
The skirt's cup hooks pull out, or the hem drags on an uneven floor: switch to hardware rated for more weight than the fabric alone, or mount a thin board behind the pedestal with hook-and-loop tape connecting the board to the fabric's top hem. Recheck the hem length against the floor's highest point once the new mount is in place.
Fabric is visibly wicking water or holding a damp smell after a few weeks: re-hem it higher off the floor, or swap to a fully outdoor-rated fabric before reinstalling.
Finish line
Wipe up splashes near the top and base of the dresser right away instead of letting them sit, and keep the bathroom ventilated with a fan or open window after showers. Every few weeks, check the drawer bottoms, edges, and base for swelling, peeling, or soft spots; catching moisture damage early beats replacing a warped drawer later.
For organizing the drawers, one option is to keep everyday items like towels and toiletries up top where they're easy to reach, saving lower drawers for backup supplies, though that's a preference, not a rule. Put leak-prone bottles, like spare liquid soap or cleaning spray, in a small washable bin or tray so a spill doesn't sit directly inside the drawer.
Once the dresser and skirt are functioning as storage, add character with a few lightweight pieces chosen separately rather than fabric-matched to the skirt, the way Warshaw layered in a Mini Rodini textile, a Hay rug, and vintage decor of her own, according to Apartment Therapy. If you're repainting while you're at it, lean toward satin or semigloss over matte or eggshell. This Old House notes these finishes resist humidity better and wipe clean more easily, which matters in a room that sees steam and splashes daily.
Don't overthink matching Warshaw's exact dresser model, fabric print, or decor choices. The reusable part of this project is reclaiming wasted wall space and sink clearance for real storage, then layering in color and texture that fit your own room and budget.
Before calling the project done, run through a final check:
- The dresser is anchored and doesn't rock with a drawer extended.
- Every drawer clears nearby fixtures.
- The top and base show no swelling, peeling, or warping.
- The skirt's hem stays above the floor.
- The shutoff valves are still reachable.
- The skirt's attachment points don't loosen when you tug the fabric.

















Comments
Be the first, drop a comment!