





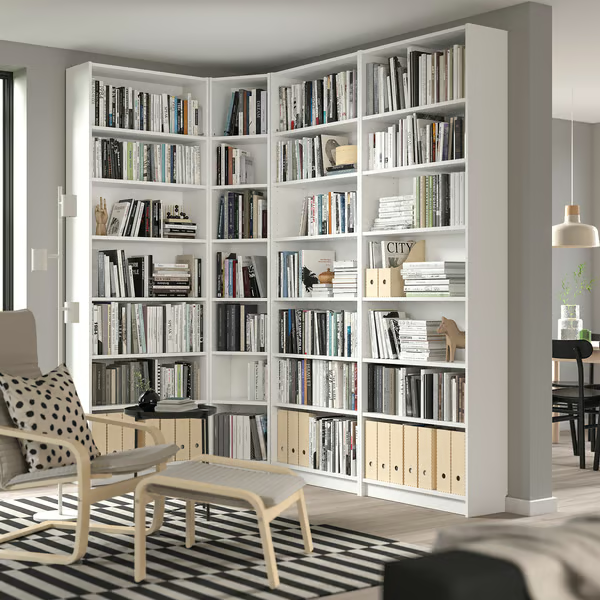
This guide covers planning, building, and finishing an IKEA BILLY office built-in makeover, the kind that reads like custom cabinetry instead of a row of flat-pack bookcases pushed against a wall. Four decisions largely determine whether it works: layout planning, base construction, wall anchoring, and trim work. This guide sticks to the bookcase-and-cabinet wall itself: the shelving, cabinets, base, and trim. It doesn't cover building a matching desk, since a built-in desk is its own carpentry project with different layout math.
Two different projects turn up when researching this online, and they're easy to mix up. One home-office DIYer built a BILLY-and-HAVSTA storage wall for $994.71 in core materials. A separate, roughly $2,000 office refresh covered by Yahoo Home & Garden used stock Lowe's cabinets and custom shelving instead of BILLY units, so it's worth a look for paint and flooring ideas but not for BILLY construction, and it won't come up again in this guide.
BILLY works as a foundation because of its footprint. The BILLY/OXBERG configuration with a height extension and glass or panel doors measures a narrow 30 cm deep, shallow enough to line a wall without eating much floor space. Dimensions and load limits differ among products, though, so confirm the exact spec sheet for whatever SKU is actually stocked near you before planning around any number below.
Treat this as intermediate DIY work measured in weekends, not an afternoon. Taller units are hard to hold plumb solo; having a second person help hold and steady the unit while it's fastened is a practical safety habit worth building into the schedule.
What you'll need
Core materials:
BILLY or BILLY/OXBERG bookcases in the configuration decided on, with dimensions and shelf weight limit confirmed for the exact model sold locally
Wall anchors: screws and plugs matched to the wall material behind the surface, per the model's assembly instructions
A stud finder, a level long enough to span the full run, and a tape measure
A drill/driver, bits, and clamps
Optional, depending on the chosen style:
HAVSTA cabinets or another closed-storage cabinet, only for a bookcase-over-cabinet wall
2x4 lumber and shims, only if adding a raised base
Beadboard panel and MDF sheets, or another filler material, only if closing gaps between units
A circular saw, only if a unit needs trimming for ceiling height or lumber needs cutting for a base
A nail gun, only if attaching trim; a drill/driver with finish screws is a slower substitute
Safety glasses, hearing protection, and a dust mask for any cutting, sanding, or nailing
Caulk, primer, and paint, only for painted trim and filler panels
Scope and budget
One real build offers a useful reference point, without being a guarantee for a different wall. The Barbie's Casita project combined two BILLY bookcases with four HAVSTA cabinets for a total of $994.71 in materials, and what the builder expected to take a few weekends stretched into about two and a half months of weekend work. Unit count, cabinet choice, and the lumber needed for a base or trim will move that number for a different layout, sometimes by a lot. Build slack into any weekend estimate rather than planning around the best case.
Choose your BILLY built-in style before you shop
Real BILLY builds tend to fall into two rough categories, plus a base-and-trim variation worth planning for. Treat this as a planning framework, not an industry standard, and pick a direction before ordering anything.
A straightforward BILLY wall of shallow bookcases, left freestanding, which suits a room where every inch of floor space matters.
BILLY units raised on a built base, with trim added along the top and bottom edges, for a finished cabinetry look instead of a bare wall of shelving.
BILLY paired with base cabinets, HAVSTA in the Barbie's Casita build, for a taller mixed-storage wall combining open shelving with closed cabinet space.
Match the style to the room. A freestanding BILLY wall suits tight rooms where floor space is the priority. A raised base with trim suits rooms where a finished, built-in look matters more than squeezing out every inch of height. BILLY over cabinets suits rooms with wall space to spare and a need for closed storage plus a work surface.
The base-and-trim and cabinet-plus-bookcase styles both add real carpentry beyond assembling the IKEA piece itself: box building, trim fabrication, and panel infill. Factor that extra labor and cost in before committing to a style, not after the units are already home from the store.
Plan your IKEA BILLY office built-in makeover before you buy
Record wall width, ceiling height, baseboard depth, and the location of any window, door, or outlet before ordering a single unit. The BILLY/OXBERG configuration on IKEA's Philippines listing measures roughly 40 cm wide, 30 cm deep, and 237 cm tall with a height-extension option, but check the specs sheet for whatever unit the local store actually carries before treating those figures as fixed.
Add up the width of each unit planned, plus any filler panels or beadboard strips going between them, and compare that total against the measured wall width. Measure the wall width at floor level, mid-height, and near the ceiling rather than in one spot; older walls often aren't perfectly square, and catching a difference between those three measurements before ordering means filler strips can be sized for the actual opening instead of an assumed one.
Ceiling clearance takes more math if a base is part of the plan. IKEA's guidance for this bookcase states there must be enough space between the top of the unit and the ceiling to anchor it to the wall. That clearance has to survive the whole stack: measure floor to ceiling, subtract the unit's height, and whatever base height gets added comes out of what's left for anchoring room at the top. If the remaining gap looks tight, that's the point to shrink the base, not the point to skip the anchor clearance.
If the math still comes up short, treat that as a signal to change the plan, not a reason to reach for a saw. One builder trimmed about 2.5 inches off a BILLY bookcase with a circular saw when it ran too tall for the ceiling, and noted that choosing the shorter BILLY bookcase avoids the cut altogether, according to Barbie's Casita. Neither the cutting method nor the shorter-unit swap is IKEA's own instruction; it's one builder's workaround for one wall. If a wall forces the question, reconsider the unit size or the layout before buying.
For a sense of the precision this requires, the Barbie's Casita build started from a 131¼-inch-wide by 112-inch-high wall with roughly 14 inches of usable depth next to a window, before the builder selected two BILLY bookcases and four HAVSTA cabinets. Use that as an example of the level of detail needed, not a template for a different wall.
Before you drill: check the wall
Follow the assembly and anchoring instructions that ship with the exact BILLY or BILLY/OXBERG model purchased. This article does not prescribe fastener types or a fastening sequence; that's the manufacturer's job. If the wall material can't be identified or there's no solid fixing point behind the surface, stop and get qualified help.
Locate studs and identify what's behind the surface — drywall, plaster, or paneling over drywall — before drilling anything. IKEA's warning for this bookcase is direct: it's a tipping hazard that must be anchored with screws and plugs suited to the actual wall, and the company recommends professional advice if the wall material is unclear.
Build the base and position the units
A raised base is optional and only applies to the base-and-trim or cabinet-plus-bookcase styles. IKEA's printed instructions cover assembling and anchoring the bookcase itself, not building a base underneath it, so this section covers the planning math, not a validated fastening method. Confirm base construction and load-bearing details against a trade carpentry source or a professional before cutting lumber.
If building one:
Calculate the maximum base height using the ceiling-clearance math from the planning step above.
Check the floor for level across the full width the base will span, not just at one end. If the floor is uneven, the base needs to be leveled before any bookcase sits on it.
Confirm the final clearance one more time once the base is in place, since that's the number that changes once lumber goes down.
Wear eye and hearing protection when using a circular saw or nail gun, and follow the tool manufacturer's operating instructions.
Once the base is set, put each unit in place and hold it plumb before joining it to its neighbor, following the manufacturer's assembly steps for the exact model purchased. Anchor each unit to the wall before adding trim or filler panels, since the mounting points on the back are easiest to reach before anything covers them; use the screws and plugs IKEA specifies for the wall material identified earlier. The printed instructions govern the anchoring method and hardware for the SKU purchased, and this guide isn't a substitute for them.
Plan shelf loads by weight once the units are up. The BILLY/OXBERG configuration on IKEA's listing rates each shelf for a maximum of 14 kg, about 31 pounds. Save top shelves for lighter items and put binders, printers, or heavier equipment lower, on cabinet shelving if the build includes it.
How to customize IKEA BILLY bookcases with filler panels and trim
Closing the visible gaps between units and against the wall is what turns separate bookcases into one structure. The Barbie's Casita build used a beadboard panel between bookcases for texture and MDF sheets to frame out the top and sides; that's what that builder used, not the only combination that works, and any substitute material needs its own finishing plan to match.
Add base and cap trim last, once the unit is anchored. Elevating bookcases on a built 2x4 base and running trim along the top and bottom edges is what turns a plain flat-pack silhouette into something that reads as built-in cabinetry.
Decide on doors before finalizing trim placement. IKEA describes the panel doors as a way to hide contents and the glass doors as a way to display them. Choosing the door configuration first means the surrounding trim can be sized around the doors actually installed, instead of adjusting trim afterward to fit a change.
Hold off on caulk and paint until the unit is anchored and confirmed plumb. Sealing the seams too early can hide a unit that isn't sitting flush against the wall, which makes an alignment problem harder to catch before the finish coat locks it in.
Troubleshooting the fit
Wall isn't square. If the three width measurements from the planning step don't match, size filler strips for the widest gap and trim them down at install rather than cutting to one number and hoping it fits everywhere.
Floor isn't level. Shim the base until it reads level across the full run before setting any bookcase on top of it. A base that's level at one end and off at the other will telegraph into every door and drawer above it.
Not enough clearance at the top. If adding a base eats into the anchor gap IKEA calls for between the unit and the ceiling, that's a stop point. Shrink the base, drop the raised-base idea, or choose a shorter unit rather than anchoring with less room than the instructions call for.
Unfamiliar wall material or inconsistent studs. IKEA's own instructions raise this as a real limit, not just a caution: get professional advice before guessing at anchoring into something that can't be identified.
Common mistakes to avoid
Skipping research before cutting or anchoring. One couple building a different kind of office storage wall said they watched around 100 how-to videos before tackling parts of their renovation. That was their own prep process, not a universal requirement, but checking the product instructions and making a cut plan before touching a saw beats improvising once the wall is already open.
Treating one project's total as a universal number. A cost or timeline tied to a specific unit count and configuration, like the Barbie's Casita figures above, will shift for a different wall. Unit count, cabinet choice, and how much base or trim carpentry gets added are the variables that move it.
Folding in room-level changes as if they're part of the same project. Repainting the walls or swapping out old flooring, like the carpet-to-stenciled-floor switch in the Yahoo Home & Garden office refresh, are worthwhile add-ons seen in real office projects. They're a separate scope from the BILLY structure itself, though, and shouldn't get budgeted or scheduled into the same timeline as the built-in.
Finishing up
Before calling the project done, walk the wall and confirm a few things. Check that the printed assembly and anchoring instructions for the exact model purchased were followed rather than improvised. Confirm each unit is level and plumb, that anchoring is complete at every mounting point, and that trim covers the seams meant to be hidden. Open and close every door to make sure nothing catches on the frame.
Load shelves gradually from the bottom up, staying within the 14 kg per-shelf limit, and pay attention to how the wall connection feels as weight goes on. If a shelf ever feels loose at the anchor point, stop adding weight and follow the product instructions to re-anchor it, or call a qualified installer rather than trying to fix it with more trim or caulk.




















Comments
Be the first, drop a comment!