



How to Turn an IKEA MILSBO or RUDSTA Into a Greenhouse Cabinet
Many tropical houseplants struggle indoors when low humidity, weak light, drafts, or inconsistent watering stack up. An IKEA greenhouse cabinet can help by creating a more stable microclimate for humidity-loving plants, especially when it combines good airflow, measured humidity, and the right grow lights.
This guide walks through a practical IKEA greenhouse cabinet build for tropical houseplants, including aroids, ferns, begonias, calatheas, anthuriums, and similar plants. Cacti and most succulents are poor fits for this setup because they generally need drier, fast-draining conditions and are more likely to rot if the soil stays wet.
This is not a true greenhouse. It is a display cabinet modified to hold humidity, light, and airflow more consistently than an open shelf. The goal is not to seal plants into stagnant air; it is to create a tidy, controlled plant cabinet that stays humid without turning damp.
What you need before starting
Required:
IKEA MILSBO Tall or RUDSTA Wide cabinet
Thin foam weatherstripping or silicone D-profile seal
Aquarium-safe clear silicone sealant or another waterproof sealant labeled for wet environments
Rust-prevention spray or sealant for exposed metal edges and drilled holes
Rubber grommets for cable holes
Small circulation fans rated for continuous indoor use
Horticultural LED grow lights with published coverage or PPFD information
Thermometer/hygrometer
Timer or controller for lights and fans
Cable clips or magnetic mounts, depending on cabinet type
Microfiber cloths for cleaning glass and shelves
Optional upgrades:
Acrylic shelves with cutouts
Ventilated wire shelving
Reflective film for side panels
Wi-Fi thermometer/hygrometer
Smart plug for light scheduling
Expect the project to take an afternoon, especially if you are sealing gaps, routing cords, or swapping shelves. Run the cabinet for at least 24 to 48 hours before adding plants so you can check temperature, humidity, condensation, and fan placement.
Safety first: Anchor the cabinet to the wall before loading it with plants, lights, or wet pots, and follow IKEA's assembly instructions. Do not drill glass panels. If you drill metal for cable routing, wear eye protection, smooth sharp edges, protect exposed metal from rust, and keep plugs, power strips, and smart plugs outside the cabinet. Use indoor-rated lights and fans, create drip loops in cords, and keep water away from outlets and electrical connections. IKEA also advises choosing the right hardware for your wall type when you anchor furniture at home.
Step 1: Choose your IKEA cabinet
The cabinet you start with determines how much space you have, how easy the setup is to access, and how much planning the airflow needs.
MILSBO Tall is the better choice for larger plant collections, vertical displays, and climbing plants on moss poles. IKEA's MILSBO product details list the cabinet at 28 3/4 inches wide, 16 1/2 inches deep, and 68 7/8 inches high, with adjustable glass shelves, a top cable outlet for lighting, and an 11-pound maximum load per shelf. That shelf limit matters once pots, wet soil, and ceramic planters start adding weight.
MILSBO's tall, narrow shape makes it easier to create vertical airflow from bottom to top. It also works well for magnetic light and fan mounts where the metal frame allows them, which is useful while you are testing the best placement.
RUDSTA Wide is better for smaller collections, lower-profile displays, and setups where you want easier access to every shelf. IKEA's RUDSTA product details list the cabinet at 31 1/2 inches wide, 14 5/8 inches deep, and 47 1/4 inches high. Its metal back panel can hold magnets, which makes it easier to mount lights, fans, and cable clips without drilling.
Choose MILSBO Tall if you have a larger plant collection, vertical plants, or moss poles; its height makes it better for climbing aroids, but the shelves have an 11-pound load limit and the taller cabinet must be anchored securely. Choose RUDSTA Wide if you want a smaller, lower-profile display with easier shelf access and a metal back panel that works well with magnetic mounts; just plan fan placement carefully, because wider shelves can create stagnant air pockets when plants are crowded.
Product names, dimensions, prices, and availability can vary by country, so check your local IKEA listing before buying parts or cutting shelves.
Other IKEA cabinets can work for propagation projects, but MILSBO and RUDSTA are the clearest options for this guide because they already have glass doors and display-friendly frames.
Step 2: Seal and protect the cabinet
MILSBO and RUDSTA are display cabinets, not waterproof greenhouse equipment. Before loading the cabinet with plants, protect metal edges, seams, and any drilled holes from moisture.
If you are drilling a cable hole, choose a metal panel, not glass. Drill a clean opening, insert a rubber grommet, and seal exposed metal so the cord does not rub against a sharp edge. Keep electrical connections outside the cabinet, not tucked behind pots or near condensation.
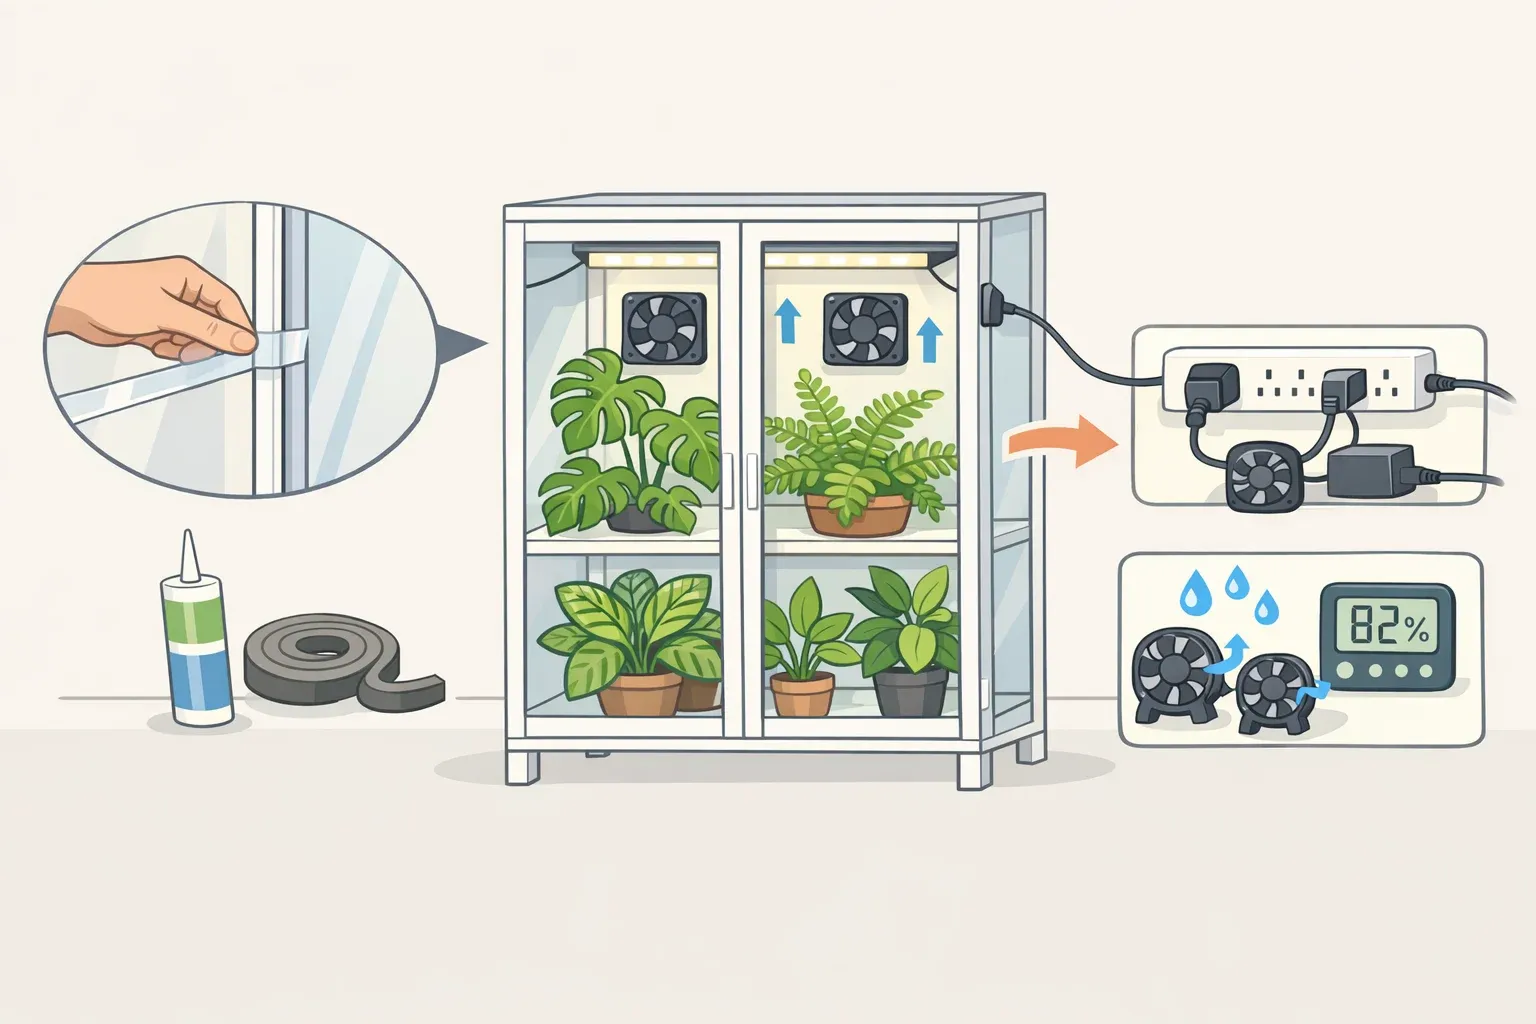
Apply thin foam weatherstripping or silicone D-profile seal to obvious door gaps. Avoid tape so thick that it keeps the doors from closing cleanly or stresses the hinges, glass, or lock. You want the cabinet to hold humidity more steadily, not become airtight.
After assembly, run a small bead of aquarium-safe silicone or another waterproof sealant labeled for wet environments along the bottom interior seams where condensation or watering runoff could collect. Let the sealant cure fully before adding plants.
A sealed, well-stocked cabinet may hold higher humidity through plant transpiration alone, so measure conditions before adding a humidifier. The University of Georgia Extension notes that indoor plant growth depends on several plant care factors, including light, temperature, humidity, water, nutrition, and soil. Humidity helps some tropical plants, but it does not make up for poor lighting, wet soil, or stagnant air.
Step 3: Add airflow before plants
Airflow is the step that determines whether a cabinet feels like a plant display or a damp box.
Still, humid air raises the risk of mold, rot, and slow-drying foliage. A fully sealed cabinet with lights and no airflow is the setup to avoid. Fans do not need to blast the plants, but air should move gently through the cabinet whenever humidity is elevated.
Mount one small fan near the top and angle it downward. Mount a second fan near the bottom and angle it upward. This creates a loop that moves air across the glass and leaves, helping reduce condensation and stagnant pockets.
For most beginner builds, simple low-speed circulation works better than complicated settings. A fixed timer can let humidity climb too high when fans are off, so monitor readings and adjust fan timing or speed as needed. If the cabinet fogs up overnight or leaves stay wet for hours, increase airflow before changing anything else.
Do not add a humidifier by default. In a small sealed cabinet, a humidifier can push humidity too high and may leave mineral residue if it is not cleaned or filled with appropriate water. Start with plants, sealed doors, a hygrometer, and fans. Add humidity only if readings show the cabinet is consistently too dry for the plants inside.
Step 4: Choose shelves and grow lights
Shelving and lighting work together. Shelves affect airflow, and lights affect both plant growth and cabinet temperature.
IKEA notes that MILSBO's glass shelves allow light to spread through the cabinet. In a plant setup, those same shelves can restrict vertical airflow, especially when the cabinet is crowded. If you keep the stock glass shelves, leave open space around the edges and avoid packing every shelf wall to wall.
For better airflow, consider acrylic shelves with cutouts or ventilated wire shelving. This is one of the most useful upgrades if plants are packed across several levels. It helps air move between shelves and keeps leaves from sitting in still, damp pockets.
Choose horticultural LED grow lights with published coverage or PPFD information, and check cabinet temperature after installation. Use PPFD ranges as starting points, not fixed rules: lower-light plants generally need less intensity than hoyas, orchids, or variegated aroids. Plant response matters more than chasing a perfect number. If leaves bleach, curl, or crisp near the light, move the plant lower or reduce intensity. If plants stretch, lean, or lose color, they may need more light.
Avoid incandescent bulbs in a small cabinet because they run hot and are inefficient for this use. LED grow lights are the better choice, but even LEDs can warm a small enclosed space. Check the temperature at plant height, not only near the top of the cabinet.
Run lights on a timer and give plants a dark period. A common starting point is 12 to 16 hours of light per day, adjusted by plant type, distance from the light, and room conditions. In winter, check plant response and move lights slightly closer only if plants begin stretching or losing color.
Step 5: Test before adding plants
Run the cabinet empty for 24 to 48 hours before adding plants. This makes problems easier to fix before the shelves are crowded.
During the test, check that:
Lights turn on and off correctly
Fans move air through the whole cabinet
Humidity does not spike and stay too high
Temperature stays safe at plant height
No condensation pools at the bottom
Cords stay dry and away from water
Place the thermometer/hygrometer at plant height, not at the very top of the cabinet. Conditions can differ from shelf to shelf, especially in taller builds. If fogging persists on the glass, increase airflow, open a small gap, or reduce humidity before adding more plants.
For most humidity-loving tropical plants, aim for steady, moderate humidity rather than the highest number possible. Avoid keeping the cabinet above 85% humidity for long stretches, especially with seedlings or freshly watered plants, because constantly wet conditions raise disease risk.
Step 6: Stock the cabinet carefully
Choose plants with similar care needs. A cabinet works best when the plants inside want roughly the same humidity, light, and watering routine.
Good candidates include:
Anthuriums
Many philodendrons
Alocasias
Ferns
Begonias
Calatheas
Hoyas that like brighter light and steady conditions
Orchids suited to indoor growing
Propagation boxes and cuttings
Poor candidates include:
Most cacti
Most succulents
Plants that need very dry soil between waterings
Pest-infested plants
Plants that need much stronger light than your cabinet provides
Place higher-light, heat-tolerant plants closer to the lights. Put plants that prefer cooler, dimmer conditions lower in the cabinet. Keep leaves away from the glass when possible, especially if condensation forms there.
Do not overcrowd the cabinet. Leave space between plants so leaves are not pressed against glass or blocking fan airflow. Overcrowding reduces light, slows drying, and makes pest checks harder.
Water at soil level when possible, and avoid routinely soaking foliage inside a humid cabinet. Wet leaves dry more slowly in enclosed spaces, which can increase disease pressure. Remove standing water from saucers and wipe up spills quickly.
Maintenance and troubleshooting
A greenhouse cabinet is not a set-it-and-forget-it project. The first two weeks are the most useful testing period.
A working setup should have:
Stable humidity readings
Gentle air movement
No persistent condensation
Leaves that dry within a few hours after watering
No soft stems, moldy soil, or sour smells
No heat spikes when lights are on
Clean glass, acrylic, and shelves regularly with a soft cloth. Use water or a mild cleaner that is safe for the surface you are cleaning, and avoid harsh products on acrylic that can scratch or cloud it. Mineral deposits can reduce light and make the cabinet harder to clean, so wipe spills and condensation before residue builds up.
Check fans for dust, inspect cords for damage, and make sure adhesive mounts or magnets are still secure. Replace weatherstripping if it compresses or peels away. Replace acrylic shelves or panels if they yellow, warp, crack, or become hard to clean.
If glass fogs or condensation pools: Increase airflow, open a small gap, or reduce the number of plants until readings stabilize.
If a plant develops soft rot: Move it out of the cabinet, check the roots and soil, and improve airflow around neighboring plants before lowering humidity across the entire setup.
If leaves crisp near the top: Check light distance and cabinet temperature. Move sensitive plants lower or reduce light intensity.
If plants stretch or lean: Move them closer to the grow lights, increase light duration within a normal day-night cycle, or choose a stronger fixture.
If rust appears at seams or drilled holes: Remove plants from the area, dry the cabinet, treat the exposed metal, and reseal before moisture spreads.
With regular monitoring and maintenance, a cabinet setup can work long term, but it is still a modified display cabinet, not a plug-and-play greenhouse. Build it around the basics: a safe anchored cabinet, gentle airflow, measured humidity, suitable lighting, and plants that actually want the same conditions.



















Comments
Be the first, drop a comment!