



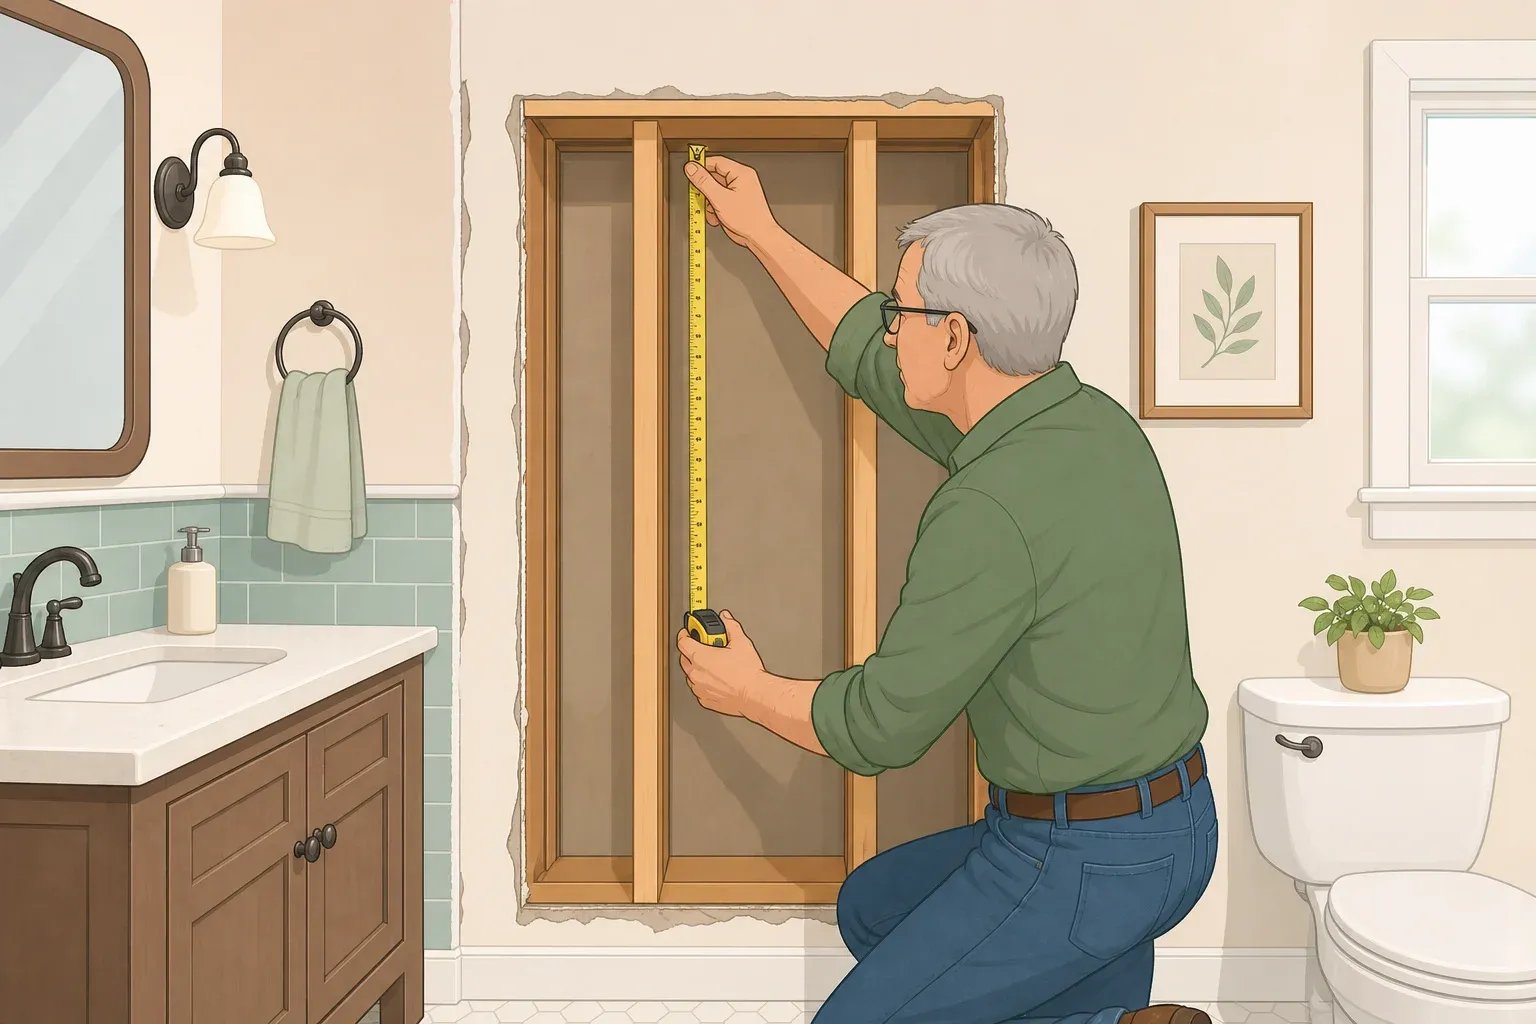
A cramped bathroom with no floor space for another cabinet can still gain useful storage. One option is to build a shallow shelf or cabinet into an existing wall cavity rather than adding furniture that projects into the room.
The catch is that the wall has to cooperate. Older bathrooms can hide plumbing vents, wiring, blocking, insulation, unusual framing, or previous renovations, so the first step is finding out what is actually inside the wall before planning the storage around assumed stud dimensions.
If a wall uses nominal 2x4 studs spaced 16 inches on center, the clear space between studs is typically about 14½ inches wide and the framing itself is 3½ inches deep. That gives you a useful starting point for a slim recessed shelf, but not a guaranteed finished cabinet size.
The project is reasonable for an experienced DIYer only when the chosen bay is a straightforward, nonbearing interior wall with no plumbing, wiring, ductwork, or other obstruction in the way.
Check the wall before planning the cabinet
Do not buy lumber or a recessed cabinet based only on a stud finder reading.
Start by identifying the two studs that would border the opening and scan the area for:
Electrical wiring
Plumbing
Pipes or vents
Metal plates
Ductwork
Unexpected framing
The space above a toilet can look ideal for recessed storage but may contain a plumbing vent. Exterior walls are also poor candidates in many homes because the cavity may contain insulation, air-control layers, or other parts of the building envelope.
Older houses can be even less predictable.
They may use different stud spacing, plaster and lath, metal framing, diagonal bracing, previous patches, or utilities routed in ways that would not be obvious from the finished wall.
A detector can help narrow down the possibilities, but it does not prove that a cavity is empty.
Make a small inspection opening first
Once a bay appears clear, make a small exploratory opening through the wall finish only rather than cutting the full cabinet opening immediately.
Keep the cut shallow and centered well away from the studs.
Use a flashlight and, if available, an inspection camera to look for:
Wiring
Water or drain lines
Vent pipes
Ducts
Insulation
Blocking
Bracing
Metal protection plates
If anything unexpected appears, stop.
Do not move plumbing or electrical wiring simply to make a recessed shelf fit. Choose another bay or have the appropriate licensed professional assess the wall.
A metal plate attached to a stud is also a stop sign. Those plates are commonly installed to protect pipes or wiring from screws and nails.
Do not drill through one.
Don't assume horizontal blocking can be removed
A horizontal piece of lumber crossing the cavity needs to be identified before you alter it.
It might be ordinary backing installed for a previous fixture, but it can also serve another purpose, including fireblocking or structural support.
The current International Residential Code includes requirements for fireblocking in wall assemblies and limits how studs in bearing and nonbearing walls may be cut, bored, or notched.
Local codes can differ, and older homes may have been built under entirely different rules.
If the proposed niche requires cutting a stud, header, brace, or unexplained blocking, stop treating it as a simple between-stud storage project.
Have the wall assessed before changing the framing.
Decide whether the wall is a good candidate
The simplest location has:
Two intact studs on either side
No plumbing or wiring through the proposed opening
No ductwork
No insulation that needs to remain in place
No unexplained blocking or bracing
A dry location outside a shower or tub surround
Enough depth for the items you actually want to store
If those conditions are not present, moving the niche to another wall bay is usually easier than redesigning the wall around the obstruction.
Tools and materials for a dry recessed shelf
For a straightforward dry-area installation, you may need:
Stud finder
Wire and pipe detector
Flashlight or inspection camera
Drywall saw or oscillating multi-tool
Level
Tape measure
Moisture-tolerant plywood or suitable solid wood
Wood screws
Wood glue
Trim or a face frame
Drywall patch materials
Paintable caulk
Primer and bathroom-appropriate paint or finish
Avoid ordinary unsealed MDF for a bathroom built-in.
Bathroom humidity can reach surfaces well outside the shower itself, and exposed edges on moisture-sensitive sheet goods can swell over time.
Plywood or appropriately finished solid wood is generally more forgiving for a shallow dry-area cabinet. Seal the exposed faces and cut edges according to the finish manufacturer's instructions before installation.
Build only after measuring the actual cavity
Once the inspection confirms the bay is usable, measure the real opening.
Record:
Width between the studs
Available cavity depth
Desired cabinet height
Location of any obstruction that is staying in place
Thickness of the surrounding wall finish
Do not build the box to a theoretical 14½-inch width and assume it will fit.
Studs can twist, bow, or sit slightly out of position, particularly in an older wall.
Measure at several heights and use the narrowest relevant dimension when sizing the cabinet.
Building the between-stud bathroom shelf
The simplest version is an open recessed shelf.
A cabinet door can be added later, but the hinges, reveal, face frame, and door thickness need to be planned around the finished opening rather than treated as an afterthought.
1. Mark the final opening
Use a level to mark the opening within the confirmed clear bay.
Keep the existing studs intact.
Do not notch, cut, or remove them to make the cabinet wider.
If the storage design only works by changing the framing, the project has moved beyond the simple build covered here.
2. Cut the wall finish carefully
Expand the exploratory opening along the marked lines.
Control the cutting depth so the blade does not plunge deep into the cavity.
Stop immediately if anything appears that was not visible during the first inspection.
3. Measure again
Once the wall is open, measure the cavity again before constructing the box.
This is the measurement that matters.
Check that the studs are reasonably plumb and that the back surface is clear.
Do not drive screws into the drywall on the opposite side of the wall.
4. Build the liner box
Build a shallow plywood box to fit the actual opening.
The box can include:
Two side panels
A top
A bottom
A back panel
Fixed or adjustable shelves
Check it for square before finishing it.
If both diagonal measurements match, the box is square.
Sand the surfaces and apply the chosen sealed finish before installation where practical.
5. Fasten the box to known framing
Secure the cabinet through its side panels into the studs bordering the opening.
Use fasteners appropriate for the materials and cabinet design.
Do not rely on drywall alone to support the box.
If a commercial recessed cabinet is being installed instead, follow its fastening instructions rather than substituting a generic screw pattern.
6. Add the shelves
Space shelves around what will actually be stored.
A shallow cavity works well for items such as:
Toilet paper
Rolled washcloths
Small toiletries
Grooming products
Lightweight bathroom supplies
Avoid concentrating heavy objects on shallow shelves unless the cabinet and fastening method were specifically designed for that load.
Also reconsider storing medication there.
The FDA warns that a damp bathroom cabinet can reduce the effectiveness of some medicines. Most medications are better kept in a cool, dry place unless their labeling says otherwise.
7. Finish the opening
A face frame or trim can cover the cut drywall edge and give the installation a built-in appearance.
Fit the trim before reaching for caulk.
Large gaps should be corrected with fitting or shimming rather than filled with an oversized bead of caulk.
Patch damaged drywall as needed, then prime, paint, and allow every coating and sealant to cure according to its product instructions before loading the shelves.
A shower niche is a different project
Everything above assumes the cabinet sits in a dry bathroom wall outside the shower or tub surround.
A recessed shelf inside a shower is not the same project.
The niche becomes part of the waterproof wall assembly, and every seam, corner, penetration, and transition has to remain watertight.
A manufacturer such as Schluter requires its prefabricated shower niches to be supported by wall framing and integrated with the surrounding waterproofing membrane.
The connection between the niche and wall is then sealed as part of the complete waterproofing system.
That is substantially different from lining an ordinary wall cavity with plywood.
Don't treat cement board alone as waterproofing
A wet-area niche needs more than a moisture-tolerant backer.
Depending on the chosen system, the assembly may use:
A sheet waterproofing membrane
A liquid-applied waterproofing system
A waterproof foam backer system
A prefabricated waterproof niche
Follow one compatible manufacturer's complete installation system rather than mixing unrelated products and assuming the seams will remain watertight.
Prefabricated niches can simplify the work, but they still need to be installed, supported, and sealed exactly as their manufacturer specifies.
For example, Schluter requires the transition between its KERDI-BOARD-SN niche and surrounding wall to be sealed with the specified membrane system.
Retrofitting a shower niche is more involved
Adding a niche after a tiled shower is finished typically means opening the existing wall assembly and then restoring the waterproofing correctly.
That can involve removing tile, backer, and membrane around the opening.
The finished niche also needs details that do not matter for a dry shelf, including waterproof corners and a surface that prevents water from pooling.
Schluter's own guidance notes that a niche shelf or tiled surface can be installed with a slight slope so water drains rather than collecting.
If the proposed storage sits inside a shower or tub surround and you're not already comfortable building a complete waterproof tile assembly, this is the point to use a qualified tile installer or contractor.
Check the finished cabinet before loading it
Once everything has cured, check that:
The cabinet does not move or flex
The trim sits tight against the wall
Caulk lines are intact
Shelves feel secure
Nothing projects dangerously into the walking area
Any cabinet door opens without hitting nearby fixtures
Then place the actual items you plan to store on the shelves.
A three-inch-deep shelf can look surprisingly spacious when empty but become much less useful once bottles and containers are added.
Maintain the storage like the rest of the bathroom
Wipe the cabinet during routine bathroom cleaning.
Watch for:
Cracked caulk
Peeling finish
Swollen wood edges
Persistent condensation
Discoloration around the opening
A recurring moisture problem deserves investigation rather than another coat of paint.
If caulk separates from the wall, remove the failed material and reseal the joint rather than layering fresh caulk over the damaged bead.
Plan the storage before a larger renovation
If the bathroom is already being stripped for new drywall or tile, decide on recessed storage while the wall is open.
That gives you a much clearer view of:
Stud locations
Plumbing
Electrical runs
Blocking
Available depth
It also lets the cabinet or niche be coordinated with the rest of the wall assembly instead of cutting back into finished surfaces later.
For a dry recessed cabinet, the safest version of this project is simple: find a genuinely empty bay, leave the existing framing and utilities alone, anchor the cabinet to known framing, and use materials that can tolerate bathroom humidity.
If the wall requires structural changes, relocated utilities, or waterproofing, treat that as a different project rather than trying to force a basic between-stud shelf into a wall that is telling you no.


















Comments
Be the first, drop a comment!