




Entryway Closet Ideas for Small Apartments: DIY Guide
A narrow strip of wall by the front door can hold more than a coat hook and a shoe pile. This guide walks through checking whether your entryway wall can safely support a mounted wardrobe system, figuring out exactly what it needs to hold, and installing modular rails, shelves, and baskets so the space functions as real clothing storage instead of a permanent pile-up by the door. These entryway closet ideas for small apartments work for hallways too narrow for a full closet, as long as the wall itself can actually support the weight.
"Boutique-style" just means the categories of clothing have fixed places: everyday clothes hung visibly and sorted by type on open rails, small items tucked into closed baskets, and a layout sized to match the actual wall instead of crammed in to maximize capacity. A narrow entryway wall is better suited to small apartment entryway storage, daily rotation clothing, coats, or seasonal overflow, than to housing an entire household's wardrobe. IKEA's BOAXEL planner is built around that same combinable logic at a bigger scale, letting shoppers combine "frames, rails, shelves and baskets" into a configuration that fits the space. This guide scales that logic down to an entryway footprint instead of a full walk-in room.
This is a beginner-to-intermediate wall-mounting project, suited to readers who can identify what's behind their wall and are willing to follow the selected system's manual closely. Drilling into a wall you're trusting to hold weight every day isn't the place to guess. If you rent, aren't sure what's behind your wall, or can't confirm you have secure fastening points, work through the checklist below before you buy anything.
What you'll need
- Tape measure
- Stud finder
- Level
- Pencil and painter's tape
- Drill/driver
- Wall anchors specified by your chosen system's installation manual for your wall type
- A modular storage system such as IKEA's BOAXEL line, or a comparable rail-and-shelf system
- That system's printed or digital installation manual, your main reference for anchor type, spacing, and weight limits
DIY entryway closet checks before drilling
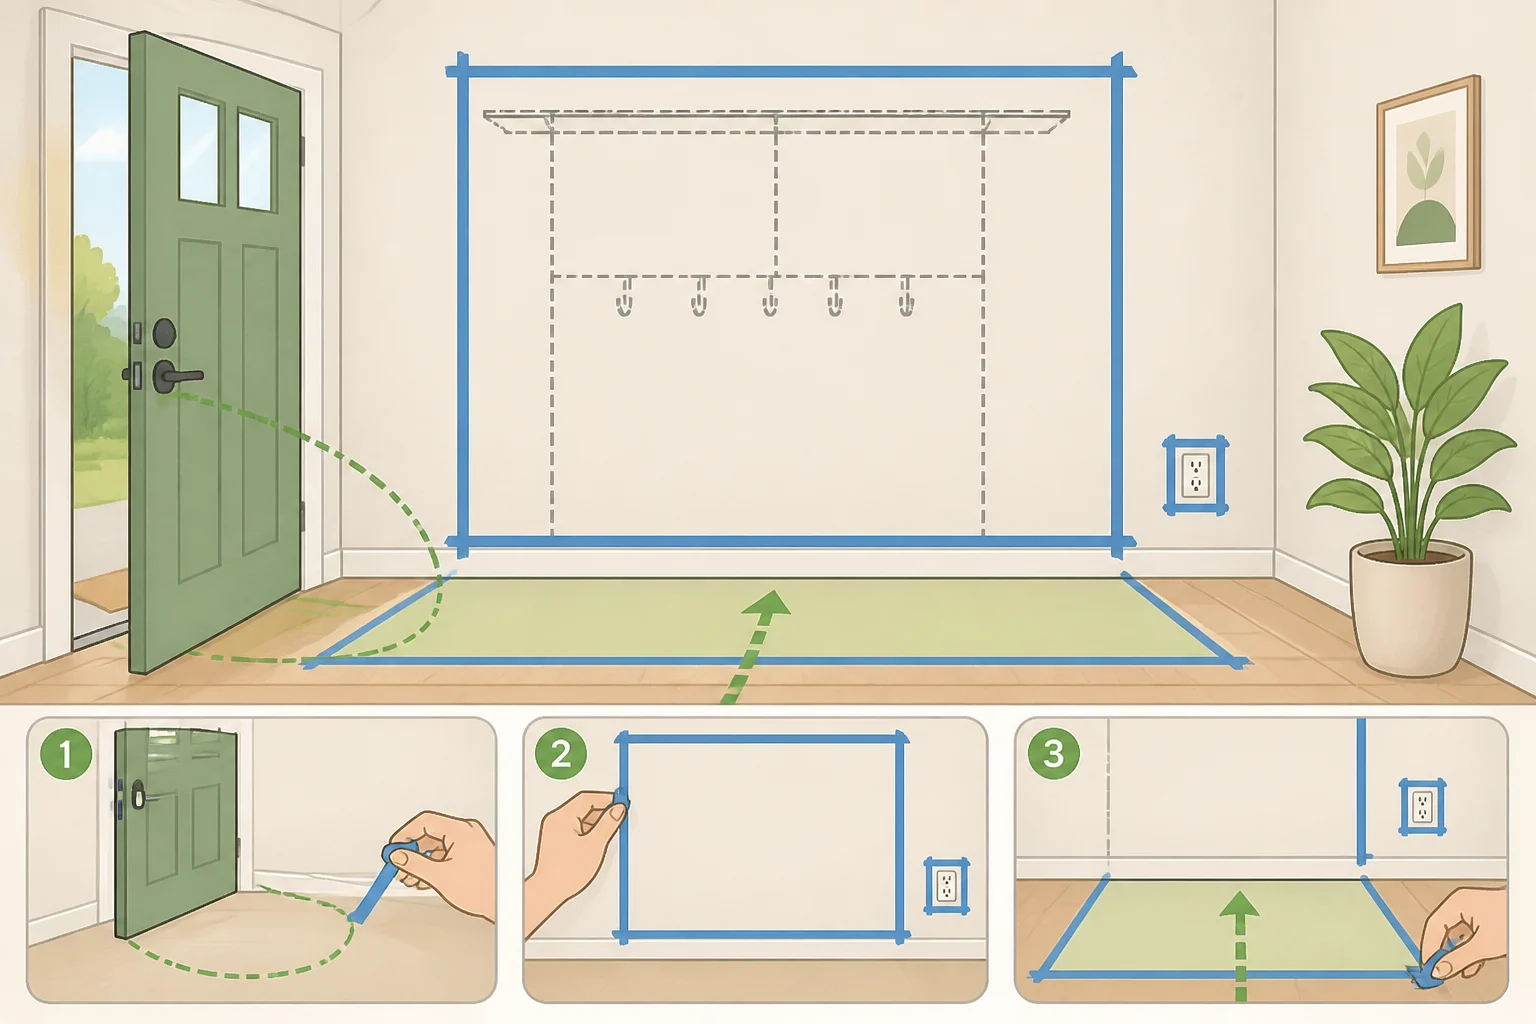
Work through this list before you buy a single component.
- Renter approval. Check your lease for language about wall-mounted hardware before drilling anything, and ask your landlord or property manager, in writing if the lease is unclear, especially if the system needs several holes or heavier-duty anchors.
- Wall type and condition. A stud finder can locate framing, but identifying the wall material itself, drywall, plaster, or masonry, often takes a visual check, a small inspection hole, or help from a landlord or hardware store professional. Different materials call for different anchors, and your system's manual is the authority on which anchor matches which material, not general hardware advice.
- The system and its manual. Pick the specific rail-and-shelf system before you plan anything else, and keep its installation manual on hand. That manual, not this guide, is the authority on fastener type, spacing, and weight limits for that product. If it doesn't address your wall material or a specific mounting question, stop and contact the manufacturer or a qualified installer rather than improvising.
- Maximum intended load. Think through the heaviest realistic combination the wall will carry, a full coat rail plus loaded baskets rather than an empty one, and check that against the limit the manual states before you load anything that heavy in practice.
- Door and walkway clearance. Walk the entry the way you do every day, open the front door fully, and mark with painter's tape where the door swings, any secondary exit path, light switches, outlets, vents, and your normal walking line. A system that blocks any of those isn't a fit, no matter how it measures on paper.
- Skill level. If you can't confidently identify the wall material, or the manual calls for hardware beyond standard anchors, bring in a professional installer rather than guessing.
If you can't find secure fastening points, or you can't keep the clearance zones open once the system is loaded, stop here. A wall-mounted setup isn't right for this entryway, and the alternatives at the end of this guide are a better match.
Plan entryway closet ideas for small apartments before you measure
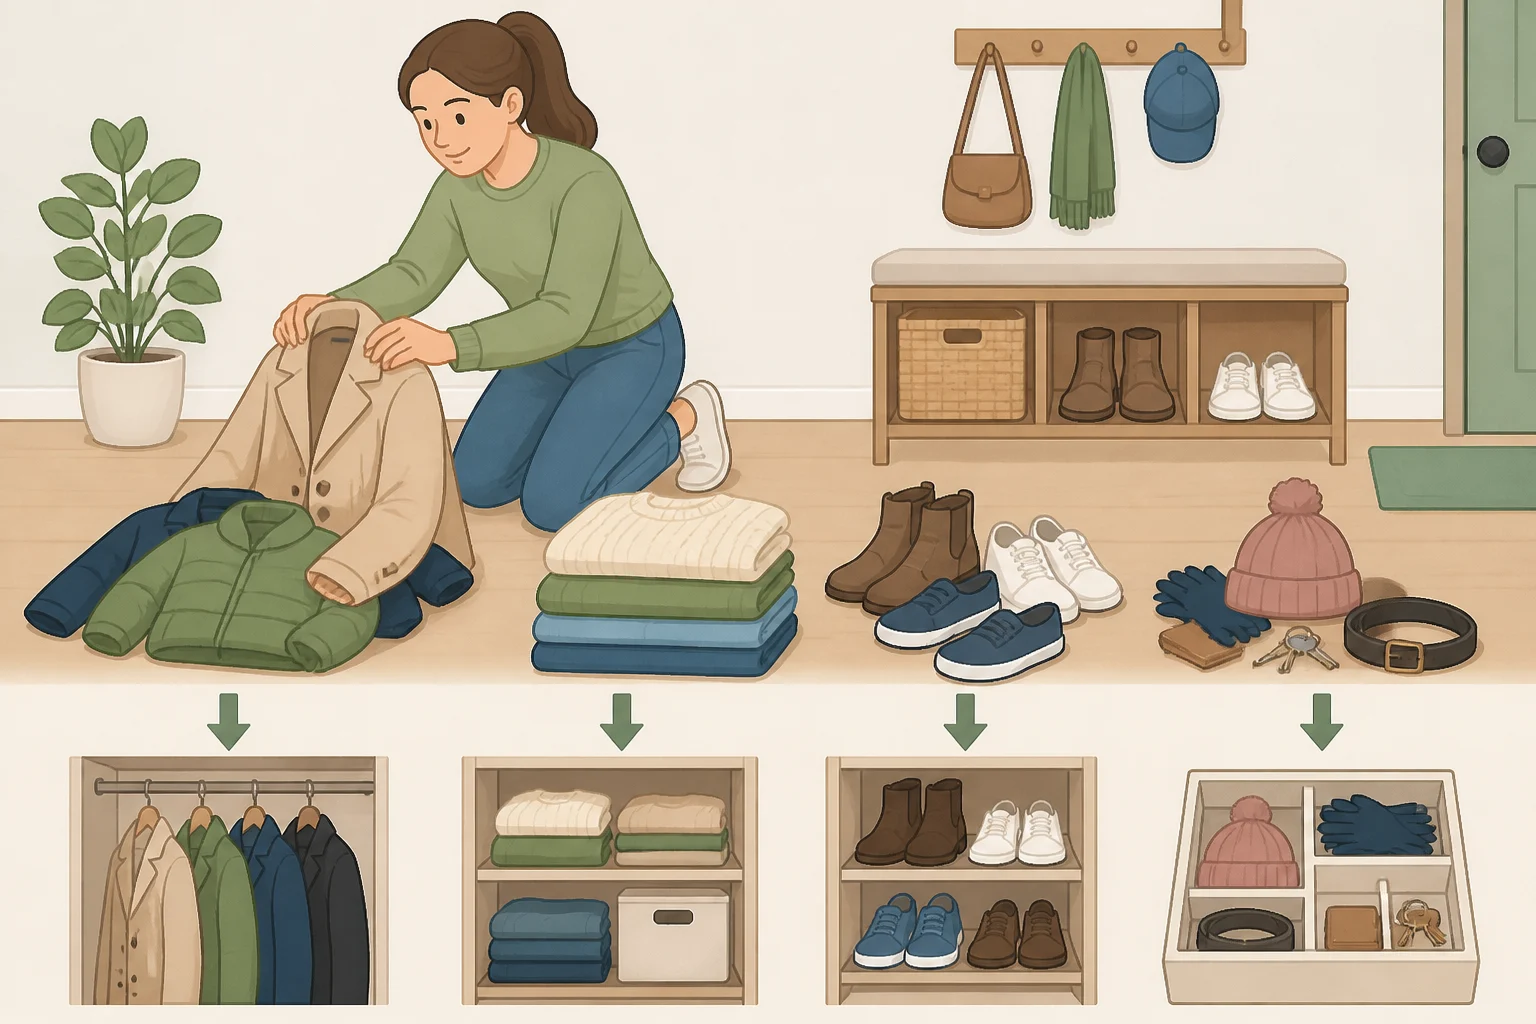
Dump your current entryway clothing pile onto the floor or a bed and sort it into rough categories: things that need to hang (coats, daily outfits), things that get folded (sweaters, casual layers), shoes, and small accessories like scarves or hats. The ratio between those piles tells you how much rail space you need versus shelving versus baskets. Sorting first is one of the simplest clothing storage ideas for tiny apartments, since it stops you from buying more capacity than the wall actually needs.
These entryway wardrobe ideas work best when you give the wall one job, coats only, daily rotation, or seasonal overflow, rather than asking it to do everything. A wall meant only for coats needs less depth and fewer shelves than one meant to hold a daily rotation of outfits. A seasonal-overflow wall might lean almost entirely on closed bins instead of open rail space.
Now measure for real, not just the empty wall. Hang your bulkiest coat on a hanger, hold it at the planned rail height, and check how far it actually projects off the wall with the door open and someone brushing past. Do the same check for shelf depth: will a stack of folded sweaters still leave room to walk by comfortably? Tape the planned depth on the floor and walk through it a few times before committing to a layout. Wall width and height numbers alone won't tell you whether the loaded system still leaves a livable path through the entry.
Choose a modular system and plan the layout
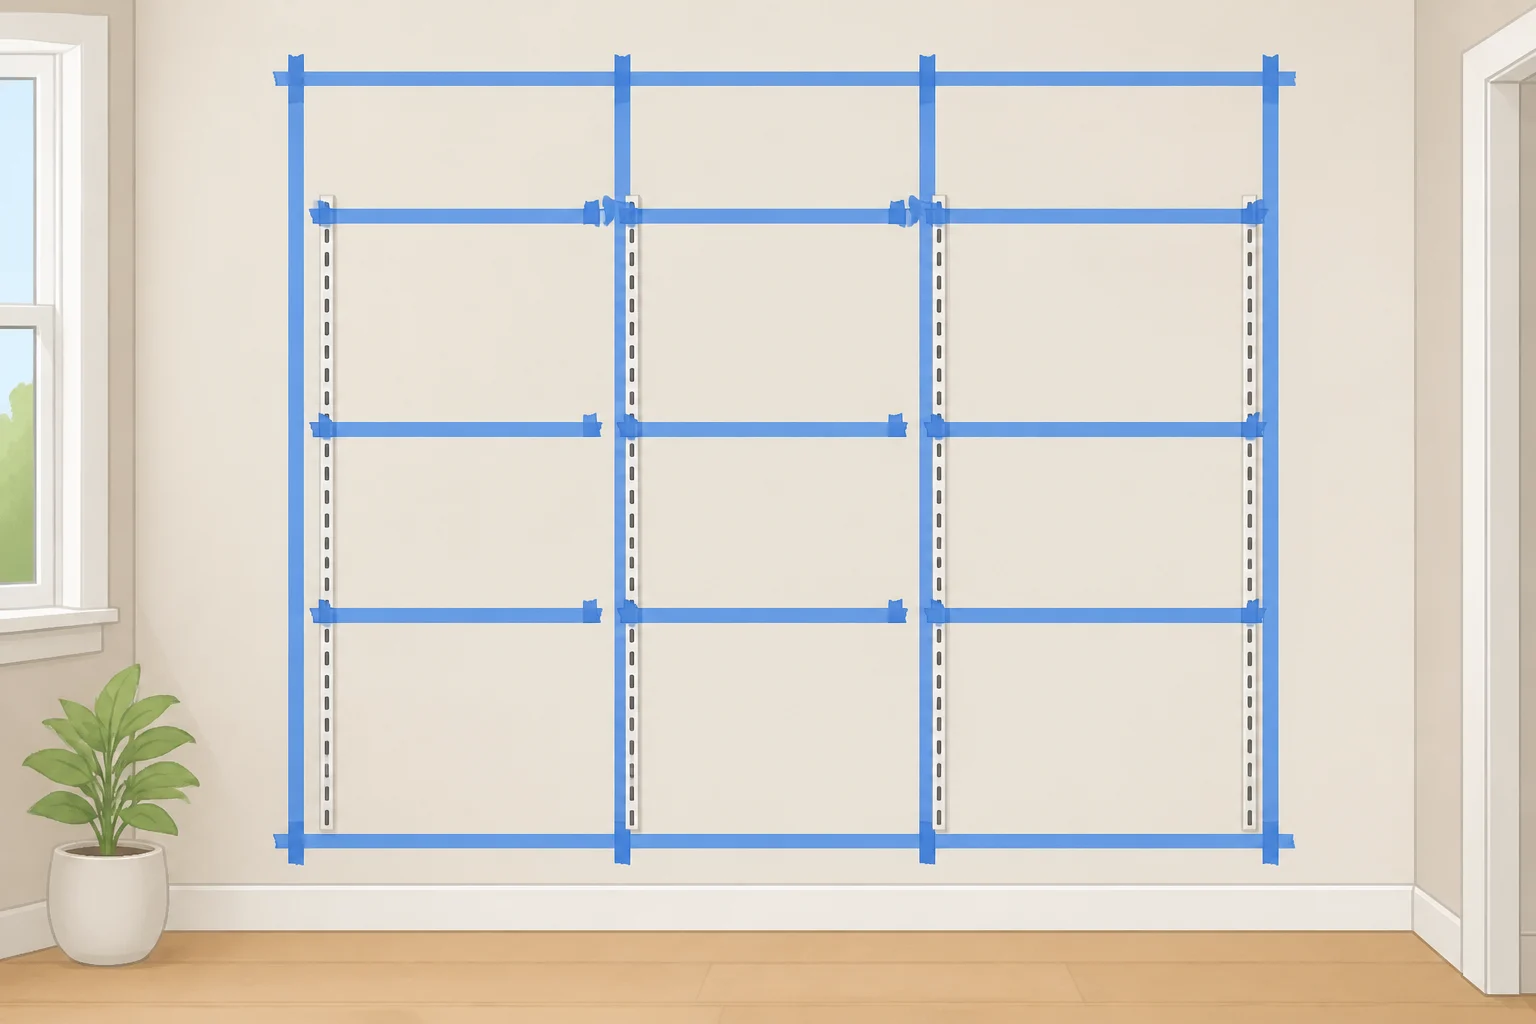
Look for a system built around interchangeable parts rather than one fixed cabinet. Frames, rails, shelves, and baskets that combine in different configurations let you match the categories you just sorted, instead of forcing your clothes into whatever a pre-built unit happens to offer.
IKEA describes its BOAXEL system as a way to combine components "in such a way that everything is perfect for you and every inch is optimally used." An entryway wall is a smaller version of that same combinable logic, scaled down from a walk-in closet to a single strip of hallway. Treat the manufacturer's installation guide, not this general framework, as the final word on how a specific system mounts and what it can hold.
Before you buy anything, map the layout. IKEA provides a BOAXEL planning tool to lay out a BOAXEL configuration on screen before you order, so you're buying based on a plan instead of guessing at quantities in the store aisle. If you're using a different brand without a digital planner, tape out the frame outline and shelf heights directly on the wall with painter's tape as a low-tech substitute.
Install the system: general order, with your manual filling in the specifics
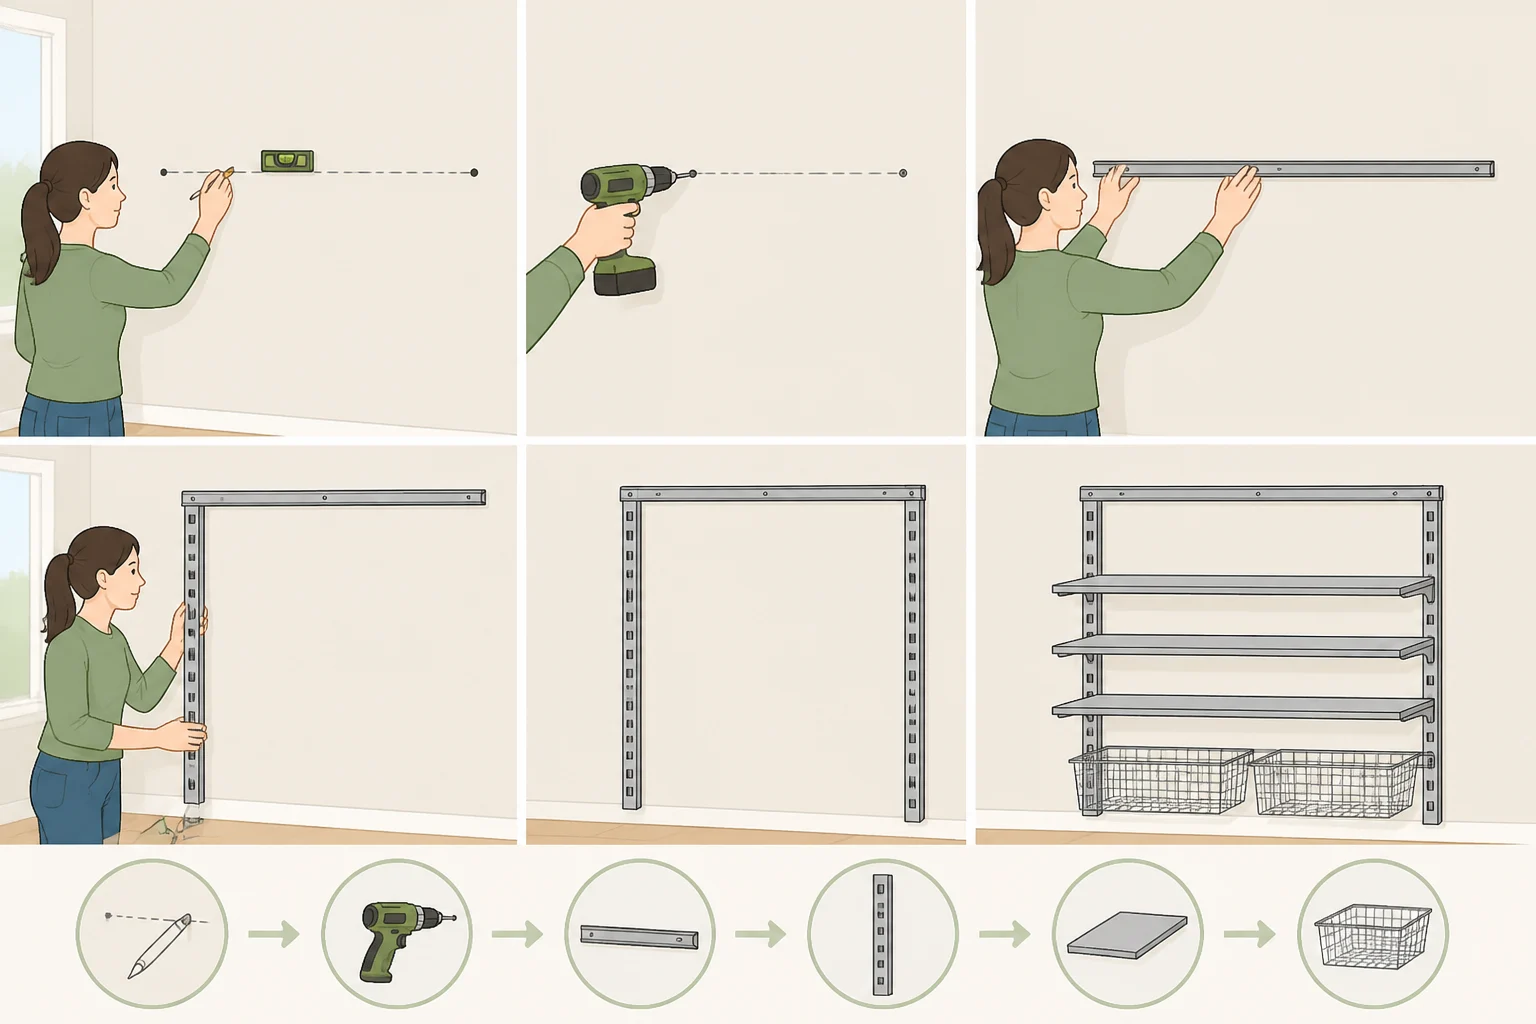
Mounting requirements vary by product. The fastener type, rail spacing, and per-component weight limit for your exact system live in its manual, not in this guide. Use the sequence below as the general order of operations, and check each step against your system's instructions before you drill. If the manual doesn't address your wall material or a specific mounting question, stop and contact the manufacturer or a qualified installer.
-
Mark your mounting line. Using the clearance zones and heights from the checklist above, mark where the frame or vertical track needs to sit, and check that line with a level before drilling anything. Every other component attaches to this first piece.
-
Mount the frame or track. Follow the manual's instructions for anchor type and fastener count for your wall material, and confirm the mount however the manual directs before loading it.
-
Attach rails and shelves at the heights your categories need. Hanging rail goes where coats or daily outfits clear the floor without dragging. Shelves for folded items sit above or beside it. Baskets for shoes or small accessories go lower, where they're easy to reach without crouching.
-
Load gradually, using the manual's stated weight limit as your ceiling. Add items a few at a time rather than hanging a full wardrobe at once, and stop at the number the manual gives for that rail or shelf. If you notice a gap between a bracket and the wall, or feel movement when you press on the mounted piece, stop adding weight and recheck the fasteners against the manual before continuing.
Watch for stop signs while you work. If you can't find a stud or confirmed anchor point where the manual calls for one, stop and adjust your layout rather than mounting into an unverified spot. If the fastener in hand doesn't meet what the manual specifies for your wall type, don't substitute something smaller because it's what's in the drawer.
Style it like a boutique entryway closet
Once the structure is fully tested and secure, the styling choices are what make it feel put-together instead of just functional. Group hung clothing by color or by type, coats together, everyday layers together, so the rail reads as a display instead of a jumble. Keep baskets closed and labeled if that helps you grab things quickly, since the point of closed storage is keeping small items out of sight, not just out of the way. Add a small mirror or a plug-in light near the wall if the layout allows for it. None of this affects how the system holds weight, so treat it as the last step, done only after the mounting is confirmed stable.
Load within the manual's limits, and know when to stop
- Add items gradually and stay within the manual's stated limit for that rail or shelf, rather than filling it until it looks full.
- Distribute heavier items, a wool coat, a stuffed bag, according to what the manual allows for each section, not wherever is most convenient to reach.
- If a bracket shifts, a gap opens between a bracket and the wall, or a rail or shelf sags under normal daily use, unload that section immediately and stop using it.
- Don't enlarge the holes, swap in a bigger anchor by guesswork, or keep re-tightening the same hardware without direction from the manual.
- Contact the manufacturer or a qualified installer if the manual doesn't address what you're seeing.
For an entryway where secure mounting points were never there to begin with, a freestanding garment rack or a row of shallow hooks is worth considering instead. Neither requires wall anchors or confirmed fastening points, which can simplify things for a rental or a wall you couldn't confidently identify. It won't offer the same closed storage for small items, but it avoids the wall question a mounted system can't skip.
Success looks like a wall that holds its assigned category of clothing without blocking the door, the walkway, or the exit route, and hardware that stays snug under daily use. Revisit anchor tightness occasionally and reassess what's hanging there as the seasons change, so the space keeps functioning as storage instead of sliding back into a catch-all pile.

















Comments
Be the first, drop a comment!