



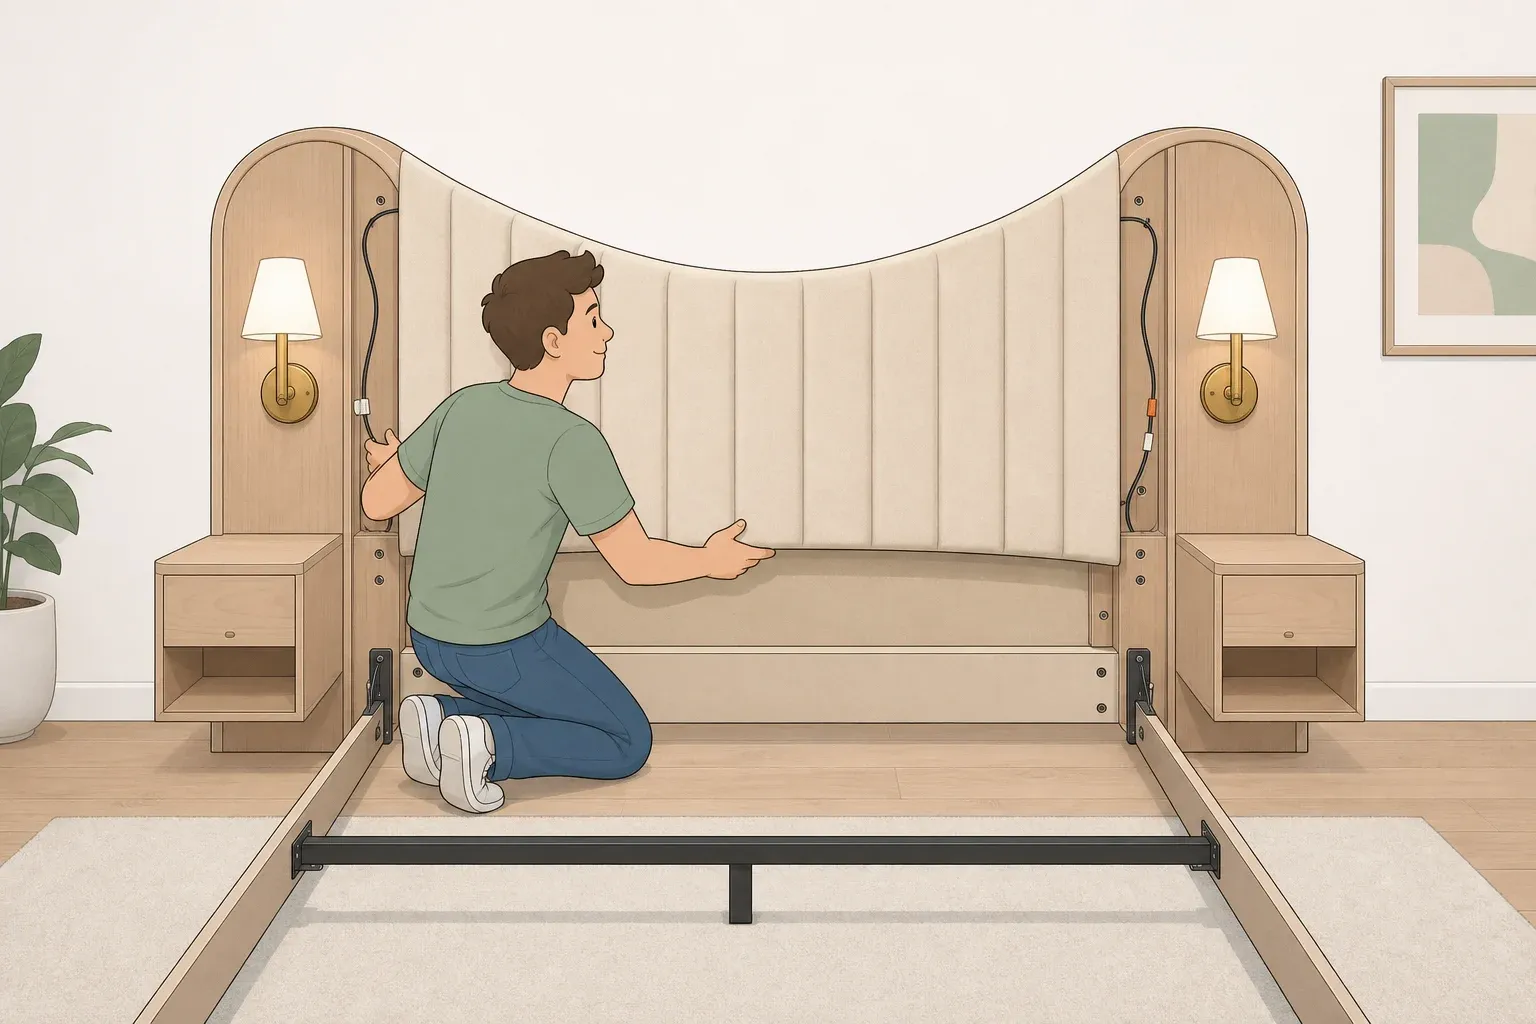
Sasha Faiz's bedroom makeover gets attention for the pink walls first, but the bolder move is the headboard: a wave-shaped panel spanning the full width of the wall, described as combining side tables and sconces built directly into it, for a project she calls a $600 DIY. "I am not a carpenter … but knew I wouldn't be able to find this shape in stores so went on the mission of making it myself," she says of the piece on Apartment Therapy.
This guide walks through building a DIY wavy headboard with built-in nightstands the way most home DIYers can actually pull it off: a wave-shaped panel sized to a specific wall, paired with separate nightstands and sconces placed to read as one built piece. Fusing side tables and hardwired sconces into an actual single structure the way Sasha did calls for load-bearing carpentry and electrical work that goes past a template-and-jigsaw project, so this guide treats the panel and the furniture around it as two connected builds.
Choose the panel-only version or hire out the integrated build
If the goal is Sasha's exact structure, tables and sconces built into a single curved wall unit, hire a carpenter for the load-bearing box structure and bring in an electrician to run the wiring. That's a professional job from the start, not a weekend upgrade.
If the goal is the look, on a DIY budget and timeline, build the wave panel covered in this guide, then set separate nightstands and a pair of sconces beside it so the wall reads as a built-in headboard with sconces even though nothing is physically joined. That's a genuine wall-to-wall headboard DIY, just assembled as connected pieces instead of one continuous structure.
Color carried a lot of the design work in Sasha's room too. She paired Farrow & Ball's Sulking Room Pink with a deep red, Benjamin Moore's Cascabel Chile, and used a burgundy tone for the headboard itself. For similar color-drenched bedroom ideas, pull the panel color from that same muted or saturated family as the wall paint rather than a contrasting one, so the curve reads as intentional instead of competing with the room.
Before you start: skill, time, and workspace
Get a realistic picture of the job before buying material.
Skill level: intermediate DIY. If cutting a smooth curve with a jigsaw, running a stud finder, and mounting hardware into studs are all unfamiliar, practice the cut on scrap material before touching the actual panel.
Time: plan for more than one work session. Templating, cutting, dry-fitting, and finishing happen as separate stages, and the primer and paint need their own drying time before the panel goes anywhere near the wall.
Workspace: a garage or similar space with room to lay a full sheet flat and support it on sawhorses while cutting and painting.
Helper: at least one extra set of hands, for lifting, holding sections during dry-fitting, and supporting the panel while it's mounted.
Dust: cutting MDF or plywood throws a lot of fine dust. Work in a well-ventilated space, wear eye protection and a dust mask while cutting, and clear the area of anything that shouldn't end up covered in sawdust.
What you'll need
Large kraft paper or cardboard, for a full-size wave template
Flexible curve ruler or a bendable straightedge, useful but not required
3/4-inch MDF or plywood, sized to the wall; for a very wide wall, ask the lumberyard whether a thicker sheet or extra backing is needed to resist sagging across the span
Jigsaw with a fine-tooth blade
Wood filler suited to the panel material
Sandpaper, 120-grit for shaping and 220-grit for the final smoothing pass
Stud finder
Mounting hardware rated for the panel's finished weight, installed exactly per its own instructions (a French cleat, a pair of interlocking beveled wood strips, is one common option for a flat panel like this)
Wood screws sized to the hardware chosen
1x4 lumber for backer strips at any panel seams
Primer and paint, or edge banding and stain if showing wood grain instead
Felt or rubber pads for the panel's lower back edge
Eye protection and a dust mask
A helper, for lifting and holding sections
Staining instead of painting means choosing plywood from the start and covering every cut edge with edge banding before finishing. MDF's cut edges don't take stain evenly, so make that call before the curve gets cut, not after.
Measure your wall and bed before you cut anything
Measure the wall's full width and height, and mark every outlet, switch, baseboard heater, and piece of window trim inside that span. A curve that looks fine on paper can land right on a switch plate once it's scaled up to the real wall.
Measure the bed frame's width and decide how far past it the panel should extend on each side. That extra width is a style call, so base it on what looks right against the specific bed rather than copying another room's proportions. Measure from the mattress top to the ceiling too, since that span sets how tall the panel can go before it competes with the ceiling line or window trim.
Run a stud finder across the entire width being covered and mark every stud found. Don't assume a standard spacing pattern; confirm what's actually behind the drywall, since older homes and additions vary.
This method assumes standard drywall over wood studs. If the wall turns out to be plaster or masonry, or the framing behind it isn't clear, stop and have a contractor assess anchoring options before going further. Metal studs change which fasteners work, too, so a plan built around wood studs doesn't automatically transfer.
How much weight a mounting cleat can hold depends on its lumber size, the fasteners used, and how many studs it's anchored into. Check the load rating printed on the hardware's packaging or instructions rather than estimating it, and treat anything beyond a small, light panel as a job to confirm with a hardware store or contractor before cutting material to size. Anyone renting or sharing the space should also weigh that a mounted panel is harder to remove without patching than a leaned headboard.
Stop and rework the plan if the panel would sit over outlets that can't be routed around, or if the wall and hardware can't be confirmed to support the design. Scale the panel down or bring in a contractor rather than compensating with extra adhesive or more screws in the same couple of spots.
Draft and cut a symmetrical wave template
Fold a large sheet of kraft paper or cardboard in half lengthwise to mark the wall's vertical centerline.
Draw one half of the wave freehand or with a flexible curve ruler, using the fold as the mirror axis.
Cut the half-wave shape, flip it, and trace it onto the other half. Mirroring the curve this way avoids the lopsided look that comes from eyeballing two sides separately.
Tape the full template to the wall at bed height, then step back to the doorway or to where the bed will sit, checking it against the ceiling line and bed width before cutting anything.
The high and low points of the curve should land at matching heights on both sides of center, and the lowest point shouldn't dip below the mattress top. Some visible hand-cut variation is normal here and part of the look. Sasha's own shape came from freehand work because she couldn't find it ready-made, so it's worth sizing the curve to the actual wall and bed rather than chasing a perfect template match.
Build and mount the panel
Cut the curve. Transfer the template to the panel material and cut along the line with the jigsaw, supporting the sheet on sawhorses so it doesn't flex or crack mid-cut. If the wall needs more than one section, plan any seam to fall directly over a wall stud.
Dry-fit and mark the wall. With a helper holding the panel or section in place, confirm the curve clears the outlets, baseboards, and trim marked earlier. Mark the exact height for the mounting hardware directly on the wall, and confirm a stud sits at each point the hardware will attach.
Test-fit the hardware. Hold or clamp the hardware in place on both the panel and the wall marks, checking that it sits level and any seams close tightly. Do this on bare, unfinished material, so mistakes show up now instead of on a painted piece later.
Take the panel down and reinforce seams. Screw a 1x4 backer strip flush across the back of any seam, spanning both sections, to help keep the joint from flexing, then fill the front-facing gap. Filler alone closes the visual gap but doesn't reinforce the joint.
Fill and sand. Fill screw holes and any remaining gaps, then sand the whole panel smooth, starting at 120-grit and finishing at 220-grit.
Prime and paint. Coat the panel, including the cut edges, while it's still flat on sawhorses, since even coverage is easier before the panel is hanging. Let the finish cure fully per the product label before moving on.
Install the hardware for real. Attach the mounting hardware to the panel and to the wall marks made in step 2, following the hardware's own instructions exactly, including how many studs it needs to span. A hardware store or contractor can confirm the right choice for a panel this size if the packaging doesn't spell it out.
Add felt or rubber pads near the bottom back edge before hanging. On a wall that isn't perfectly flat, pads keep the panel from rocking at the bottom even when the top is mounted securely.
Hang the panel with a helper supporting the bottom while the top edge is aligned, and the pads are checked for even contact with the wall on both sides.
Dress up small gaps. If a narrow cosmetic gap shows along the top or side edges once the panel is up, a thin bead of paintable caulk can hide it after touch-up paint. Caulk disguises a small gap; it doesn't level, support, or secure the panel, so a wide gap means adjusting the mount, not adding more caulk.
Common mistakes and quick fixes
Panel flexes when pressed. The hardware likely isn't anchored into enough studs for this panel's size, or a wide panel needs a second point of support lower down if the hardware's instructions call for one. Add support rather than more screws in the same one or two spots, and check with a hardware store or contractor for a large panel.
Panel rocks at the bottom. Adjust or add felt pads rather than forcing the panel flat against an uneven wall.
Seam shows through the paint. The backer strip likely wasn't flush, or the filler coat went on too thin. Sand it back, apply a thin second coat, and re-sand before repainting.
Stop using the installation if the panel ever pulls away from its mount, flexes noticeably when pressed, or a seam reopens after touch-up. Those are signs to redo the anchoring, not to add another coat of paint or a bead of caulk.
Add nightstands and sconces for a built-in look
Once the panel is up, nightstands and sconces do the rest of the work without being cut into the panel itself. Set freestanding nightstands directly against the wall on either side of the wave, at a height where the top lines up near where the curve dips lowest, so the pairing reads as a built-in headboard with sconces even though each piece stands on its own. Match the finish and color to the panel, and keep both nightstands the same height and depth so the two sides stay visually even.
These are separate furniture pieces, not built-in structures, and that distinction matters for weight. Any nightstand meant to hold a lamp or a stack of books needs its own legs, base, or wall brackets rated for what's actually placed on it, confirmed by whoever installs it rather than assumed because it sits next to a secure panel.
For lighting, plug-in sconces installed per the fixture's own instructions add fixtures flanking the headboard without opening up the wall. Check local code and hire a qualified electrician for hardwired sconces, the way Sasha's are built into her headboard, since a fixture's mounting instructions won't cover wiring rules for a specific home.
Finish and inspect
Press firmly at the top corners of the mounted panel; it shouldn't shift. Check the bottom edge too, since the pads should keep it from rocking against the wall. That's a mounting check, not a weight test, so don't lean on the panel to see how much it holds.
Run through this before calling the project done:
Press-test the top corners and the bottom edge for any movement.
Recheck the cleat connection and any filled seams once the panel has been up through a season or two, since framing shifts as a home settles.
Confirm nightstands and sconces are secured on their own hardware, independent of the panel, before setting anything on top of them.
Stop and call a contractor or electrician if the panel pulls away from its mount, if the design has outgrown what the studs and hardware can support, or if the sconces need to be wired directly into the wall.
Don't overthink matching the exact wave shape to a template. Size it to the actual wall, bed, and taste, the same way Sasha did when she couldn't find the look ready-made.















Comments
Be the first, drop a comment!