



Bookshelf Room Divider Behind Bed: Full Build Guide
Building a bookshelf room divider behind bed means solving one problem before any other: getting real separation from the rest of the room without blocking every scrap of light that reaches it. Designer Lizzie Gill ran into exactly that problem when she renovated a dilapidated Connecticut barn into a studio and guest space. "I wanted to build a room divider that hid the headboard of the bed, but also allowed light through," she told Architectural Digest five years ago.
Her project is the design principle this guide works from, not a blueprint to copy. The available research doesn't document her exact construction, so what follows generalizes the idea into something buildable in an ordinary bedroom.
A bookcase room divider behind a bed isn't a wall unit dragged into the middle of the floor. It stands unsupported and shows every surface, front, back, sides, edges, which means different engineering and finishing than a bookcase pushed flat against drywall (Woodwiki, three months ago). Five numbers decide whether it holds up: height, depth, section width, shelf span, and floor clearance (Woodwiki, three months ago).
One scoping note before any lumber gets cut. The anchoring method this guide is built around, a furniture strap into a wall stud, is the option with the clearest attachment path in the available research, so the assumption throughout is that the divider sits close enough to a wall to use it. A separate method for placements without a nearby stud gets its own subsection later, and it comes with real caveats worth reading before relying on it.
Map the footprint before you buy lumber
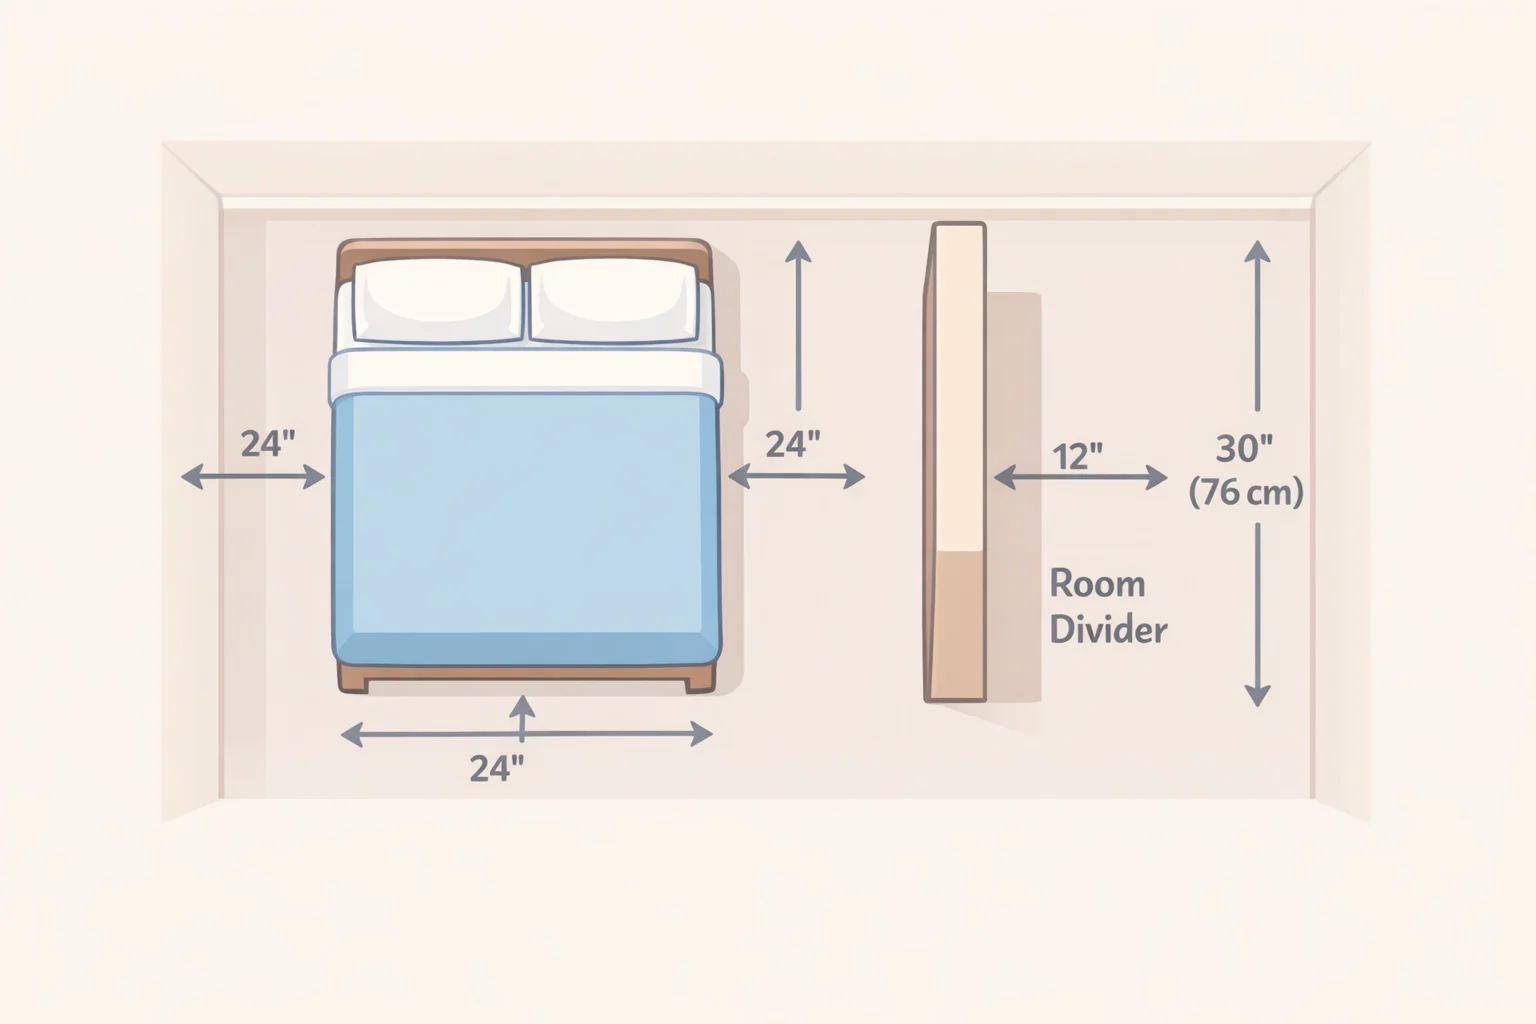
Lay the room out in order: bed, then divider depth, then a walkway. Woodwiki's baseline is 30 inches of clearance on any side someone will walk past the unit, close to the width of a standard interior door at 32 inches (Woodwiki, three months ago).
For a worked example, assume an 80-inch bed frame. Add a 12-inch divider depth (the target explained below) and a 30-inch rear walkway, and the math lands at roughly 122 inches of usable room depth, before factoring in end clearance, furniture overhang, or other circulation needs (Woodwiki, three months ago). That's a floor, not a finished plan, so measure the actual room rather than trusting a hypothetical.
There's a placement rule built into this guide: the divider should land within reach of a wall stud on at least one side, since that's what the strap method needs. Before cutting anything, confirm both pieces are in place: enough floor space for the footprint above, and a stud within strap-anchoring distance. If either is missing, the project needs to change shape before the saw comes out.
Plan a bookshelf room divider behind bed: height, depth, and width
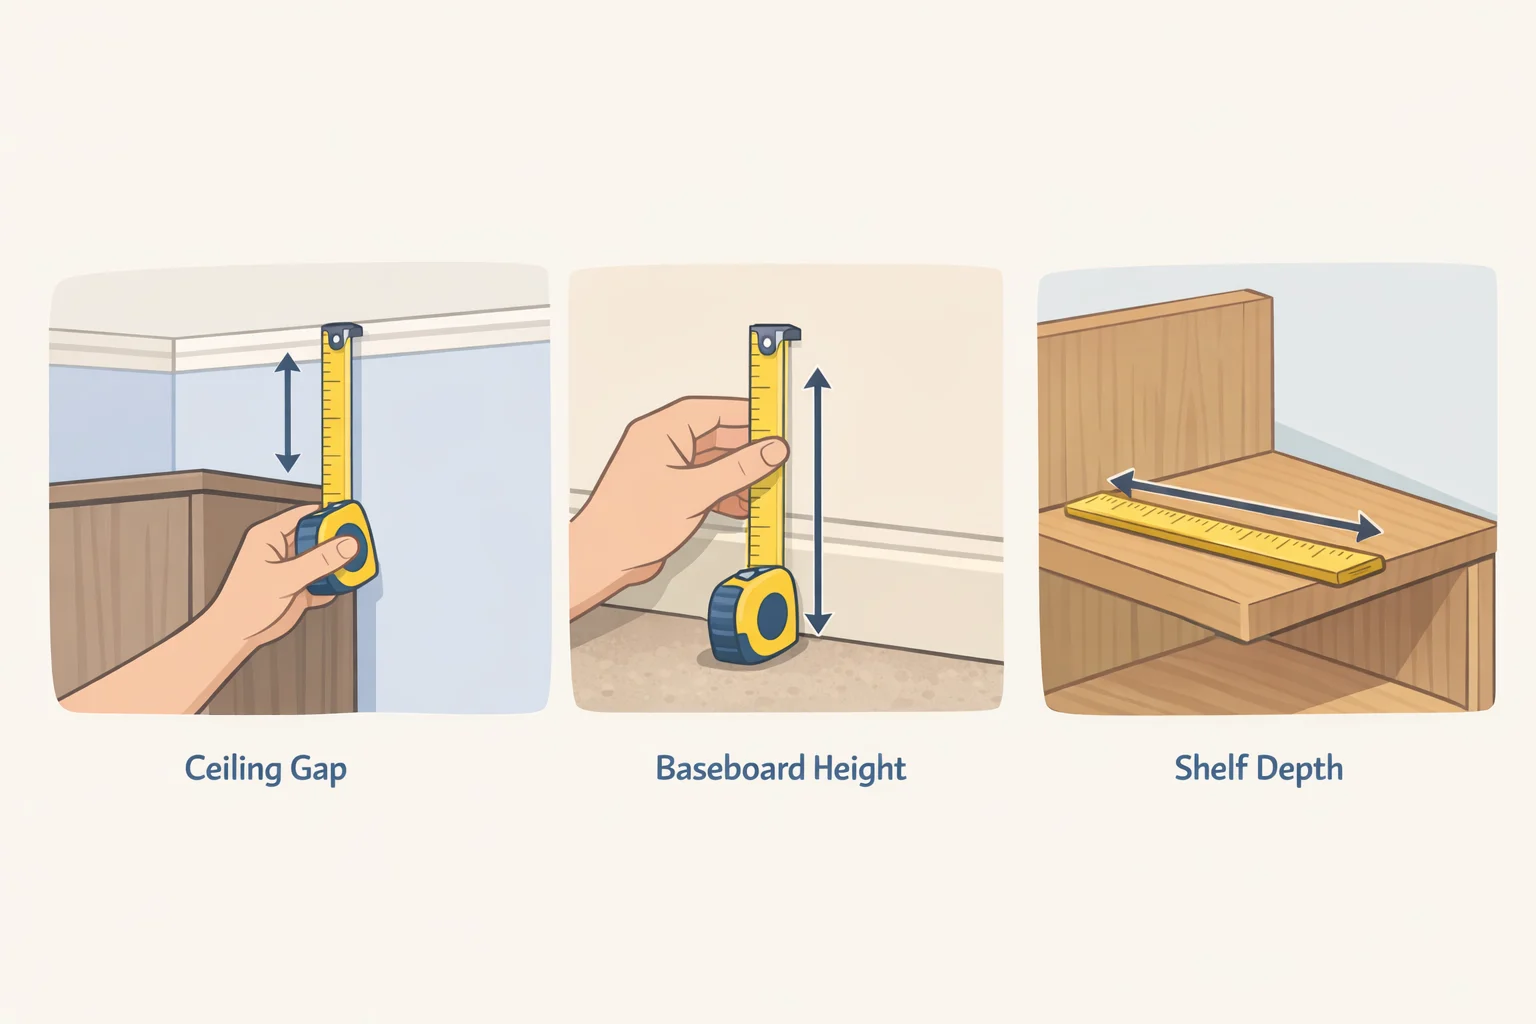
Height sets the mood more than any other decision. A 72-inch unit sits near eye level for most adults, creating separation without fully closing off the room, while a 78-inch build reads as more architectural and intentional (Woodwiki, three months ago).
Two adjustments move the actual cut height away from those round numbers. Leave 6 to 12 inches of gap below the ceiling to keep the room feeling open, and account for baseboard trim, typically 3.5 to 5.5 inches, when measuring floor to ceiling (Woodwiki, three months ago). Skip either adjustment and the finished piece lands taller or shorter than planned.
Depth has a design target of 12 inches on the outside dimension. That fits paperbacks, which need 10 inches, and most hardcovers, which need 11 to 12 inches, without eating excess floor space or losing the footprint that resists tipping (Woodwiki, three months ago). Depending on how the side panels are joined, usable interior shelf depth may run a bit less than that 12-inch outside measurement, so check actual clearance against real books before finalizing a cut list.
Width is the one call that's more design judgment than fixed number. For anyone weighing a room divider instead of a headboard, matching or exceeding the bed's width is the safer default, since a narrower unit leaves the headboard exposed on the sides. Some layouts leave that gap on purpose for a lighter, less enclosed look, so treat it as a choice rather than a rule.
By design, the ceiling gap and eye-level height above are meant to let light travel over the top of the piece and into the rest of the room, which is the point of choosing this over a solid headboard.
Build the modules for a DIY bookshelf room divider
The parts list is straightforward: two side panels per module, top and bottom rails, fixed shelves, solid-wood edge banding on every exposed edge, and a base. The material of choice is 3/4-inch hardwood plywood with solid-wood edge banding, assembled with pocket screws and PVA glue, a combination fast enough for a first build (Woodwiki, three months ago). A Kreg pocket-hole jig runs $30 to $60, and PVA glue gives 5 to 10 minutes of open time to adjust joints before it sets (Woodwiki, three months ago).
That parts list is a starting point, not a finished cut list. The one module-level dimension the sourced guidance pins down is width: for a 30-inch-wide module with 3/4-inch side panels, interior shelf width works out to roughly 28.5 inches, the number to cut fixed shelves to. Height, panel depth, rail dimensions, base construction, shelf count, and shelf attachment method aren't specified in the available research, and shelf spacing depends on the actual books going on the divider. Work those numbers out against the height and depth targets above and the tallest books on the shelf, ideally with input from a woodworker if this is a first build, rather than treating any of the missing measurements as settled here.
Section width is where the numbers get strict regardless of what else changes. Keep each module between 24 and 36 inches, with 30 inches as a conservative starting point, because standard 3/4-inch plywood has a real unsupported span limit around 32 inches and shelves wider than that sag under normal book weight (Woodwiki, three months ago). Woodworkers checking that math against the Sagulator, the shelf-deflection calculator most in the trade use, find that a 3/4-inch birch plywood shelf at 36 inches under 30 pounds per linear foot approaches the residential deflection standard of L/360, meaning a 36-inch shelf shouldn't sag more than 0.1 inches (Woodwiki, three months ago). Solid hardwood runs roughly twice as rigid as plywood for the same cross-section, according to a technical comparison Woodwiki cites from Woodweb (Woodwiki, three months ago).
That span math is also why a wide divider gets built as multiple modules rather than one long bookcase. To build a 60-inch, roughly queen-width divider, make two 30-inch modules and join them side by side; the source describes two narrower units as structurally stronger, and far easier to carry into a bedroom, than a single wide piece (Woodwiki, three months ago).
Finish all interior surfaces before final assembly. Once modules are joined, the unfinished interior faces become nearly impossible to reach with a brush or sander (Woodwiki, three months ago). Cut, edge-band, and finish the interior faces of each panel first, and assemble each module on a flat surface before moving on to joining modules and anchoring.
What joining two modules does, and doesn't, fix
Assembling each module square matters before anything gets joined. A common shop check: measure both diagonals corner to corner on the box; matching numbers mean it's square, and a mismatch means the clamps need adjusting before the glue sets. That's a general workshop habit, not a step spelled out in the sourced guidance, but it's worth doing on any box-shaped module.
Joining the two 30-inch modules into a 60-inch divider is where the sourced guidance runs out. Woodwiki's claim is narrower than it sounds: two 30-inch modules are structurally stronger and easier to carry than one wide unit, but nothing in the research specifies a seam design, a fastener pattern, or a brace that makes the joined pair resistant to racking on its own (Woodwiki, three months ago). Don't treat modular construction as a racking fix by default. Get a woodworker or engineer to spec the actual joint, whether that means a brace, a fastener pattern, or connecting hardware, for the materials and dimensions in play before relying on it next to a bed.
Once the divider is built and anchored, a simple hands-on check is still worth doing: push firmly on the top corners from the side and from the front. It shouldn't rock, lean, or shift at the anchor point. That test can catch an obviously loose connection, but it doesn't verify structural safety on its own, and passing it isn't a substitute for a real bracing design if the joint hasn't been engineered.
Anchor it: racking, tipping, and the methods this research verifies
Woodwiki frames failure in a tall freestanding unit around two dominant modes: racking, a side-to-side lean or wobble, and tipping, a forward or backward topple (Woodwiki, three months ago). Those aren't the only ways a piece like this can fail. Fasteners can work loose over months of use, an uneven floor can throw off how a strap sits, and an overloaded shelf puts stress of its own on the joints. Racking and tipping are simply the two modes the sourced guidance addresses directly, and as the previous section covers, racking resistance for a multi-module divider isn't fully solved by anything in the available research.
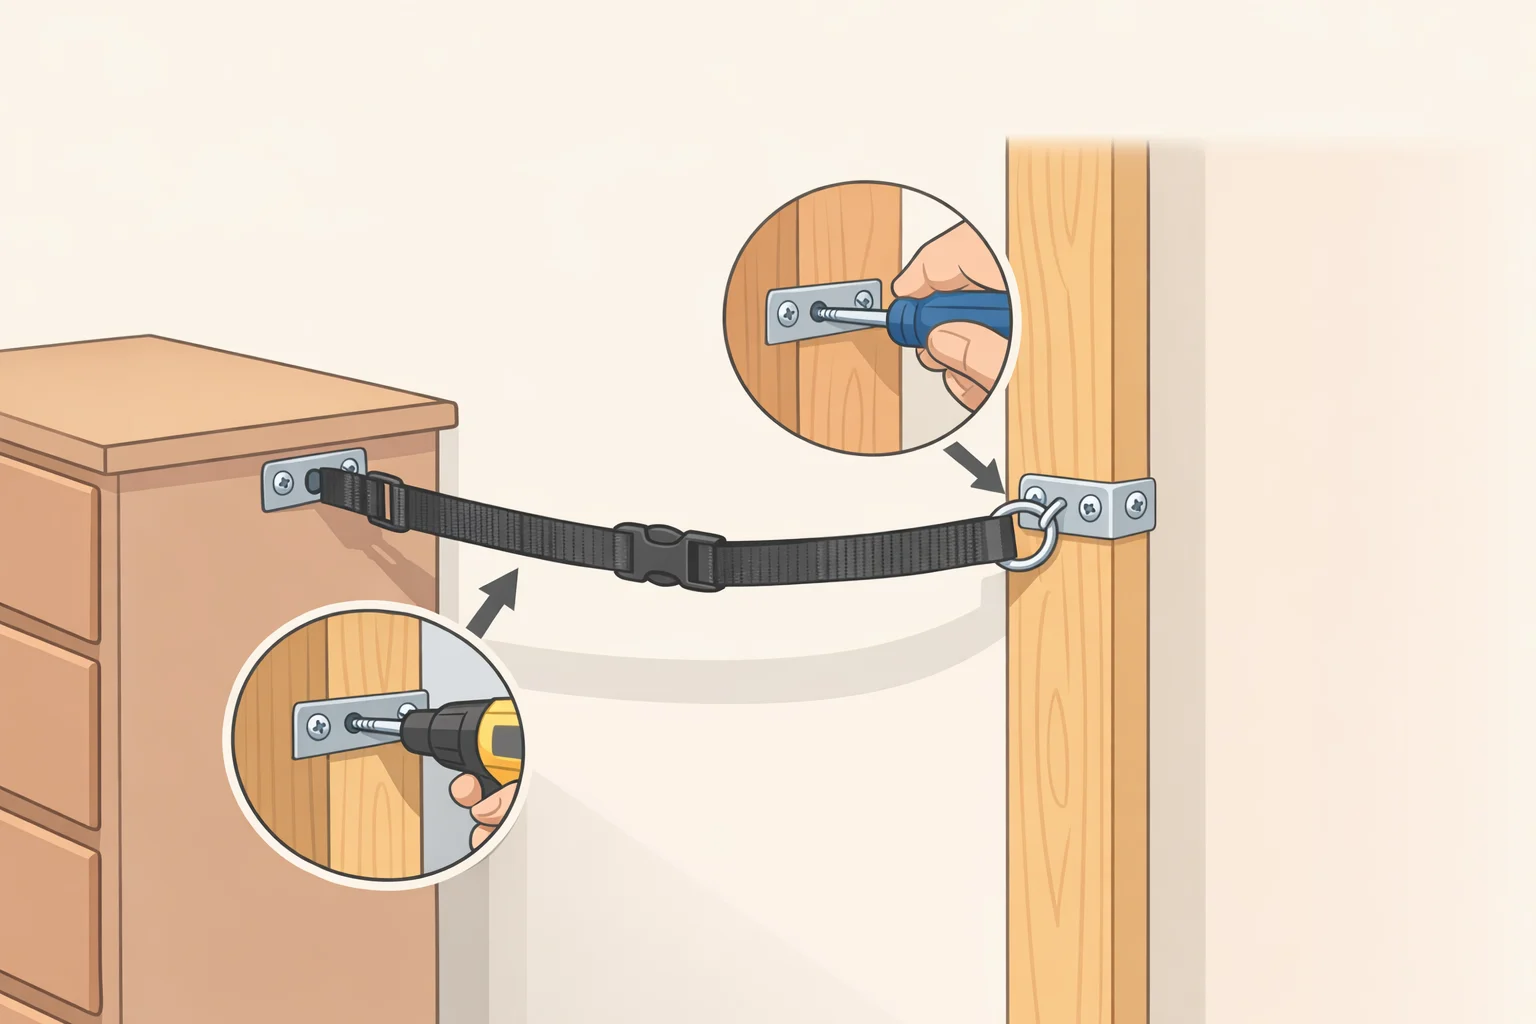
Tipping is the one failure mode with a specific, sourced fix. The source's anti-tip method is a furniture strap, priced around $15 to $40, that screws into the back of the unit and runs through drywall into a wall stud (Woodwiki, three months ago). That's why this guide is scoped to placements within reach of a stud in the first place.
Woodwiki attributes to the Consumer Product Safety Commission a general recommendation to anchor tall bookshelves, particularly in homes with kids or pets (Woodwiki, three months ago). This article hasn't independently verified the specific height threshold Woodwiki cites for that recommendation, so don't treat any number here as settled. Confirm current anchoring guidance through the unit's own hardware instructions or a qualified professional before relying on it, especially for a piece this tall standing next to a bed.
If there's no nearby wall stud
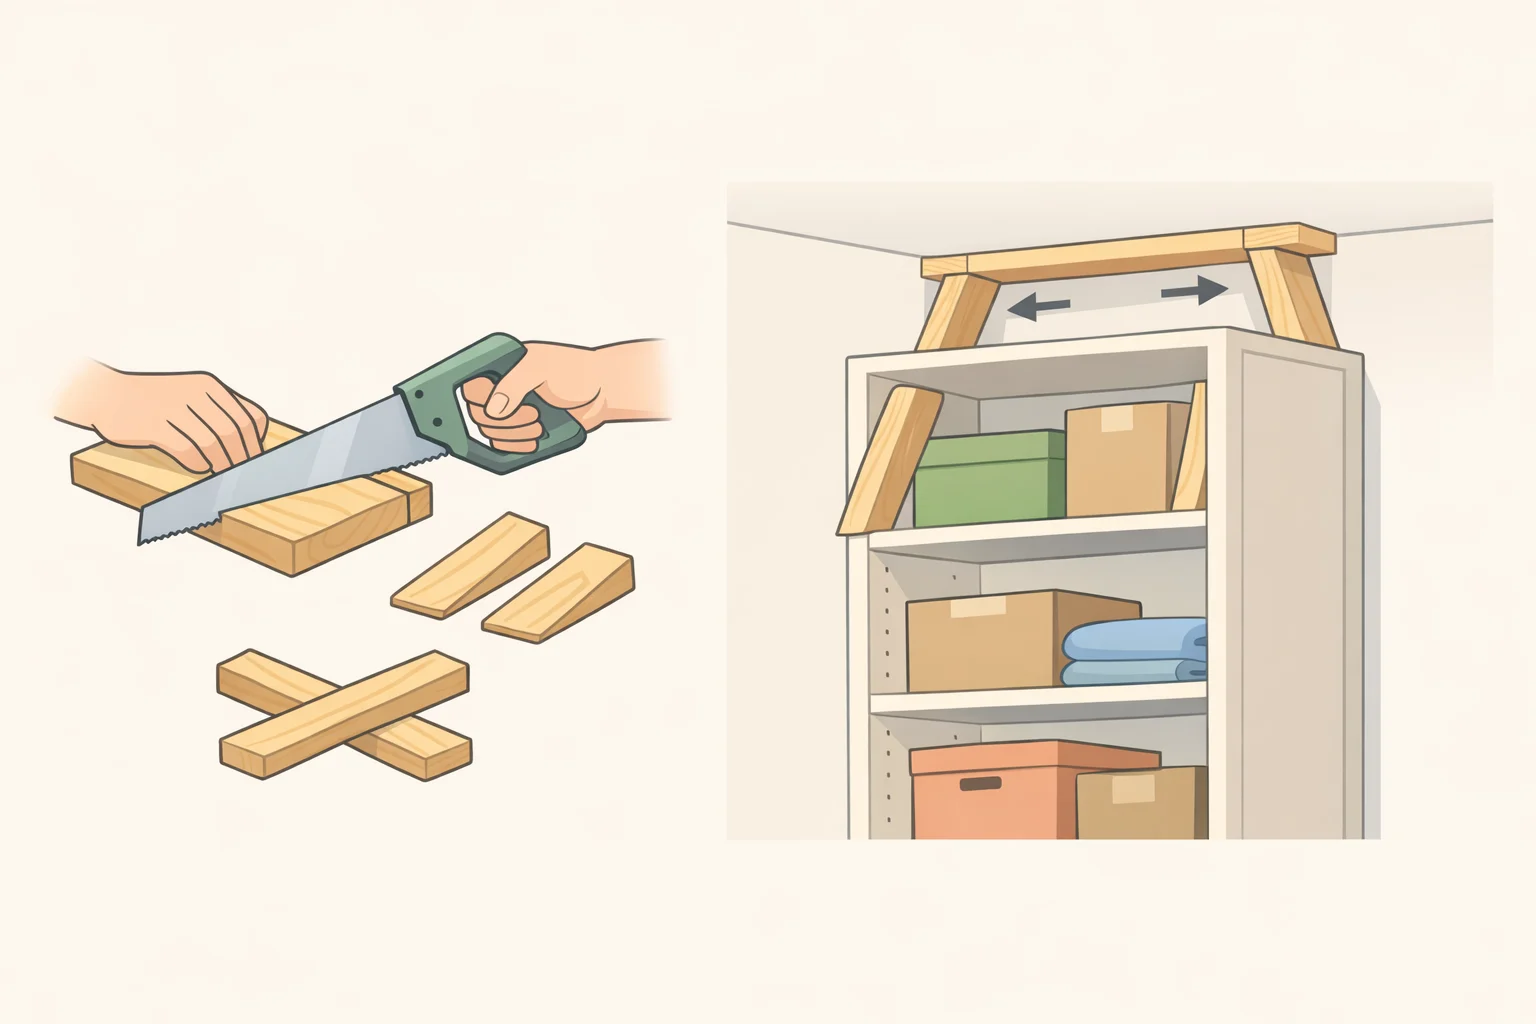
Woodwiki also describes an alternative for placements without a stud in range: cut a 2x4 to the exact height between the top of the unit and the ceiling, and wedge it in as a spacer. The source calls the method strong, reversible, and workable in any room (Woodwiki, three months ago). What that description leaves out is a load rating, a fastening detail, or a documented test, so it reads more like a lead worth following up than a finished build instruction. Before using it next to a bed, get a documented, load-rated bracing solution behind it, whether that's hardware built for the purpose or a design an engineer has actually calculated and signed off on, not just an opinion that it should hold.
A separate category sits even further outside what's verified here: "no-holes" renter methods, including one referenced in a YouTube video title 10 months ago. The available research doesn't document a load-tested bracing approach for that method either, so treat it as unverified until there's a manufacturer-rated kit or professional sign-off behind it.
Whenever a mattress or a sleeper's body can push against the divider, treat the shelf nearest the pillow as a light-duty zone, as a personal precaution rather than something spelled out in the sourced guidance. Soft, low items only; skip glass and anything heavy at head height.
Finish both faces so it reads as furniture, not storage
The sheen matters more than most builders expect. Use satin, not gloss: across five visible surfaces, gloss creates heavy reflection and can end up reading like a lacquered kitchen cabinet rather than bedroom furniture (Woodwiki, three months ago).
Apply two to three coats of oil-based polyurethane, sanding with 220-grit paper between coats. The cited guidance gives a minimum cure time of 24 hours before moving the piece into the bedroom for an oil-based finish, and a minimum of 4 hours for a water-based one (Woodwiki, three months ago); drying and full curing aren't necessarily the same thing, so treat those numbers as floors, not guarantees.
Finish both faces of every panel to the same standard. An unevenly finished panel will cup toward the wetter side (Woodwiki, three months ago), which is reason enough to give the back the same attention as the front even though nobody's shelving books against it.
Style the bed-facing shelves with restraint: books, closed baskets, a low lamp, one or two shelves left deliberately empty. That open layout, paired with the ceiling gap and eye-level height covered earlier, is meant to preserve the two features that make this worth building over a solid headboard: visual separation and borrowed light. It's also what pushes the piece toward a bedroom bookshelf partition rather than a wall of storage.
Where this leaves the build
The footprint, stud location, and module width are the numbers to lock down before cutting anything: real walkway clearance, a wall stud within anchoring reach, and modules between 24 and 36 inches.
From there, the decision is simple. If a stud is within reach, anchor tipping with the furniture strap covered above, and don't consider the racking question closed until a woodworker or engineer has specified the joint between modules. If there's no stud nearby, either track down a documented, load-rated bracing system before proceeding or choose a different design that doesn't require an unsupported unit standing next to a bed. A divider that lets light through but can't be trusted to stay upright isn't solving the problem it was built for.









Comments
Be the first, drop a comment!