



How to Build Upholstered Fabric Wall Panels for a Headboard
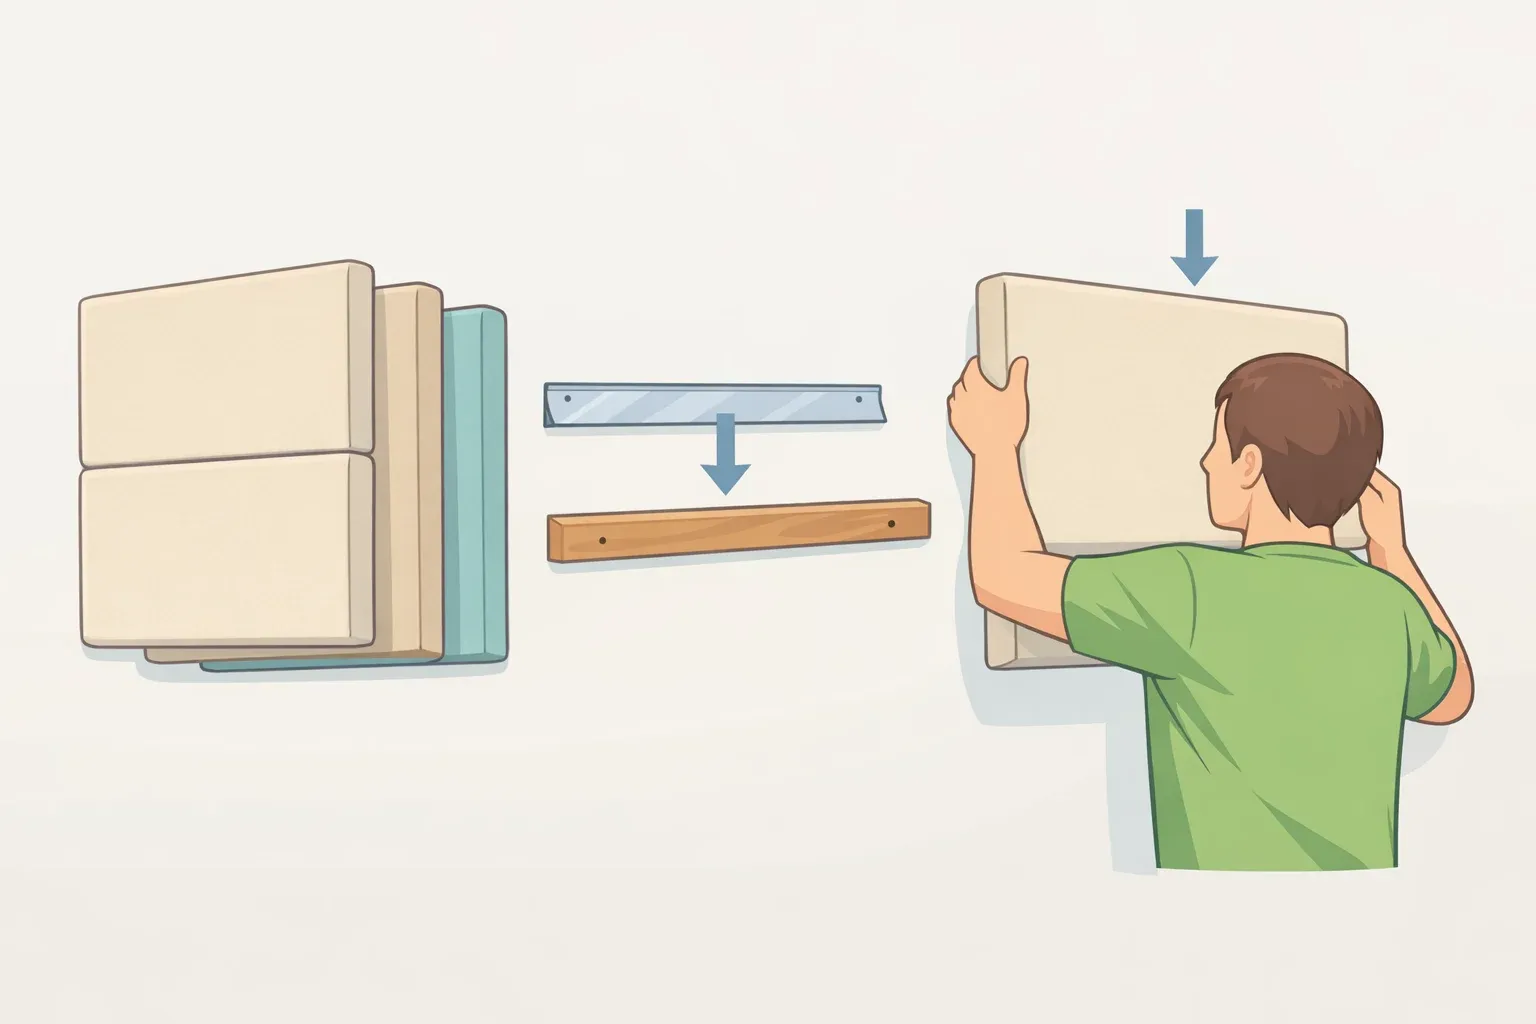
This guide covers one project: a set of four removable upholstered fabric wall panels, sized to work as a headboard or small accent wall, built from plywood, padding, and stretched fabric. The panels hang on a French cleat, a two-piece wood bracket that lets you lift the whole set off the wall to swap fabric or relocate them later. That's what "removable" means here: the panels detach cleanly, but the cleat itself is screwed into wall studs. This is a drilling project, not a no-drill one, and those screw holes will need patching whenever the cleat comes down for good.
Treat the timing as a rough estimate for this specific scope, not a universal rule: roughly half a day for cutting and padding, another stretch for wrapping and stapling, and an hour or two for mounting once the panels are done. Wrapping is genuinely beginner-friendly, more patience than skill. Mounting takes more tool confidence, since you're measuring, leveling, and driving screws into studs, so add extra time if a drill and stud finder are new to you.
Padded wall panels show up in a few design contexts worth knowing about before you buy materials. Hospitality designers cite bouclé, sheers, and wool-rich textiles for the warmth and acoustic softness they bring to hotels and restaurants (Hospitality Interiors, earlier this year), and padded headboard walls are described as the most popular residential upholstery application in Singapore's condos and HDB flats (Goodrich Global, last month). That's design-world interest and traction in one regional housing market, not proof padded walls are standard everywhere. Build this because it suits your room, not because it's trending.
One panel, or a whole wall?
The phrase "fabric wall panels" can mean two very different projects, and mixing them up leads to buying the wrong materials. This guide builds the self-contained upholstered panel you mount to the wall, using the same basic elements as Singapore's popular padded-headboard bedrooms, rigid backing, padding, and stretched fabric, just sized down into four mountable pieces and without professional-grade materials or finish (Goodrich Global, last month). True "fabric walling," where a specialist stretches fabric over a batten-and-wadding framework across an entire wall, is a rare specialist trade requiring materials, labor, and skill well beyond a weekend project (Hart Design Selection, earlier this year).
This build isn't the right fit if: you want one continuous, floor-to-ceiling fabric surface; the space is commercial or code-regulated and needs certified fire-rated materials; you can't locate wall studs in the mounting area; or you're hoping panels will block sound from a neighboring room. Each of those calls for a different approach, covered later in this guide.
What you'll need: sample plan, materials, and tools
Use this layout as your default unless your wall measures noticeably differently.
Sample plan: four panels, each 15 inches tall by 36 inches wide (about 38 by 91cm), arranged two rows by two columns. That size falls within the standard range for upholstered panels, 12 to 15 inches by 30 to 45 inches (Old in the New, 2024). With a roughly 1-inch reveal between panels in each direction, two stacked panels bring the finished height to about 31 inches, and two side-by-side panels bring the finished width to about 73 inches. If your wall doesn't divide evenly into that grid, adjust the number of panels rather than stretching one panel's size; a partial row looks unfinished. Four panels at that size add up to about 15 square feet of backing material, so one standard 4-by-8-foot sheet of plywood has enough area to cover the project. That doesn't account for cutting waste or how the four rectangles actually nest on the sheet, so ask the store to confirm the layout works before you pay for just one sheet.
Materials:
- Backing: half-inch plywood or OSB, four pieces cut to your panel size, a stable and standard choice for this kind of build (Old in the New, 2024)
- Padding: 3/8 to 3/4 inch (10 to 20mm) of polyester wadding, the depth Goodrich Global cites for keeping bedroom panels architectural and space-efficient, or a comparable high-density foam for more give underhand (Goodrich Global, last month)
- Fabric: upholstery-grade fabric ordered by the yard or meter. For each panel, add twice your wrap allowance to both dimensions; a 4-inch allowance on a 36-by-15-inch panel needs a fabric piece roughly 44 by 23 inches. Multiply that across four panels, then adjust for your fabric's usable width, any pattern repeat, and grain direction, since fabric generally can't be rotated 90 degrees without the weave showing sideways. Have your retailer confirm total yardage before ordering, and buy extra as a cushion against cutting mistakes. For a headboard, a high-touch zone, choose fabric rated for general or heavy-duty upholstery use and check its Martindale rub count before buying (Goodrich Global, last month)
- A French cleat kit: two wall-side strips (one per row) long enough to span both columns, plus four panel-side strips, one per panel
Before buying a cleat kit, check its packaging or product listing for:
- the maximum load the complete two-piece system supports, and whether that figure is per panel or for the full installation
- whether the rating assumes screws driven into wall studs, or allows anchors in drywall alone
- the number and spacing of fasteners required per length of cleat
- whether the recommended screws will hold securely in half-inch plywood or OSB on the panel side
- how much clearance the cleat leaves behind the panel
These panels are decorative wall coverings, not structural supports. Don't lean full body weight against them, and don't treat them as a substitute for a properly mounted bed frame or headboard unless the hardware is specifically rated for that kind of load.
Tools: Have the plywood cut to your four panel sizes at the hardware store when you buy it, which skips needing a saw entirely. If cutting at home, use a circular saw with a straight-edge guide on a supported surface, safety glasses, and a dust mask. You'll also need a staple gun with staples long enough to bite through fabric, padding, and board; fabric scissors; a tape measure; level; stud finder; pencil; and a drill/driver.
Before you start: wall check, fire considerations, and mounting method
Locate structure first. Find studs with a stud finder before drilling anything. If you don't know what's behind the wall, old wiring or plumbing included, stop and use a wall scanner or call an electrician rather than guessing. If studs don't line up conveniently with your planned panel spacing, shift the whole layout a few inches rather than anchoring a cleat into drywall alone.
Check rules before buying fabric. Landlord, condo, or HOA rules may restrict wall penetrations. Separately, check your padding and fabric manufacturer's fire information and any local code requirement for your building type. Commercial installations require certified flame-retardant fabric and core materials rated to standards like ASTM E84 or EN 13501-1 (HM Building Materials, three months ago; Goodrich Global, last month). A residential bedroom project doesn't automatically require that certification, but "upholstery-grade" fabric isn't the same claim as "fire-rated." Keep panels clear of space heaters and lamps, and if a panel sits near an outlet or switch, make sure the box, wiring, and faceplate stay fully accessible.
Choose your mounting method now, before cutting anything. The drilled French cleat described in this guide is the default: it detaches cleanly for removal, but it requires drilling into studs and its true capacity depends entirely on the kit you choose, per the checklist above. Rated adhesive strips or hook systems can work instead, but only for a single small, light decorative panel well away from a bed, and only if the packaging explicitly rates the product for that weight and orientation. That's a separate, smaller project, not a substitute for the four-panel build here.
Template before you cut. Make a full-size cardboard template of one panel and hold it against the wall to catch outlet overlap, switch clearance, or trim conflicts before any board gets cut.
How to build upholstered fabric wall panels: cutting, padding, and wrapping
- Cut, or have cut, your four backing boards to size, then cut padding to match each board's dimensions. Run a hand along the cut edges and sand down rough spots; plywood edges can be abrasive enough to snag or fray fabric over time.
- Attach the padding to the board face with upholstery spray adhesive, or by stapling through its edge into the board, so it doesn't shift once wrapped. A stable padding attachment keeps the finished surface flat and consistent from one panel to the next (Old in the New, 2024).
- Lay the fabric face-down, center the padded board on top, and pull the fabric taut around to the back.
- Staple from the center of each edge outward toward the corners, alternating sides to keep tension even (Old in the New, 2024). Working all the way down one edge before starting the opposite side tends to pull the fabric off-square.
- At each corner, trim excess padding and fabric bulk at an angle before folding, the same approach used to miter a corner on upholstered furniture, so corners lie flat instead of bunching.
- If you're using a patterned fabric across all four panels, lay out every cut piece together before stapling any of them, matching the repeat so it lines up once panels are mounted side by side.
Success check: run a flat hand across the finished face of each panel. You should feel even tension with no puckering or loose fabric. Fix wrinkles now, by pulling nearby staples, re-stretching, and re-stapling, not after the panel is already on the wall.
Mount the panels with a French cleat
- Screw a panel-side cleat to the back of one panel, positioned a measured distance down from its top edge, say 1 inch. Repeat that exact measurement on the other three panel backs so all four hang identically.
- Test-fit before marking the wall: hook that panel onto a short scrap of wall-side cleat held level against the wall at the height you want its top edge to sit, with a helper steadying it. Mark exactly where the top of that cleat scrap lines up.
- Draw a level line through the mark across the wall, then screw a full-length wall-side cleat into every stud it crosses along that line, following the kit's fastener and load instructions.
- For the bottom row, measure straight down from the installed top cleat by one full panel height plus your intended reveal, then mark, level, and install the second wall-side cleat the same way.
- Hang the first panel in each row, then cut a spacer block to your intended side-to-side reveal and use it to mark where the neighboring panel should stop. Panels can slide sideways along a cleat spanning both columns, so add a screw or small stop block at that mark, positioned so the panel can still lift straight up and off for removal.
- Lift each remaining panel, with a helper if it's larger than about two feet square, so its cleat engages the wall cleat fully along its length, then let it settle under its own weight. Check with a level before moving to the next panel in that row.
Once a panel is seated, run a hand along its top and bottom edge and give it a gentle nudge. This checks for obvious looseness, not a load test. It should sit flush with no visible gap, tilt, or sideways play. If a panel hangs crooked, sits proud at one end, or shifts when nudged, take it down, confirm both cleat halves are level and fully engaged across their length, and reseat it; don't force it flat by pushing on the fabric.
What this build does for sound: realistic expectations
This project is decorative, and its acoustic performance is untested. Foam, wadding, and fabric are porous materials that absorb some sound energy rather than reflecting it, which is the same principle behind similar layered construction, professionally built and tested to a specific standard, in cinemas, recording studios, and boardrooms (Goodrich Global, last month). Whether this plywood-and-padding assembly captures any meaningful share of that effect hasn't been measured, and no independent rating exists for it.
For comparison only, not a prediction: commercial fabric-wrapped acoustic panels pair a porous core, mineral wool or fiberglass, with a fabric woven specifically to let sound pass through, and they're lab-tested to a Noise Reduction Coefficient, a scale from 0 to 1 that averages how much sound a material absorbs across the 250, 500, 1,000, and 2,000 Hz bands, the range that covers most speech. Commercial fabric-wrapped panels land around 0.85 to 1.15 on that scale, against roughly 0.05 for painted drywall; ratings above 1.0 happen because of how sound behaves at a panel's edges and in the air gap behind it during testing, not because a material absorbs more sound than physically strikes it (HM Building Materials, three months ago). Those numbers describe tested commercial products built with materials, mineral wool or fiberglass cores, this project doesn't use; substituting them into a build like this isn't safe, since they require different handling and fire precautions (HM Building Materials, three months ago).
There's also a difference between absorption and soundproofing worth keeping straight. Absorption cuts down on sound bouncing around inside a room, the kind of thing that makes a bedroom feel echoey. It does nothing about sound passing through a shared wall to a neighbor's apartment, which is a transmission problem solved inside the wall assembly, with added insulation, decoupling, or mass. Goodrich Global credits continuous, professionally built padded bedroom walls with dampening some noise transfer in shared-wall apartments (Goodrich Global, last month), but that's a floor-to-ceiling specialist build, not four foam-backed plywood rectangles. There's no tested basis for predicting how much echo, if any, these four panels will reduce in a real bedroom. Treat them as a design choice that happens to use sound-absorbing materials, not as an acoustic upgrade.
Check the install, then finish and maintain
Before calling the project done, confirm every cleat screw is seated into a stud and that each panel doesn't shift under the gentle nudge test described above. Check that outlets and switches near the panels are still fully accessible, and that no door, vent, or piece of furniture now contacts the panel's added depth.
A few common issues and fixes:
- Fabric loosens or puckers after mounting: pull the nearby staples, re-stretch, and re-staple. Corners are the usual culprit, so check those first.
- A row looks crooked once panels are hung: recheck that both ends of the wall cleat line are actually level, not just eyeballed. A slight tilt is barely visible on an empty cleat but obvious once panels are hanging.
- A panel won't sit flush: lift it off and confirm the panel-side cleat engages the wall cleat's full length, not just one end or a stop point set too close.
- Panel edges don't line up with their neighbors: check that all four panel-side cleats sit the same distance from their panel's top edge; even a small difference shows once panels are side by side.
If a panel still wobbles after remounting, take it down and recheck it against your cleat kit's fastener and load specs rather than pushing it back into place and hoping.
For ongoing care, vacuum with a brush attachment to keep dust out of the weave, and treat marks promptly using the fabric's specific cleaning code rather than reaching for a generic all-purpose cleaner (Goodrich Global, last month).
Call in a professional instead of pushing the DIY further if you want continuous fabric walling across a full wall, if the space is commercial or code-regulated and needs certified fire-rated materials, if a panel's weight exceeds what your cleat kit is rated to support, or if you're unsure what's actually inside the wall you're about to drill into.




















Comments
Be the first, drop a comment!